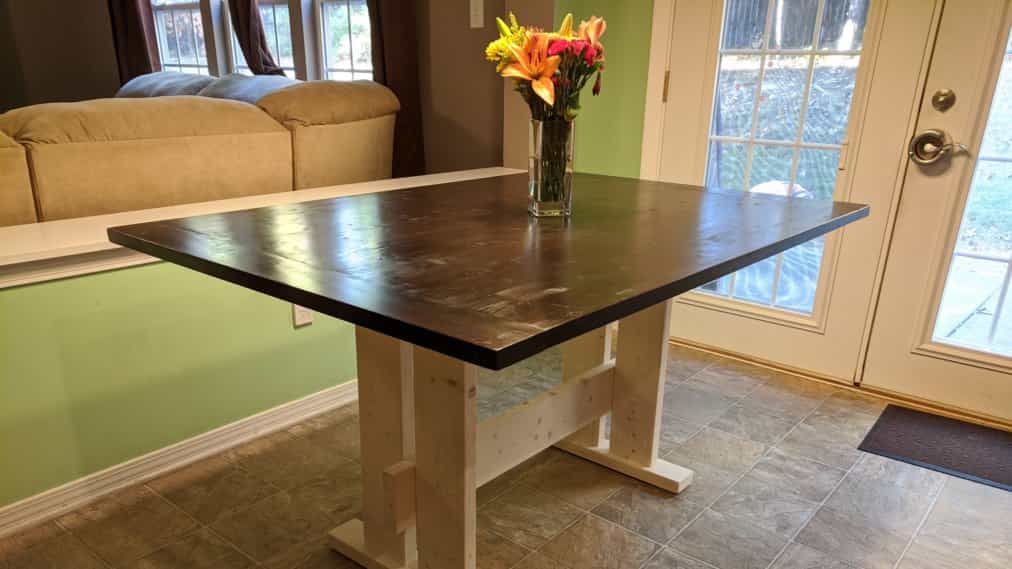
Easy DIY farmhouse kitchen table for 6 under $100
My family of 5 spends a LOT of time around the kitchen table. 🤗
Making plans for a farmhouse kitchen table for this special space in our home and building that table had been on my to do list for a long time.
I finally got time to do it in the Fall of 2021.
My wife and I had the following criteria for our build your own kitchen table plan:
- It comfortably accommodates 6 people
- It’s rustic looking
- It’s about 40″ wide and 55″ long
- It has an at least 1″ thick tabletop
- It’s a two-tone farmhouse table, with white legs and brown top
- It’s inexpensive, under $100
- Its plan uses only the limited set of tools I have
I took inspiration from some of the farmhouse kitchen table plans I found online, but none of them matched all criteria we had.
So, I made a plan from ground up. This post describes that plan.
If you’re looking for instructions on how to build a farmhouse kitchen table, I hope this post inspires and empowers you! 👍
If you’re looking to build both DIY farmhouse dining table and chairs, then check out my farmhouse chair plan also that goes nicely with this table.
Supplies and cost*
*Cost as of Jan 2022 when supplies were expensive, due to the prolonged economic impacts of the COVID pandemic. Also, the costs of screws, stain, finish, etc. have been adjusted to reflect only what is used in the project.
| Item | Count | Price | Store |
| 1″ x 24″ x 3′ panel | 2 | $29 x 2 = $58 | Lowe’s |
| 2″ x 6″ x 8′ board | 2 | $11 x 2 = $22 | Home Depot |
| 2″ x 4″ x 8′ board | 1 | $6 | Home Depot |
| Varathane Antique White wood stain | As needed | $1 | Home Depot |
| Varathane Kona stain | As needed | $1 | Home Depot |
| Minwax Fast-Drying oil-based polyurethane | As needed | $5 | Lowe’s |
| Elmer’s Carpenter’s wood glue | As needed | $0.50 | Amazon |
| 1.5″ and 2.5″ pocket hole screws | As needed | $2 | Amazon Amazon |
| White pocket hole plug | As needed | $4 | Amazon |
| 1″ panel board nails | As needed | $0.25 | Home Depot |
| #8 Flat washers | As needed | 0.75 | Amazon |
Total cost of supplies: $99.50
Power tools used
How to build a farmhouse kitchen table for 6
Plan: A detailed plan, i.e., snapshots of a 3D model of this project annotated with exact measurements of various components, is available at this link.
Step 1: Get the supplies
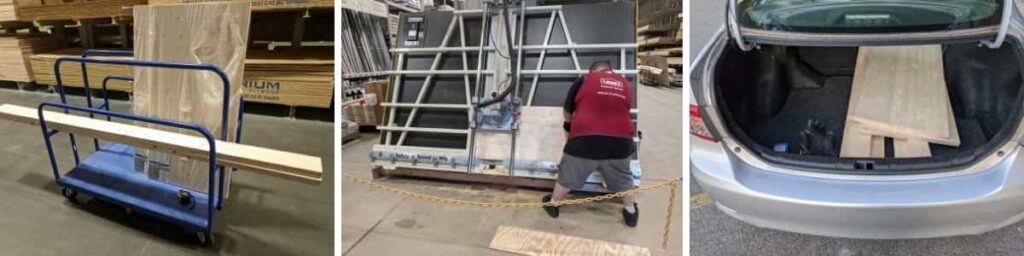
As with most of my other projects, like making a bookshelf or creating a dado without any power tools, I hauled all supplies for this project in one of our family sedans. 🚗
However, this project was atypical because of the 1″ thick panels, a component I had not used in any other build.
The project panels had to be cut to size using the panel saw at a local Lowe’s.
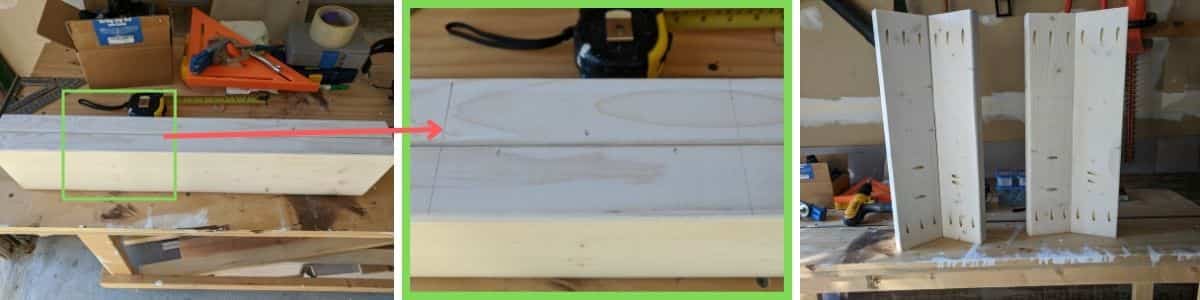
Each panel was cut lengthwise to create two 3′ long boards. These boards would be used as breadboard ends for the tabletop! 👌
The picture below shows memories from getting the supplies.
Caveat: Check with your local Lowe’s ahead of time if their panel saw is functional and can cut 1″ thick panels. The person who assisted me at my local Lowe’s said they cut 1″ thick panels only on a case by case basis. If you cannot find a Lowe’s that can cut the panels for you, you can use a circular saw, table saw, or jig saw to do the job.
Have you enjoyed this post thus far? Do you have any questions or suggestions for improvement? Please leave a comment below. I’d love to hear from you.
Step 2: Edge join the panels to make the tabletop
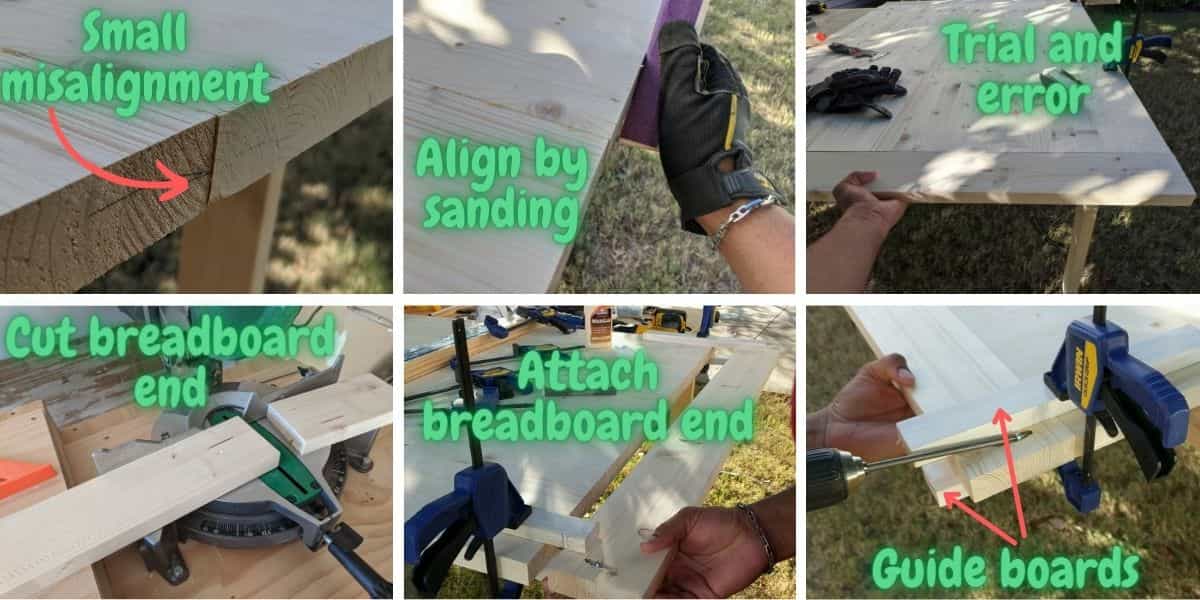
Edge joining the 1″ thick panels to make the tabletop was the trickiest part of this project. 🤔
I wanted to get the edges aligned as best as I could from the get go so that I would get a nice, flat tabletop without a whole lot of sanding.
Making and using clamping cauls, as described starting at this time in this video, is one of the best (and simplest) ways to get boards aligned during edge joining.
Note: You do not have to use cauls to build the tabletop. If you have a nice flat surface in your workspace that you can use to lay the panels flat and join them together, that might do. It’s just that, without cauls, your tabletop may not be as flat and you may have to do a lot more sanding after joining if you’d like to get the edges aligned.
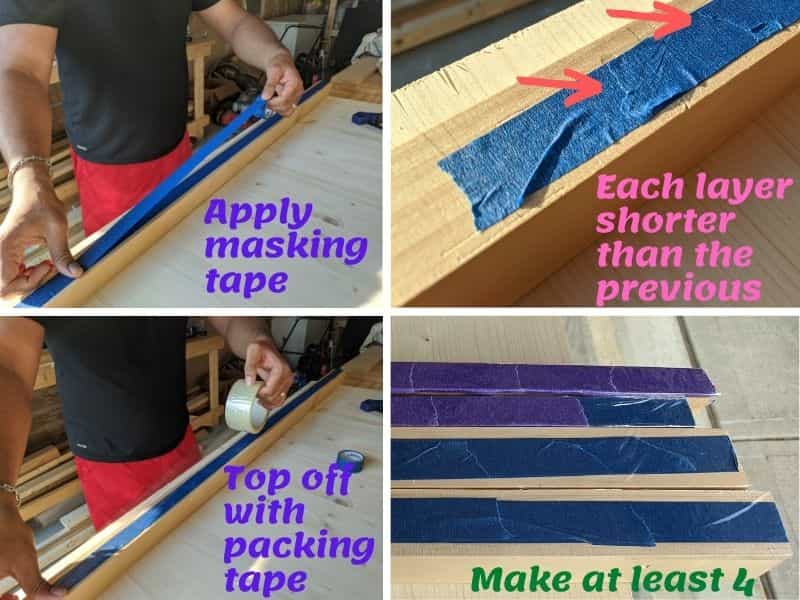
How to make clamping cauls for woodworking
As shown in this video, I taped layers of masking tape to one side of four straight scrap boards.
The scrap boards I used were ~4′ long 2″ x 2″ boards.
The masking tape I used was like this one on Amazon.
All tape layers were approximately centered on the side to which they were applied, with each layer about 4″ shorter than the previous one.
I repeated applying the masking tape layers until the last layer was less than 4″ long.
A final layer of packing tape, like this one on Amazon, was applied to protect the cauls from glue.
I created 4 cauls, each with one side progressively bulging out towards the center so that pressure would be evenly distributed when clamps are applied.
The picture below illustrates how to make wood cauls.
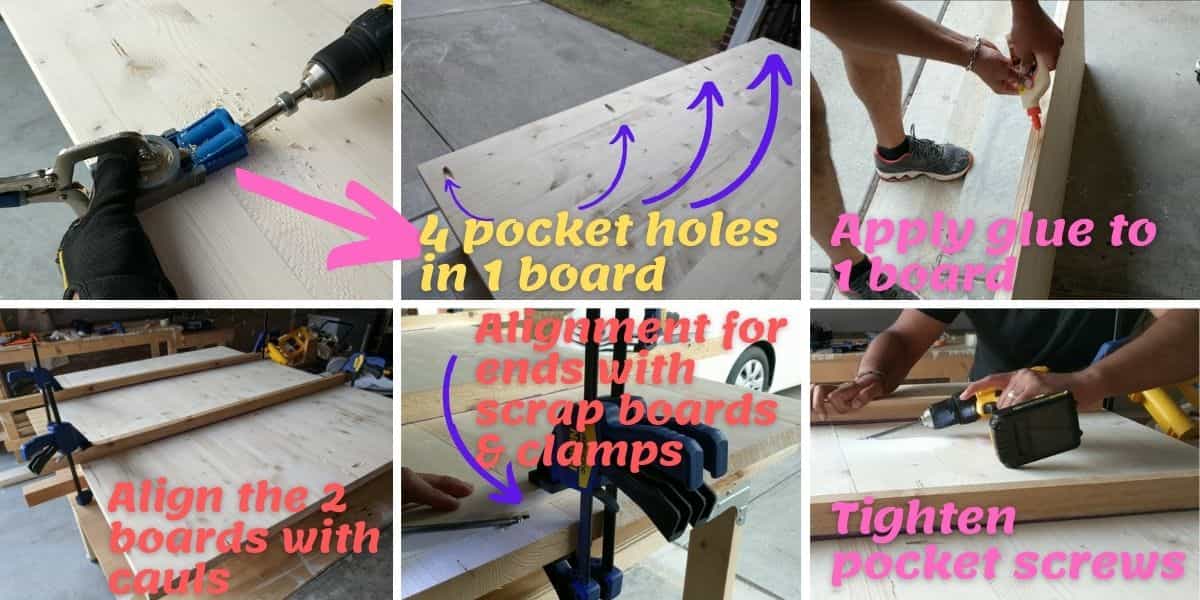
Once the cauls were made, I was ready to edge-join the 2 boards to form the tabletop.
The picture below illustrates the joining.
I drilled 4 pocket holes along the edge of one of the boards.
Tip: If the flat faces of the boards aren’t equally smooth (they likely aren’t), drill holes on a face that isn’t smooth. That way, you’ll be facing the smooth side up.
Then I set the board with pocket holes on top of 2 of the cauls, with holes facing up.
Then a generous amount of glue was applied to the the edge of the other board.
The 2 boards were then aligned between the 4 cauls using clamps.
I applied additional alignment to the ends of the seam between boards by clamping each end between 2 small straight boards.
The pocket screws were then slowly tightened to press the two boards tightly together.
Note: I used pocket screws to press the boards together in this project. The alternative would’ve been to use pipe clamps like these on Amazon, but my frugal wallet did not let me buy pipe clamps yet, so I went with pocket screws. 😉
The assembly was then left alone to set overnight. 👍
Step 3: Attach the breadboard ends
The next step involved cutting and attaching the 3′ long boards cut from the original panels in step 1 as breadboard ends.
Before attaching the breadboard ends though, I needed to sand the shorter edges of the tabletop to make sure they were flat.
This sanding had to be done because of 2 reasons:
- The original panels were not of the same length exactly. One was slightly (like 1mm) shorter than the other.
- The edge joining of the panels to form the tabletop in step 2 wasn’t perfect. The shorter edges of the panels were slightly misaligned during the process.
The sanding was done iteratively, by sanding an edge for a bit, checking alignment by pressing a breadboard end against that edge, and repeating the process again until good alignment was seen.
I used a 150-grit sandpaper wrapped around a block of scrap wood for the sanding.
So, the alignment process was by trial and error. 👍
The top row of the picture below illustrates this alignment process.
Once good alignment was seen, i.e., once the shorter edges of the tabletop were flat, the breadboard ends were cut to size on the miter saw.
The breadboard ends were then attached using glue and pocket screws.
Caveat: Attaching breadboard ends this way does not allow for movement of wood that occurs when humidity levels change. However, I that was a risk that I was willing to take for this project. Also, as you’ll see, I sealed the tabletop with 2 coats of an oil-based finish. That minimized the risk by slowing down the rate of moisture transfer to and from wood , and therefore, the rate of expansion and contraction of wood. At the time of writing this post, the table was over 6 months old and there was no sign of wood cracking due to uneven expansion.
To keep the breadboard ends flush with the tabletop during attachment, 2 pairs of straight scrap wood pieces were clamped to the top and bottom of the tabletop with their ends sticking out to guide the breadboard end.
See picture below for an illustration.
Tip: If you do not want any of the pocket holes to be seen on the top surface of the table, make sure all holes are facing down when you attach the tabletop panels and breadboard ends. I actually made a mistake by attaching the breadboard ends with pocket holes facing up! I then researched 7 ways to fill pocket holes and chose the best one to hide the pocket holes I mistakenly had facing up.
Step 4: Prepare the tabletop for staining and finishing
The tabletop assembly described in steps 3 and 4 was the trickiest parts of the project, so I let a sigh of relief once that was done! 😌
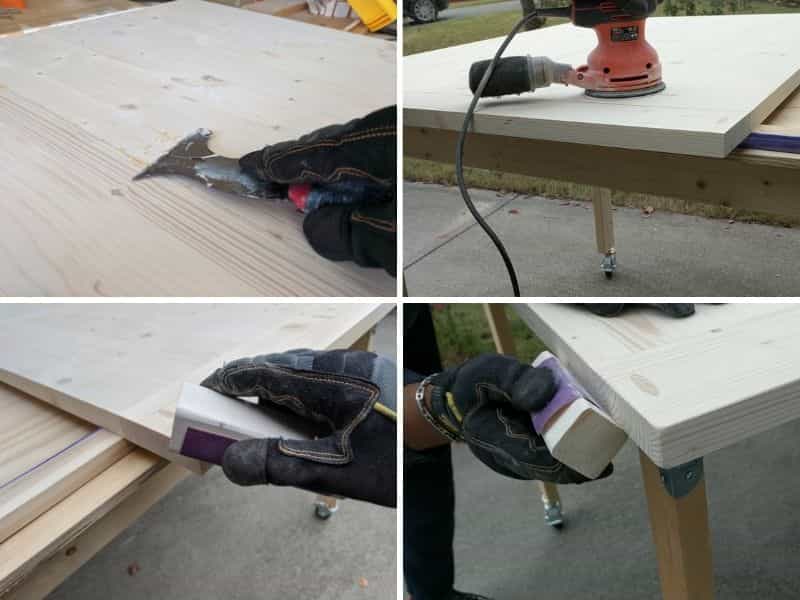
I left the assembled tabletop dry for an hour or so for the glue to nearly completely set.
Then it was time to clean up the glue and sand the tabletop to get it ready for staining and finishing.
The glue cleanup was done by scraping the tabletop with a stiff putty knife like this one on Amazon.
See picture below for an illustration.
Then I sanded the surfaces, corners, and edges of the tabletop to smooth them.
The surfaces were sanded with a 5″ orbital sander and 120 grit sandpaper.
The corners and edges were rounded using 150 grit sandpaper wrapped around a scrap piece of wood.
Tip: Sanding the corners and edges, especially the corners, is an important safety measure, especially if you have young children.
The picture below illustrates the preparation of the tabletop for staining and finishing.
Have you enjoyed this post thus far? Do you have any questions or suggestions for improvement? Please leave a comment below. I’d love to hear from you.
Step 5: Stain and finish the tabletop
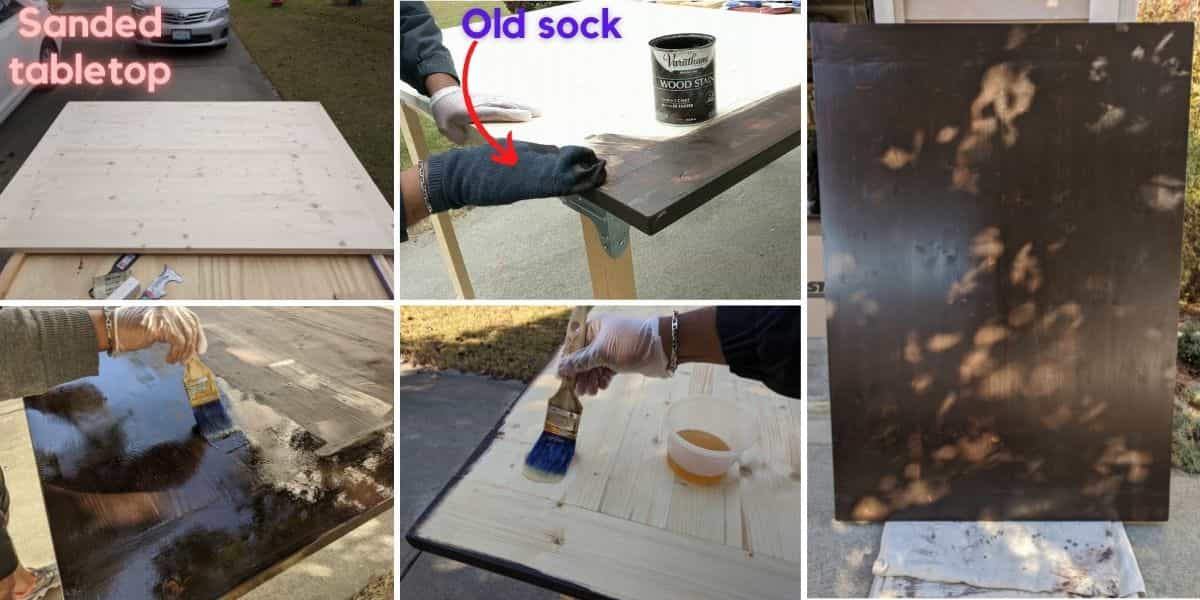
Staining and finishing the tabletop was one of the most satisfying steps of this project. 🙂
Tip: Using an old rag cloth is the best way to apply stain as it gives you a lot of control and you can apply pressure to rub the stain on. If you have an old sock, wrap it around your hand, and you’re good to go! Also, be sure to use protective gloves like this one on Amazon.
The stain I used was Varathane Kona.
I stained only the top surface of the tabletop, but you can stain both sides if you desire.
Once the stain was dry, I finished the tabletop with an oil-based polyurethane (see the supplies list at the beginning of this post).
I applied 2 coats of polyurethane to both the top and bottom surfaces of the tabletop.
The generous application of poly gave the tabletop a lot of protection from moisture.
The picture below illustrates the staining and finishing of the tabletop.
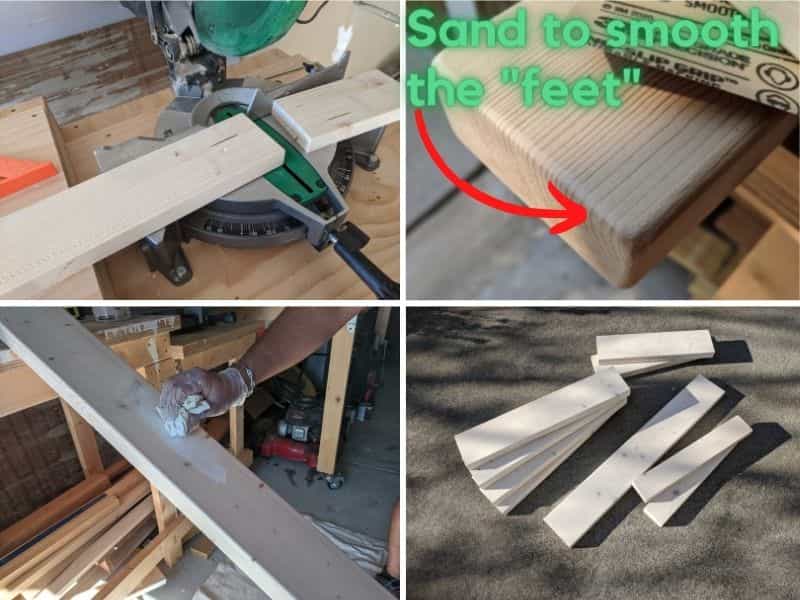
Step 6: Stain and cut the lumber for the table leg structure
Time in between coats of staining and finishing of the tabletop can be utilized for preparing the lumber for the table leg structure.
This preparation involved cutting and staining the 2″x6″ and 2″x4″ lumber.
The stain I used for the leg structure was Varathane Antique white.
I made all the cuts using my miter saw.
The edges and corners of the “feet” – the bottom pieces of the leg structure – were smoothed using a 150 grit sandpaper wrapped around a piece of scrap wood, similarly to how I smoothed the edges and corners of the tabletop.
The pieces were then stained using a piece of rag cloth.
In total there were 9 2″x4″ and 2″x6″ pieces that make up the leg structure.
The picture below illustrates the process of preparing the leg structure pieces.
Step 7: Assemble the table leg structure
The leg structure of this table looks straightforward, but I needed to pay attention to some details to get it just right.
First I drilled pocket holes on each of the pieces that were to become the 4 legs of the table.
Between the 4 legs, a total of 32 pocket holes were drilled.
All pocket holes were straightforward to make, except the 8 holes that were to support the horizontal bar running between each pairs of legs.
To drill these 8 holes, each pair of legs were set on the workbench with their ends aligned.
The left panel in the picture below illustrates the process.
The boundaries of the horizontal bar as well as positions of the pocket holes were marked on each pair (middle panel in the picture below)
The 8 holes were then drilled using a Kreg jig like this one on Amazon. The right panel in the picture below shows the positions of all 32 holes.
Tip: Note how the 2 holes on each leg to support the horizontal bar were not at the same height as the holes on the leg next to it. This was to prevent the pocket screws from running into each other during assembly.
After the holes were drilled, it was time to attach the legs to the horizontal bar.
To hold the pieces where they should be as the pocket screws were tightened, I cut several pieces of scrap wood as shown in the top left panel of the picture below.
These scrap wood pieces corresponded to some of the measurements in my plan.
A combination of these scrap wood pieces and clamps were used to hold the legs steady.
For example, one scrap wood piece cut to length was used to make sure that the bottom of the horizontal bar was at the correct distance from the bottoms of the legs (see top right panel in the picture below).
I also used a 12″ speed square to make sure the legs were perpendicular to the horizontal bar (see middle right panel below).
Tip: If you make sure to drill the holes such that they face the horizontal bar when attached to the bar, the holes will be less visible in the final assembly of the table. This is what I did, as shown in the bottom right panels of the picture above and below.
The picture below illustrates these details.
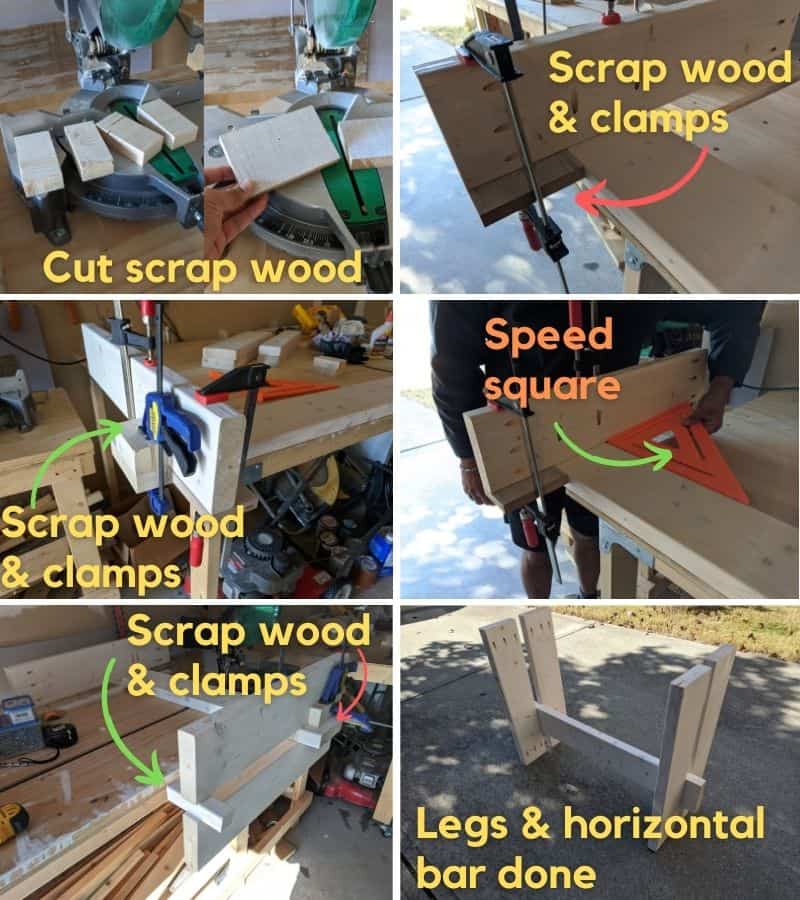
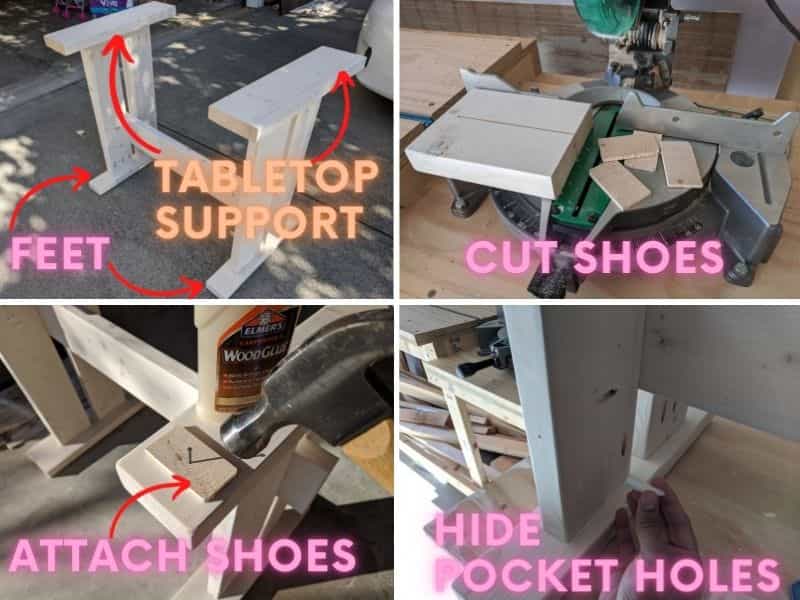
After the legs were attached to the horizontal bar, it was time to attach the “feet” and tabletop support (see picture below) to the leg structure.
The feet and tabletop support were attached using pocket screws driven through the pocket holes at the top and bottom of the legs.
The picture below shows the result.
To reduce the chances of the table wobbling after installation, I didn’t want all of the feet of the table to touch the ground.
So I also made “shoes” for the feet.
The shoes were nothing but 0.25″ thick pieces of wood cut from a scrap piece of 2″x6″.
To make the shoes, the 2″x6″ scrap wood piece was first cut along the length half-way, and then cut twice along the width at 0.25″ thickness to make 4 thin slices of wood.
The shoes were then attached using a combination of glue and nail.
Tip: When attaching each shoe (see picture below), pre-drill the nail hole in the shoe to prevent it from splitting during the hammering. Also, hammer the nail all the way and then some, so that the nail head does not stick out and scratch the surface of your floor where you install the table.
Finally, to complete the table leg assembly, hide the pocket holes using the white, plastic covers (see the list of supplies at the beginning of this post).
Tip: Applying a little bit of glue to the plastic cover will help hold it in place if it feels loose installation. I have done this in pretty much all projects where I have used store-bought pocket hole covers, including the bookshelf and farmhouse chair projects.
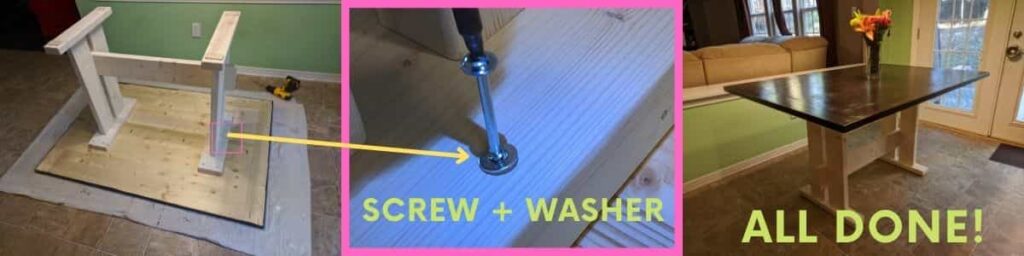
Step 8: Attach the tabletop to the leg assembly
The final step in this project is to attach the tabletop to the leg assembly. 😎
Tip: I did this assembly in our kitchen as it would have been difficult, if not impossible, to get the fully assembled table through the doors in our house. I recommend you do the same!
The table top was placed with bottom surface up on our kitchen floor on a soft drop cloth.
Then the final assembly was done by screwing in the tabletop support of the leg assembly into the tabletop.
Even though this was not a pocket hole joint, I used the 2.5″ pocket hole screws for this. The round head of the pocket hole screws brought the tabletop tightly joined to the leg assembly.
Note, the tabletop panels are slightly thicker than 1″ and the tabletop support pieces of the leg assembly were 1.5″ thick.
That meant it was safe to use 2.5″ screws here without the screw tips sticking out of the tabletop surface! 😨
But for added safety, I added a washer to each screw. See picture below.
Each of the 2 tabletop support pieces were screwed in with 6 screws.
The final, assembled farmhouse kitchen table looked beautiful!
My side said she was “more than happy” with the result. I think I did alright then. 😄
Have you enjoyed this post? Do you have any questions or suggestions for improvement? Please leave a comment below. I’d love to hear from you.