The best way how to fill pocket holes revealed
A mistake I made in a recent woodworking project had me looking for the best way to hide pocket holes.
Long story short, as part of my farmhouse kitchen table project, I was making a tabletop by edge-joining multiple boards using glue and pocket screws.
Instead of facing all pocket holes down, I accidentally had some of them facing up. 🤬
I was quite disappointed and frustrated with myself at first. 😟
After a few hours, I got myself together and started searching the internet and asking online forums on how to fill pocket screw holes.
But each of the many solutions I found online either required special tools I didn’t have, or didn’t cover up pocket holes well enough for me to be happy with it.
So, I decided to invent my own way how to hide pocket screw holes and compare it with the best methods I could find online and do.
This post describes the methods I compared and the best way how to plug pocket holes.
A power sander is the only tool you need for the best way I describe.
I use pocket hole joints generously in my projects. See my farmhouse chair or platform bed project for examples.
If you’re anything like me, you too are using a lot of pocket holes in your projects. It’s only a matter of time before you have a hole that you need to cover.
I hope this post helps you cover up pocket screw holes in your project, whether you need to do that because of a mistake or not. 😊
The post describes each method in detail, so that you can compare these methods yourself and choose the best one for your project and wood type.
7 different ways how to cover pocket holes
The table below lists the methods I compared, the supplies needed for each method, and the stores to get those supplies.
For detailed explanations of each of these methods, read on to the later sections in this post.
Note: These are methods I saw commonly cited as “good” in my research. There are other methods, e.g., using a mix of sawdust and glue, but I discarded them off the bat because they weren’t good contenders.
| Way # | Way to fill pocket holes | Supplies needed for the method | Store to get the supplies |
| 1 | Wood filler | Elmer’s carpenter’s wood filler | Amazon |
| 2 | Pocket hole plug + sawdust + glue | Elmer’s carpenter’s wood glue + Kreg solid-wood pocket hole plug | Amazon Amazon |
| 3 | Wood filler + stain mix | Elmer’s carpenters wood glue + preferred stain | Amazon Home Depot |
| 4 | Pocket hole plug | Kreg solid-wood pocket hole plug | Amazon |
| 5 | Pocket hole plug + wood filler | Kreg solid-wood pocket hole plug made if the same wood as the project+ Elmer’s carpenter’s wood filler | Amazon Amazon |
| 6 | Bondo | Bondo body filler | Amazon |
| 7 | Dowels, straight cut | Dowel rods + flush-cut saw | Amazon Amazon |
Have you enjoyed this post thus far? Do you have any questions or suggestions for improvement? Please leave a comment below. I’d love to hear from you.
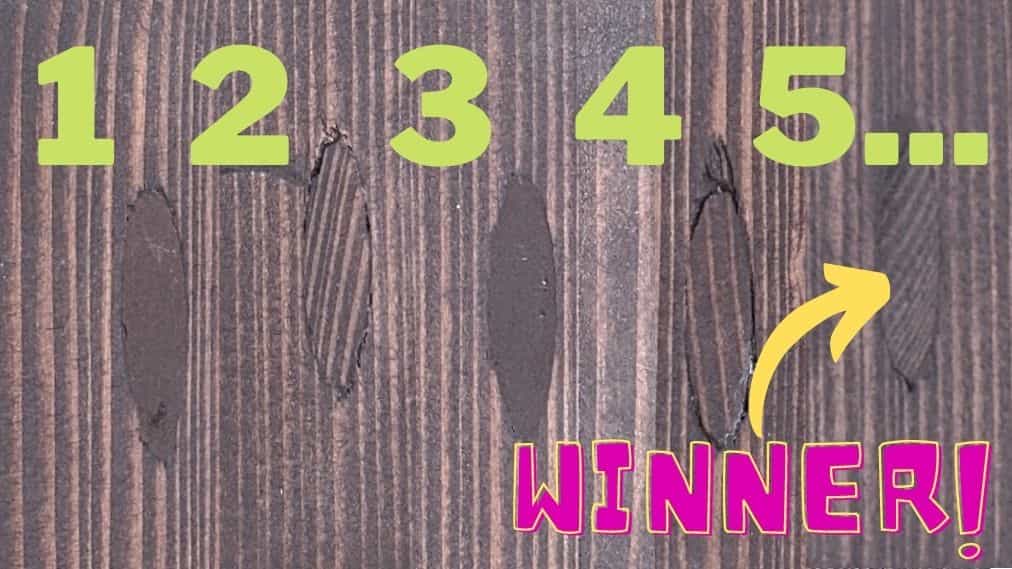
The best way how to hide pocket holes
I’ll get right to the point in this section by revealing the best way how to hide pocket screw holes.
And that is … pocket hole plug + wood filler!
The table below shows how well each of the 7 methods did for each of the 3 criteria.
The pocket hole plug + wood filler method is the only one that received the highest (all green) score for all 3 criteria.
Read on for more information on how I scored each of the 7 methods for each of the 3 criteria.
| Way # | Way to fill pocket holes | Ease of use | Appearance | Stainability |
| 1 | Wood filler | High | Low | Stainable |
| 2 | Pocket hole plug + sawdust + glue | Low | Medium | Stainable |
| 3 | Wood filler + stain | Medium | Low | Stainable |
| 4 | Pocket hole plug | High | Medium | Stainable |
| 5 | Pocket hole plug + wood filler | High | High | Stainable |
| 6 | Bondo | High | Medium | Not stainable |
| 7 | Dowels, straight cut | Low | Medium | Stainable |
How I compared the different ways to fill pocket holes
Any comparison to determine “the best” of anything depends on the experimental set up.
In that spirit, let me explain in this section how I compared the different methods.
The criteria I used to compare the 7 methods
I used 3 criteria for comparing the methods. They are:
- Ease of use: This criterion looks at how easy it is to perform the filling and what tools are required. I categorized each method as low, medium, or high with regard to ease of use.
- Appearance: This criterion assesses how well the filling blends in with the wood around. I categorized each method as low, medium, or high with regard to appearance.
- Stainability: This criterion indicates how well the filling takes on stain. I categorized each method as not stainable or stainable.
Note: I did not consider paintability as a criterion because all methods I considered use paintable filling. I also did not consider cost as a separate criterion as all 7 methods are inexpensive and comparable in terms of cost when the price of tools isn’t considered, and the ease of use criterion already incorporates the tools required. 😑
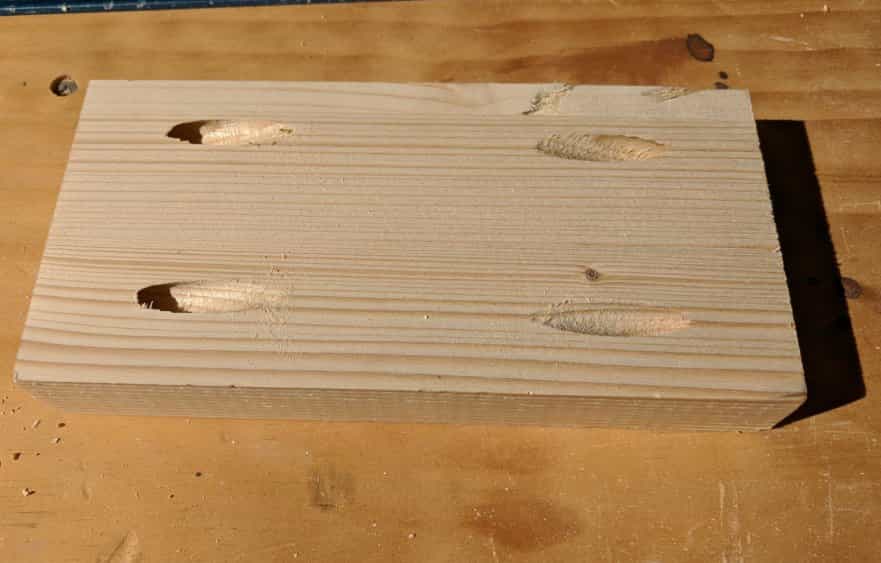
The wood used in my comparisons
The picture below shows the wood I used in my comparisons.
It was a 1″ thick, 8″ x 4″ piece cut from a 2′ x 4′ pine project panel available at Lowe’s. This is the exact type of wood that I used in my tabletop project where I had to fill the pocket holes to hide them.
I used 2 pieces like what I show below.
Each piece was drilled with pocket holes.
I then filled those pocket holes with the various methods.
After sanding and staining the filled holes, I assigned each method a score for each of the 3 criteria.
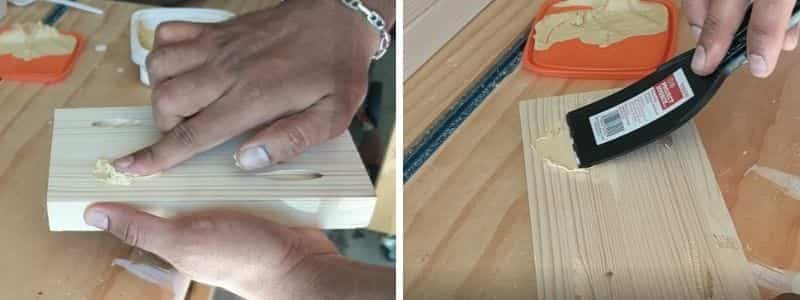
Way 1: How to fill pocket holes with wood filler
You can cover pocket holes with wood filler by first applying the filler in the hole, and then forcing the filler into the hole and spreading it flat with a flexible putty knife. This takes a bit of practice, but it’s not beyond a beginner.
I used a bare finger to do the initial application, before using a putty knife to spread the filler flat.
The picture below shows the initial application and spreading of the wood filler with a putty knife.
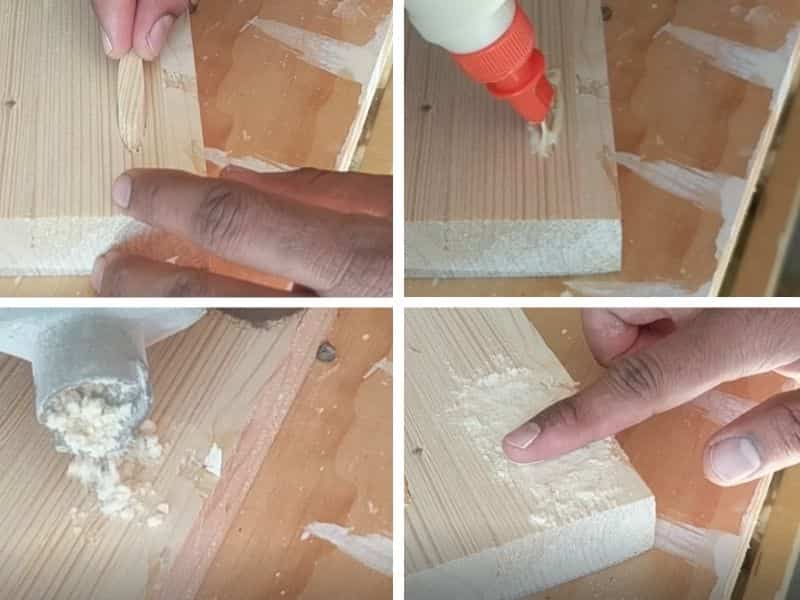
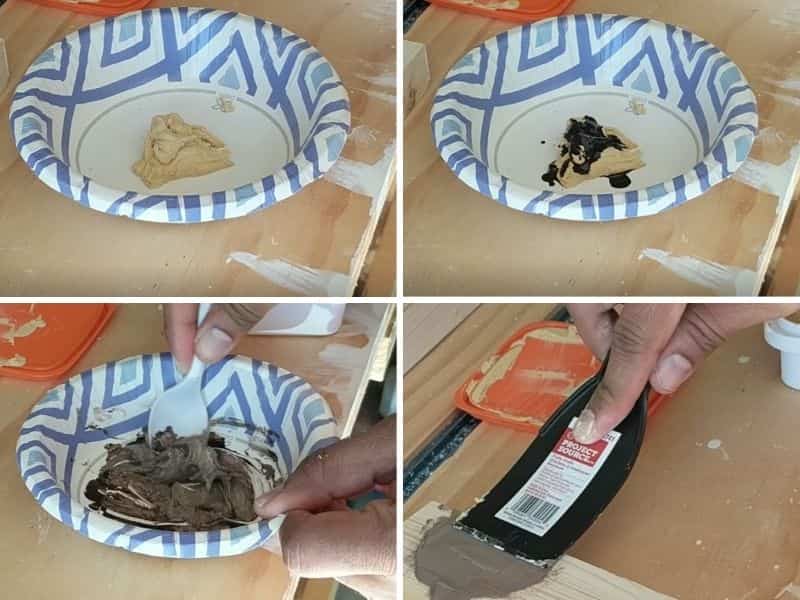
Way 2: Using pocket hole plug, glue, and sawdust
In this method, the pocket hole is first covered with a store-bought plug.
Next, glue is forced into the cracks between the plug and wood.
Finally, sawdust from using a power sander on the same type of wood is smeared on top. The idea is that the mix of sawdust and glue will fill the cracks to seamlessly blend the project and the plug.
The picture below illustrates this process.
Visit this link for a video illustration of the process.
Have you enjoyed this post thus far? Do you have any questions or suggestions for improvement? Please leave a comment below. I’d love to hear from you.
Way 3: Using a mix of wood filler and stain to fill pocket holes
In this method, wood filler is mixed with a bit of stain and the mix is then used to fill the pocket hole.
The rationale behind this method is that wood fillers typically don’t absorb stain as well as natural wood. So, the filler is pre-mixed with stain to offset this.
Note: This method is relevant to only stained projects. For projects that are painted, no need to add stain to the filler.
To follow this method, I took a bit of wood filler in a paper bowl.
Then I added a few drops of stain into the bowl.
The stain I used was Varathane Kona, the same one I used in my farmhouse chair project.
The filler and stain were thoroughly mixed with a plastic spoon.
The mixture was then applied to a pocket hole using a flexible plastic putty knife.
The figure below illustrates this process.
Visit this link for a video illustration of the process.
Way 4: How to use pocket hole plugs
Apply a bit of glue around a store-bought pocket hole plug and slowly insert it into the pocket hole. The glue acts as a lubricant during the insertion and holds the plug in place later on while sanding. Sand and finish once the glue is dry.
I use a Kreg jig for pocket holes, so I used a Kreg solid-wood pocket hole plug.
Further, since my project was made of pine, the plugs I bought were made from pine also.
The picture below illustrates the use of pocket hole plugs.
Tip: Make sure that the flat face of the plug is flush with the wood after insertion. If you accidentally push it too far, insert the tip of a sharp object, like a nail or knife, into the flat face of the plug and gently pull the plug out. If the sharp object messes up the plug too much, pull the damaged plug out completely and just use a new plug.
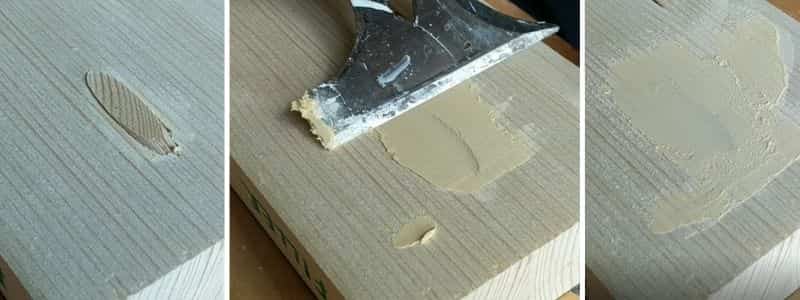
Way 5: Using pocket hole plug and wood filler
In this method, cover the pocket hole with a store-bought plug as above in Way 4. Once plug is fixed in place, cover the narrow gaps between the plug and the wood with wood filler. Sand and finish once the filler is dry.
The picture below illustrates this method.
Visit this link for a video illustration of this method.
Note: I used a rigid putty knife made of metal in this method, but a flexible plastic putty knife will work just as well. Make sure that the plug is flush with the wood after insertion and before applying the wood filler.
Way 6: Using Bondo to fill pocket holes
To use Bondo for filling a pocket hole, mix the two-part light compound as instructed on the product and fill the pocket hole just like you would use a wood filler.
Bondo may surprise you as an option in this article, but it does fill pocket holes well.
The main difference between Bondo and wood filler however is that Bondo cannot be stained.
I personally did not experiment with Bondo.
There was no need for me to experiment with Bondo myself because you can get full details on the use of Bondo for hiding pocket holes in this YouTube video and this associated blog article.
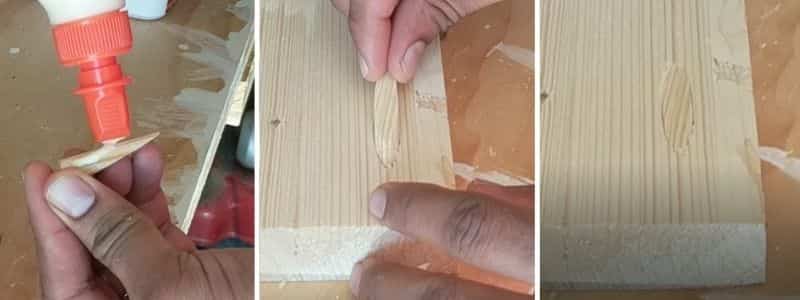
Way 7: How to fill pocket holes with dowels
First, cut a 1.5″ long piece from a 3/8″ dowel stick. Next, insert this piece tightly into the pocket hole, perhaps with the aid of a hammer. Finally, saw off the part of the dowel that sticks out with a flush-cut saw.
Note: One common question when it comes to using dowels is what size dowels to fill pocket holes. The answer is that most pocket holes can be filled with 3/8″ dowels.
The result will be very similar to using a store-bought pocket hole plug.
The main difference between a store-bought plug and dowel is that the latter may provide a tighter fit to the hole.
But there will still be a gap between the dowel and your project wood.
Full details on the use of dowels for hiding pocket holes can be found in this YouTube video and this associated blog article.
Finishing the filled pocket holes
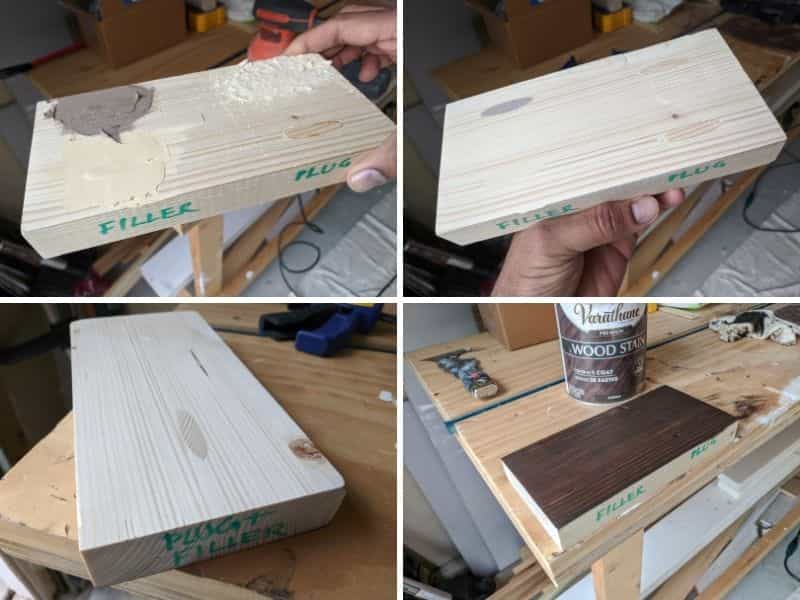
The wood blocks used in my experiments were sanded and stained after filling the pocket holes with the various ways described above.
The picture below shows the filled pocket holes before and after the sanding and staining.
The sand paper I used was 120 grit.
Final scores for each method was assigned after close inspection of the finished blocks.
How the result looked for the different ways to fill pocket holes
I personally experimented with methods 1 through 5 as explained in the previous sections.
For methods 6 and 7, I relied on this YouTube video and this associated blog article to make my assessment.
The picture below shows an up close view of how the final result looked for methods 1 through 5.
The pictures of covered pocket holes were taken by my Google Pixel camera held a few feet away from the holes.
For methods 6 and 7, see this this YouTube video and this associated blog article to find out how the result looked like.

Rationale behind each method’s score for each criterion
The table below explains the reason behind the scores each method received for each of the criterion.
| Way # | Way to fill pocket holes | Ease of use | Appearance | Stainability |
| 1 | Wood filler | High: Wood filler is easy to use. Apply a generous amount over the pocket hole and smear it flat using a flexible putty knife. | Low: Wood filler stands out from the rest of the wood after staining (see picture in the last section) | Stainable |
| 2 | Pocket hole plug + sawdust + glue | Low: This method is not easy to use. You need to carefully apply the glue around the plug. Then carefully sprinkle sawdust from sanding the same project wood. You never know the right amount of glue and it’s easy to mess up this process. | Medium: This method does a decent job but the cracks between the plug and the project wood are still quite visible. | Stainable |
| 3 | Wood filler + stain | Medium: This method has a lower ease of use than wood filler alone because there’s no guidance as to what ratio of wood filler : stain you should use. | Low: This method stands out from the rest of the wood, just like way 1, which is the wood filler alone option. Pre-mixing the wood filler with stain does not seem to have helped at all. See picture in the last section. | Stainable |
| 4 | Pocket hole plug | High: I found the pocket hole plug alone option easy to use. Simply insert the plug into the hole, perhaps with a bit of glue to hold it in place while sanding later on. | Medium: Appearance is decent, but the cracks between the plug and project wood makes it easily noticeable even for an untrained professional. | Stainable |
| 5 | Pocket hole plug + wood filler | High: It’s easy to insert the pocket hole plug and then apply a bit of wood filler. No special skills or tools required. | High: The pocket hole plug + wood filler combo blends in with the rest of the project wood. The wood filler helps cover the narrow cracks between the plug and project wood. I was unable to easily see where the pocket hole was when I looked at the project from several feet. | Stainable |
| 6 | Bondo | High: Bondo is quite easy to use. It’s like wood filler. The only difference is that you have to mix a 2-part compound before application. | Medium: The appearance of Bondo is worse than wood filler because it has a different color altogether than wood, e.g., pink. | Not stainable |
| 7 | Dowels, straight cut | Low: This method is not easy to use. It takes several steps. Compared to other methods, you need extra tools like a flush-cut saw and a hammer. | Medium: The appearance of this method is similar to store-bought pocket hole plug. | Stainable |
Summary
It’s quite common to have pocket holes in your project that you need to hide.
Based on the research and experiments I conducted for this post, a combination of store-bought pocket hole plug and wood filler is your best option to hide pocket holes.
That is the option I used in my farmhouse table project.
Have you enjoyed this post? Do you have any questions or suggestions for improvement? Please leave a comment below. I’d love to hear from you.