How to make a DIY bookshelf at home: easy plan for bookcases and standing shelves
Up until the 2020 COVID pandemic, both my wife and I were working full time.
And our twin girls were being sent to daycare (pre-K).
As the pandemic dragged on without end in sight, we made 3 major changes to our family:
- We added a new baby, a boy!
- My wife quit her job to be a stay-at-home mom.
- We decided to start homeschooling our kids.
We had always believed in the benefits of homeschooling, and had wanted to try it some day. 🏫
The half of our dining room that wasn’t temporarily walled off into a guest bedroom in another project became the location of the new school. 👍
Soon, the school began to fill with books, writing supplies, art supplies, craft supplies, and so on.
We knew it was time to line up some bookcases and standing shelves along the walls to contain our school before it took over other rooms in the house. 😂
I decided to DIY this shelves making, starting with some freestanding vertical bookshelves.
We had the following criteria for the vertical bookcases:
- White color
- Rustic-look
- 6′ tall and 2′ wide, approximately
- Each shelf at least 11″ high
- Inexpensive
- Easy to make
- Minimal material waste
If you know about my other projects like platform bed and farmhouse chair, material waste minimization is a theme in my woodworking. 😎
This post explains how to make a bookshelf easy. This DIY bookshelf is ideal for a classroom or a playroom, at home or at school.
The small width of approximately 2′ makes this DIY bookshelf great for a small space, nursery, around a window, or around a TV.
Note: This is one of the most beginner-friendly plans I have come up with! It’s absolutely easy, fun, and satisfying to execute! As a beginner, you’ll also learn how to work with a variety of materials and tools in this project.
Hope you find this post inspiring, empowering, and easy on your wallet.
Supplies and cost*
*Cost as of Oct 2021 when supplies were expensive, due to the prolonged economic impacts of the COVID pandemic. Also, the cost of screws includes only the screws used in the project, not entire boxes of screws.
| Item | Count | Price | Store |
| 3/4″ x 12″ x 8′ MDF board | 3 | 3 x $11 = $33 | Home Depot |
| 3/16″ x 2′ x 4′ Marker Board | 2 | 2 x $7 = $14 | Home Depot |
| 2″ x 4″ x 8′ lumber | 1 | $3 | Home Depot |
| Varathane Antique White wood stain (1 qt) | 1 | $9 | Home Depot |
| 3/4″ x 25ft white veneer edge band | 1 | $7 | Lowe’s |
| 2.5″ and 1.25″ Kreg screws | As needed | $3 | Amazon Amazon |
| 1″ panel board nails | As needed | $0.50 | Home Depot |
Total cost of supplies: $69.50
Note: You can tell from the supplies list that I made the shelves mostly out of MDF. As I have have explained elsewhere, MDF is great for stationary furniture like bookshelves but cheaper than alternatives, so this helped keep the costs down without compromising functionality.
Power tools used
- 10″ miter saw (Metabo)
- 20V cordless drill (DEWALT)
- 5″ orbital sander (Black & Decker)
- 6.7A Jig Saw (HYCHIKA)
How to build it
Plan: A detailed plan, i.e., snapshots of a 3D model of this project annotated with exact measurements of various components, is available at this link.
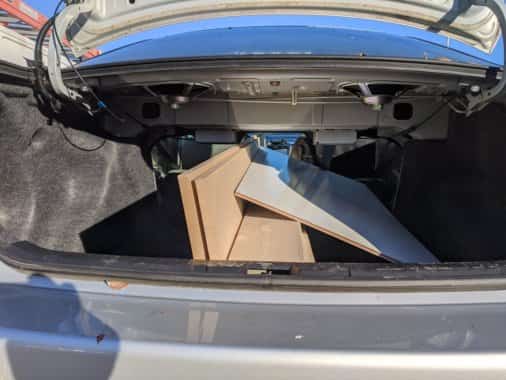
Step 1: Get the supplies
All supplies for this project can be transported in a mid-size sedan or higher.
Simply lower the back seat of your sedan and insert the lumber into the car through the trunk and through gap between the front seats.
I used our family Toyota Corolla for hauling all materials, including the 8ft MDF boards, 2″x4″s, and 2’x4′ marker boards.
The picture below shows how I did it.
Step 2: Stain the MDF boards
If you have seen my other projects like the farmhouse chair, I personally prefer finishing before cutting and assembly because it’s easier that way.
My preference works fine as long as I can hide the cut surfaces and screws in the final assembly
And I can do that hiding is the case in this bookshelf build.
So the first step is to finish the MDF boards using stain. 😎
The staining was done by first leaning the MDF boards again my workbench, and then using long strokes with a 3″ paint brush.
See infographic below for illustration.
Tip: If you order (Chinese) takeout, the food often comes in plastic containers. Save these containers. They’re great for holding stain or paint. You’ll have less cleanup after use. Simply close the lid and dispose them off. 👍
Since Varathane Antique White stain is oil-based, make sure to use protective gloves like the ones I bought from Amazon.
The long brush strokes will provide a look similar to solid wood grains on MDF!
When you’re done with one side, wait for it to dry and flip the boards to stain the other side.
Note, you may have to do multiple coats, as MDF can absorb stain like a sponge.
For one of the bookshelves I built, I had to use all of the 1 quart of stain to get the look shown below!
As I explained in another post comparing MDF to plywood, This additional labor is a price you pay for going with MDF, as opposed to (the more expensive) plywood (or solid wood).
Once you’re done with staining, remember to clean the brush using paint thinner.
If you’re a frequent DIYer, I recommend buying 1 gallon cans of paint thinners, like this one from Home Depot or this one from Amazon.
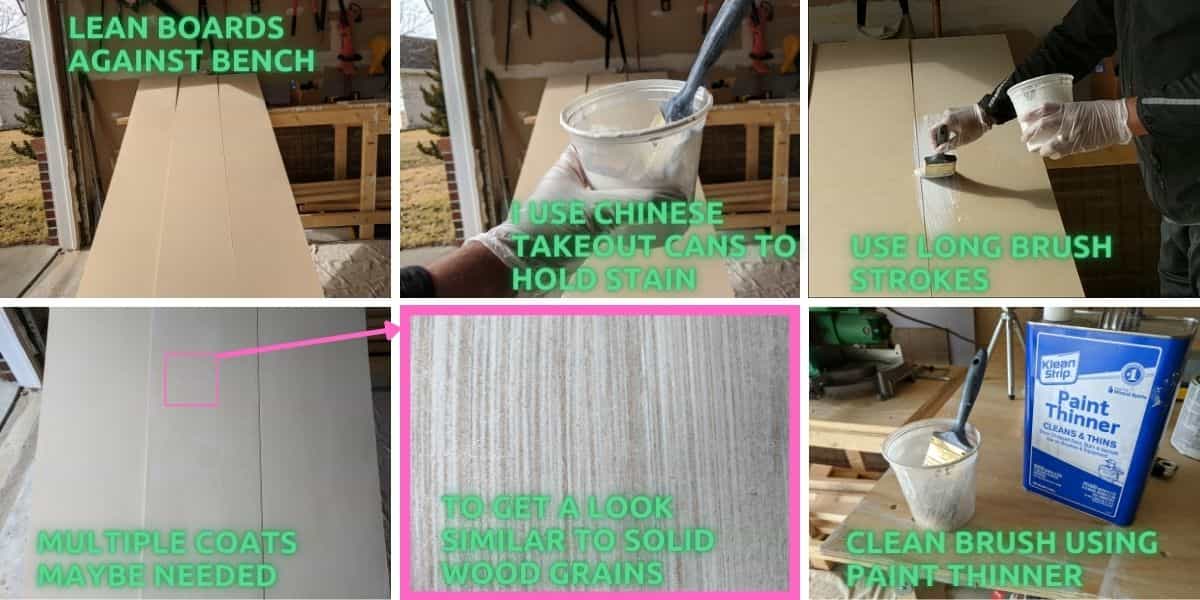
Top left: To stain the MDF boards, lean them against a bench. Top middle: I use a (Chinese) takeout container to hold the stain as a apply it. Top right: Use long strokes and possibly multiple coats (bottom left) to get an appearance resembling wood grains (bottom middle). Clean up the brush using paint thinner (bottom right)
Tip: You’ll be staining the 2″ x 4″ also later on. If you’re going to use a brush (as opposed to a rag) for staining the 2″ x 4″, sand the 2″ x 4″ ahead of time so that you can stain both the MDF and the 2″ x 4″ at the same time. This way, you’ll have to clean the brush only once, saving time and paint thinner. 😎
Step 3: Apply edge banding to the MDF boards
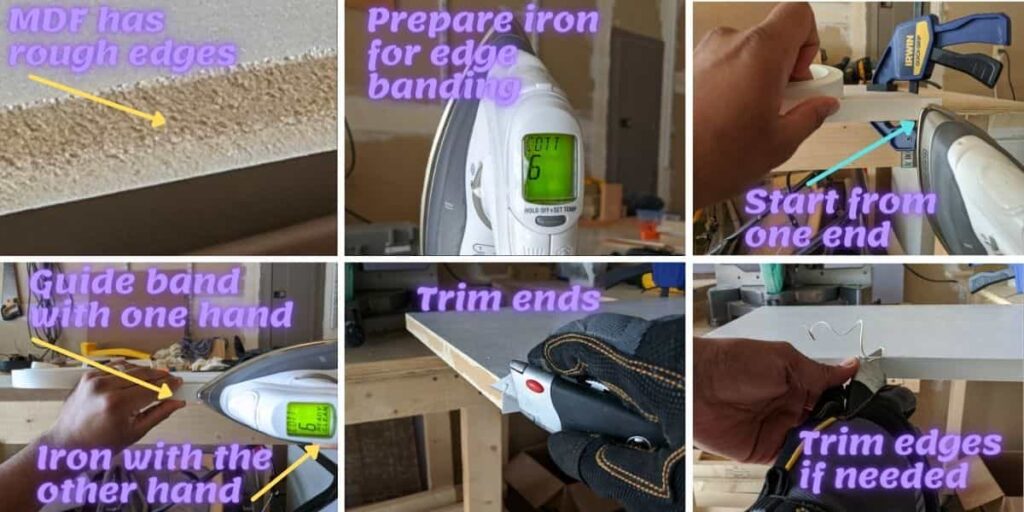
While the sides of MDF boards are really smooth and need no finishing other than staining or painting, the edges aren’t.
The edges of MDF boards are too rough to be aesthetically pleasing.
See the top left panel in the picture below for the contrast between the side and edge of an MDF board.
The solution is to apply edge bands to cover the edges of the MDF boards.
Have you enjoyed this post thus far? Do you have any questions or suggestions for improvement? Please leave a comment below. I’d love to hear from you.
Edge bands are strips of veneer that can be ironed on using a common clothes iron.
See the supplies list of this post for the specific, white band for use in this project. The edge band in the supplies list is of the same thickness as the MDF boards.
As illustrated in the picture below, the iron needs to be really hot for it to work well.
I recommend the same level that you use to iron cotton.
Don’t worry, the band will not damage the iron. 😊
Start by sticking one end of the edge band to an end of the edge of the MDF board. Use the tip of the iron to do this.
Then slowly work your way to the other end of the board.
Carefully guide the edge band in front of the iron using one hand. And slowly slide the iron over the band towards the other end of the board.
Note: Edge banding is a skill that takes a bit of practice. But don’t worry, it’s not a hard skill to master. You’ll get it with a bit of patience. 👌
Have a utility knife handy to cut and trim the band so its end aligns with the end of the edge of the MDF board.
If you have guided the band well, the edges of the band will be flush with the sides of the MDF board.
But if you couldn’t get the band to align with the board perfectly, which is likely the case the first time you do this, don’t worry!
Use a utility knife to carefully shave the edges of the band where it isn’t flush with the board.
The more you do this, the less need you’ll have for trimming the edges of the band.
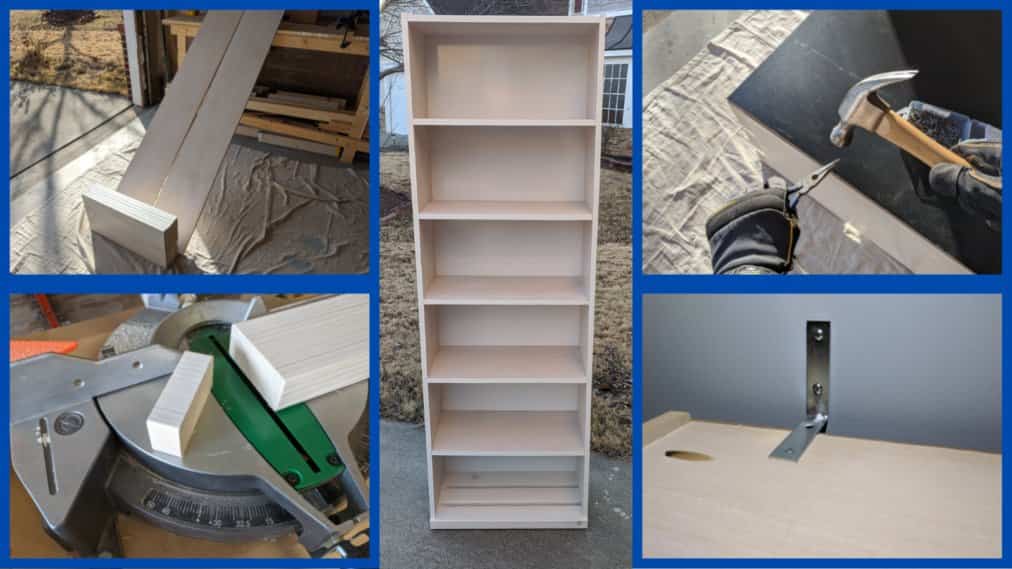
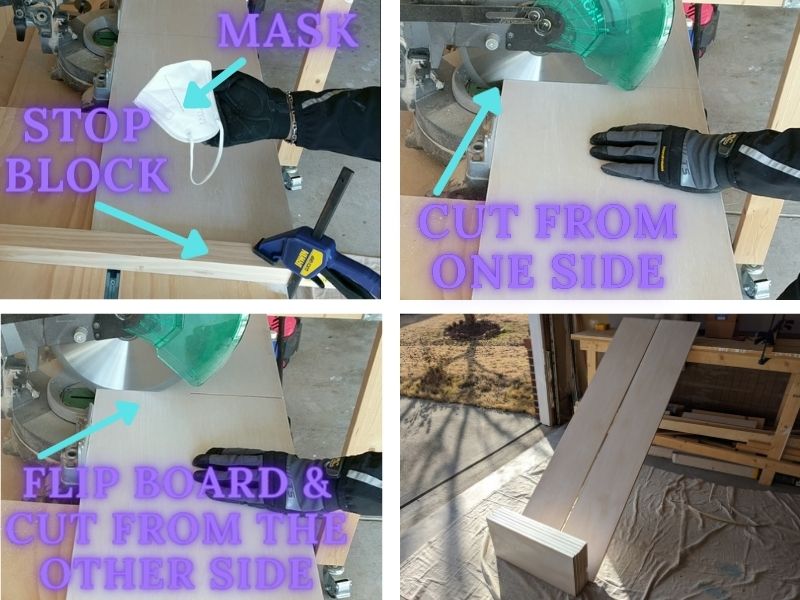
Step 4: Cut the MDF boards
You’re now ready to cut the stained and edge banded MDF boards to size.
My 10″ miter saw can cut a max of only 6.25″. This meant I had to improvise to cut 12″ wide MDF boards.
My workaround was actually very easy: I simply cut the max length from one edge of a board, flipped the board, and cut the remaining length from the other edge of the board.
The picture below illustrates what I did.
Using a stop block (top left panel in the pic below) made it very easy to get a consistent cut.
Since the 6 horizontal shelf pieces are all of the same length, using 1 stop block for all of them made the 12 cuts very fast also.
Caveat: MDF dust is very fine, so make sure you’re wearing a mask while cutting MDF.
The final result was 8 MDF board pieces to be used in this project. See this project’s plan for exact dimensions.
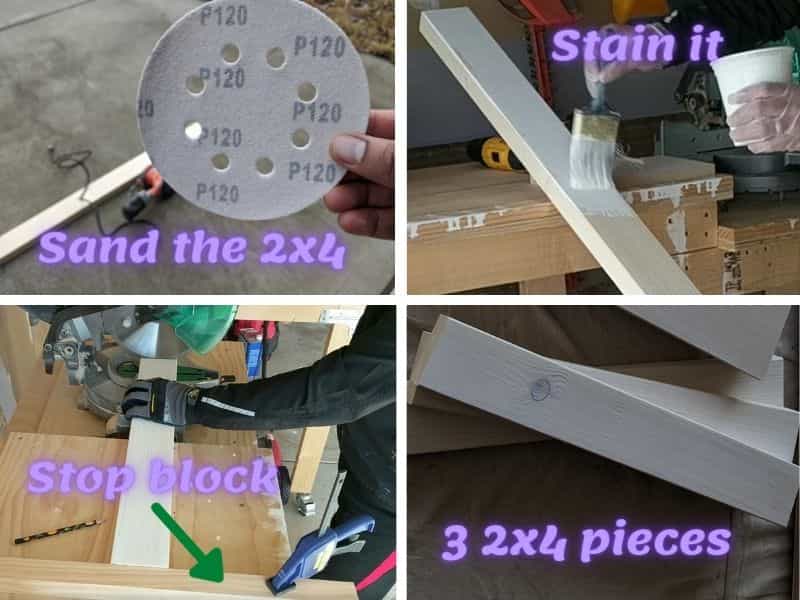
Step 5: Sand, stain, and cut the 2″ x 4″
If you have already prepared the MDF pieces, the 2″ x 4″ pieces should be very easy.
Unlike the MDF, you might want to sand the 2″ x 4″ though.
I used a 120 grit sand paper and my 5″ orbital sander (listed in the power tools above).
Staining the 2″ x 4″ can be done using a brush or a rag cloth. I used a brush in this project.
Once the stain is dry, cut the 3 2″ x 4″ pieces needed for this project using a miter saw.
Using a stop block here too will save time and make the cuts consistent.
The picture below illustrates the preparation of the 2″ x 4″ pieces.
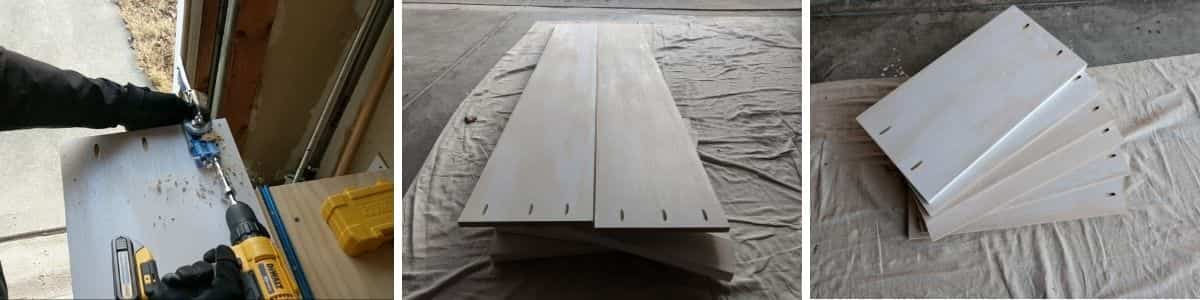
Step 6: Drill pocket holes on MDF pieces using Kreg jig
Most of the assembly in this project is done using pocket holes drilled with a Kreg jig.
And yes, MDF pieces can indeed be attached to each other and to wood using pocket holes, if you weren’t sure of that.
Drill 3 pocket holes on one end of each of the vertical MDF pieces.
These sides will be attached to the 3 2″ x 4″ pieces, which will become the bottom of the bookshelf.
Drill 2 pocket holes on both ends of one side of each of the horizontal MDF pieces.
These holes will be used to attach the shelves.
The picture below illustrates the 30 pocket holes I drilled on the MDF pieces.
Have you enjoyed this post thus far? Do you have any questions or suggestions for improvement? Please leave a comment below. I’d love to hear from you.
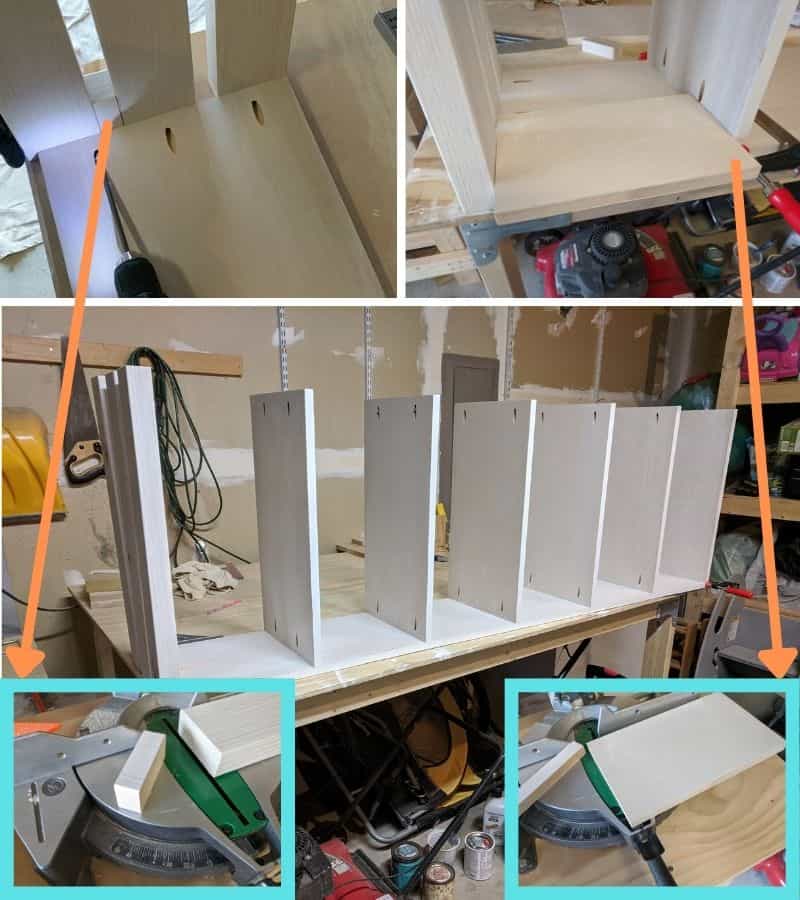
Step 7: Assemble the frame of the bookshelf
At the end of the previous step, all pieces of the frame of your shelf are ready.
It’s time to start assembling.
Lay one of the vertical MDF pieces, the one on the right side in the final assembly, on a flat surface with the pocket holes facing up.
Then attach the 3 2″ x 4″ pieces to the bottom end of this vertical MDF piece, one 2″ x 4″ piece to each of the 3 pocket holes.
You’ll be using 1.25″ Kreg screws for this assembly.
You can cut a small piece of wood from the leftover 2″ x 4″ piece in this project to assist you in making the gaps between the 2″ x 4″ pieces consistent during this step.
Place the small piece of wood between the 2″ x 4″s as you assemble them.
See picture below for more details.
There are multiple reasons why I chose to make this DIY bookshelf with 2″ x 4″ pieces at the base:
- Reduce expense: If I had made the base also with MDF, I would’ve had to buy another MDF board, which is more expensive than a 2″ x 4″.
- Minimize material waste: If I had bought another MDF board just for the base, I would most certainly have had more leftover MDF going to waste.
- Stability and aesthetics: The arrangement of the 2″ x 4″s as I have done provides for a slightly wider base, and therefore more stability. The base protruding forward a bit also looks good, at least in my view.
- Sturdy, durable base: MDF is neither sturdy around the corners and edges, nor moisture resistant. The base of the bookshelf needs to be stronger since it carries all of the weight. It also needs to be more moisture resistant, e.g., to better handle someone spilling water near the bookshelf.
Once the 3 2″ x 4″ pieces are attached, fasten one end of the horizontal MDF pieces that form the shelves.
Here again, you can cut one of the leftover MDF pieces in this project to assist you in making the shelves consistently spaced.
A couple of notes here:
- Note that the pocket holes on all horizontal MDF pieces, except the one that will become the very top of the bookshelf, is turned to face the floor when the bookshelf is stood up. The holes of the topmost shelf is turned toward the ceiling. This is intentional, because most adults are between 5′ and 6′ tall. Orienting the horizontal shelves as I show here will maximize the chances of the holes hidden from plain view of most adults standing next to the shelf. 👌
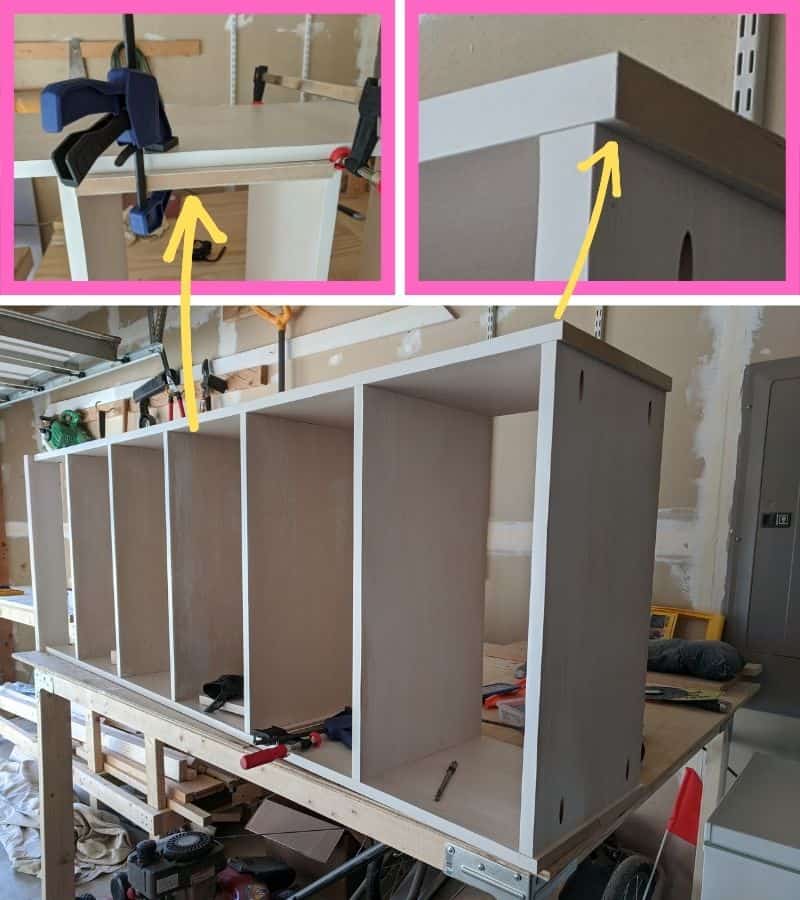
- There’s another thing special about the topmost shelf – it’s not flush with the top of the vertical MDF board. This is mainly for aesthetics, but there’s a functional reason to it as well. The edges provided by the vertical MDF boards will prevent objects that you keep on the very top of the shelf from rolling or sliding off easily. 😉 See the top right inset in the picture below for a visual of this.
Tip: If you haven’t noticed already, to love woodworking, you have to love paying attention to lots of little details. The notes I make above are just a couple of examples. 😂
After the shelves are attached as shown in the picture above, you can now attach the other vertical MDF piece.
Start from the bottom of the bookshelf and attach the second vertical MDF piece to the 2″ x 4″ pieces first.
Use the same piece of MDF you used before (top right panel in the picture above) to keep the spacing between shelves consistent.
Then attach the ends of the horizontal MDF pieces, one by one, from bottom to top of the bookshelf.
Like before, use clamps to keep things in place as you insert the screws through the pre-drilled pocket holes.
The picture below illustrates the process.
The picture below also shows how the topmost shelf isn’t flush with the ends of the vertical MDF pieces.
You may find (like I did) that 1.25″ Kreg screws aren’t enough to firmly attach the 2″ x 4″ pieces to the vertical MDF pieces.
To make the joint stronger, drill approximately 0.25″ counterbores on the bottom side of the 2″ x 4″ pieces as shown in the picture below.
Use a 3/8″ spade bit to create these counterbores.
You’ll create 6 counterbores, one for each end of the 3 2″ x 4″ pieces.
Make sure the counterbores aren’t aligned with the pocket holes.
Then insert 2.5″ Kreg screws through the counterbores and into the vertical MDF pieces to further attach the 2″ x 4″ pieces to the sides of the bookshelf.
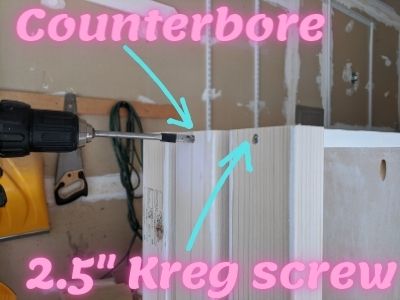
Note: Adding these 2.5″ screws wasn’t part of my plan when I started out making the bookshelf. I had to improvise when I found that the 1.25″ Kreg screws inserted via pocket holes weren’t enough. I wanted to highlight this because improvising this way is a normal part of woodworking. Don’t be discouraged if your plans aren’t perfect! 👍 You’ll almost always find a way to make things work without ruining the project.
Step 8: Cut and attach the marker boards
At this point, you’re almost there!
What’s left is the attachment of the back panels and some optional finishing touches.
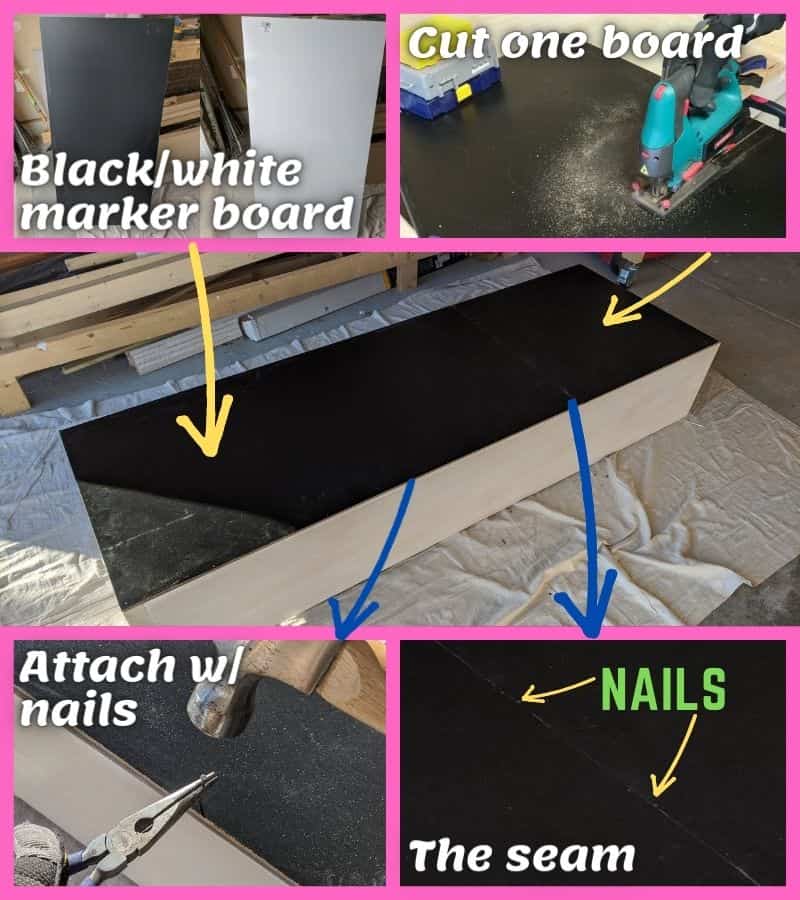
The back panel is made of marker boards that are 0.25″ thick.
One side of these boards is black and the other side is white.
Since these boards come in a 2′ x 4′ size, you’ll have to cut one of them.
I used a jig saw to do this cutting.
The marker boards are then attached to the back of the bookshelf using panel board nails,
I had the white side of the board facing the inside of the bookshelf to make the shelves completely white as per my wife’s request. 😁
The picture below illustrates the markerboards, their cutting, and their attachment. See this project’s plan for exact dimensions.
The seam between the 2 marker board pieces should align with one of the shelves, so you can drive nails at the seam too.
Tip: Since the MDF boards are only 0.75″ thick, you may want to angle the nails at the seam so that they are completely hidden from view inside the shelf.
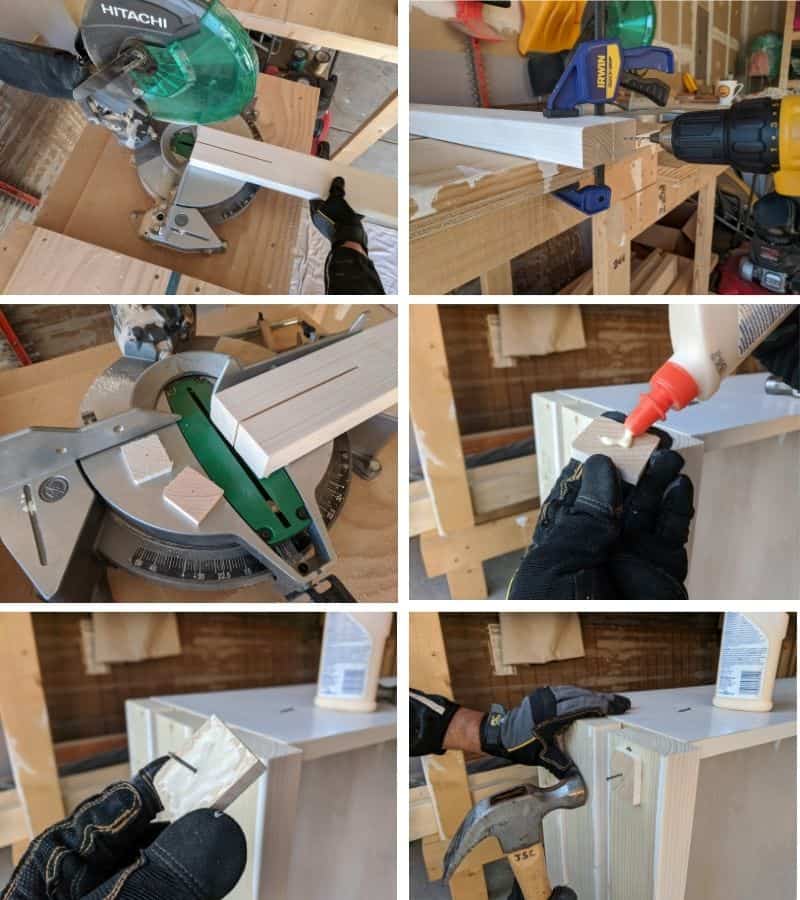
Step 9: Make and attach small “feet” at the bottom of the bookshelf
It’s helpful to add little “feet” to the bottom of the bookshelf for 2 reasons:
- The bottom assembly may not be perfectly flat
- The floor where you’ll install the shelf may not be perfectly flat.
In both of these 2 cases, the feet help reduce the wobble by providing only 4 contact points where the bookshelf will touch the floor.
To create the feet, first, use the miter saw to cut the leftover 2″ x 4″ piece in the project at one end straight down the middle, as shown in the top left panel in the picture below.
Next, drill holes into the 2 sections of the cut end (top right panel). You’ll drive a 1″ panel board nail through the hole, so don’t make it too wide. 😉
Then cut 4 0.25″ thick pieces off the 2 sections, again using the miter saw (middle left panel). These are your feet.
Finally, take each foot, apply some glue to one side, insert a nail through the hole, and attach the foot near one of the 4 corners of the bottom of the shelf.
Drive the nail enough for it to be flush with the surface of the foot, but be careful towards the end. The foot will split if you hit it too hard. 🙂
Step 10: Install the bookshelf with (optional but highly recommended) attachment to the wall
MDF is heavy, so carrying the bookshelf to where it’s going to be installed is a two-person job. At least it was for me.
Carry the bookshelf as close as you can get to the installation spot and stand it up. Then gently slide it as close as you can get to the wall.
You do not necessarily have to attach the shelf to the wall, but I highly recommend it for safety reasons.
The attachment to the wall is especially important if you intend to use this DIY bookshelf for kids, or anticipate visitors with young children.
Children have a tendency to climb on things, and you wouldn’t want this bookshelf to fall forward on them. 😨
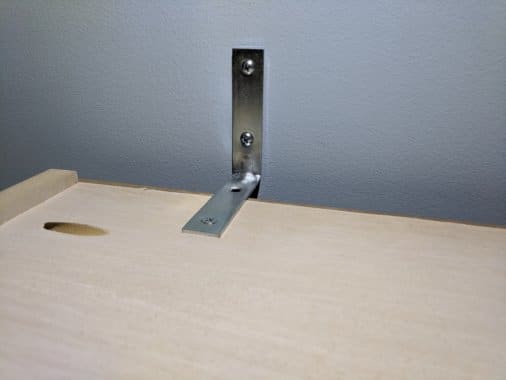
To attach the shelf to the wall, find a stud in the wall behind the bookshelf.
Studs are typically located 16″ apart, so unless you have one of those rare houses with studs located farther than 16″ from each other, you’re guaranteed to find at least 1 stud behind the bookshelf.
Once you find the stud location, attach the top of the bookshelf to the stud using a 3″ corner brace, like this one from Home Depot, or this one from Amazon.
Picture below shows how this attachment looked like for me.
The brace has 2 holes you can attach to the wall – use 2.5″ screws for these holes.
Because the baseboard will prevent the bookshelf from touching the wall, you’ll likely have only 1 hole over the top of the bookshelf. Screw in a 3/4″ wood screw though this hole to secure the bookshelf to the corner brace.
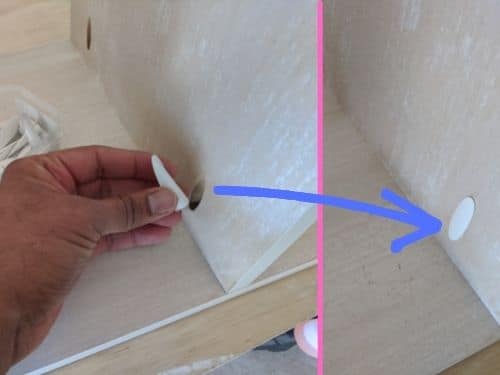
Step 11: (Optional) Cover the pocket holes at the bottom
If exposed pocket holes bother you, use these inexpensive white pocket hole covers available from Amazon.
As I mentioned earlier, if you have oriented the MDF boards right, you’ll need to do this only for some of the pocket holes, as others aren’t easily visible to a typical adult.
Tip: The pocket hole covers may not fit snugly into the pocket hole. Dab a bit of wood glue on the sides of the pocket hole or the cover to solve this problem.
The picture below shows how I covered the pocket holes.
Congratulations! You’re now a proud owner of a nice, white, rustic-looking bookshelf that you made yourself!
Fill the shelf with books and what have you. Gloat over it as you made it yourself. 😎
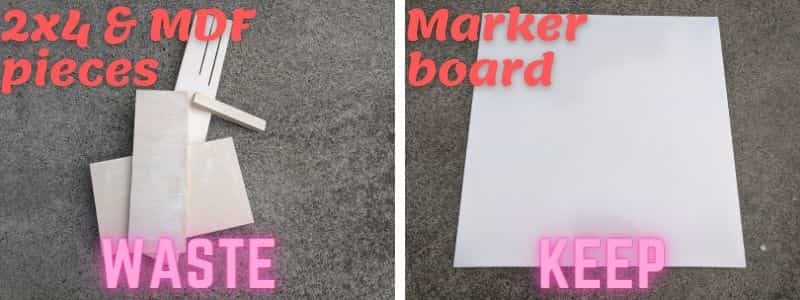
The minimal waste from this project
As I mentioned at the beginning of this post, minimizing material waste was one of my goals.
I think I have achieved that.
The picture below shows what’s left over after everything was done.
The left panel is the scrap wood that you won’t be able to use for another project. This is the only waste from the project in my view.
Now, of the 2 marker boards, a part of one of the boards will be left over as well. That is shown in the right panel in the picture below.
You can keep this part of the marker board for future use, such as:
- Building a second bookshelf. This is what I actually used it for. I built 2 of these bookshelves to sit on either side of a window in our homeschooling area! 😎
- Using it as a smooth surface. You can use it as a perfectly smooth surface on a workbench in your shop.
- Using it as a white marker board. Don’t forget that you can write on this with a dry eraser. You can use it as is, but if you’re looking a fun little project, that would be adding a frame around this leftover marker board piece. 👍
Have you enjoyed this post thus far? Do you have any questions or suggestions for improvement? Please leave a comment below. I’d love to hear from you.