How to build a king-size platform bed under $100
After I built a temporary guest room in our house for the arrival of our 3rd baby, we decided to install a king-size bed in that room.
Well, why stop at building the room when you can build a bed for that room too, I thought! 🤔
I decided to make it a platform bed. 😎
Platform bed frames support the mattress directly, without needing a separate box.
I looked through several plans available online, but were not impressed by them.
The plans I found were either too complicated, or too simple to be aesthetically pleasing.
So I decided to make my own plan. I had the following requirements for the plan:
- It should be simple enough for me to make over 1 weekend
- The cost should not exceed $100
- It should be strong, and aesthetically pleasing
- Material waste is minimal
Details of the plan I came up with are below.
Hope you find this post inspiring and practical. Enjoy!
Supplies and cost*
*Cost as of Jan 2021 when supplies were expensive, due to the prolonged economic impacts of the COVID pandemic. Also, the cost of screws includes only the screws used in the project, not entire boxes of screws.
| Item | Count | Price | Store |
| 2″ x 6″ x 8′ lumber | 4 | $8 x 4 = $32 | Home Depot |
| 2″ x 4″ x 8′ lumber | 2 | $5 x 2 = $10 | Home Depot |
| 2″ x 2″ x 8′ lumber | 2 | $2 x 2 = $4 | Home Depot |
| 1″ x 6″ x 8′ Tongue and Groove Board | 8 | $5 x 8 = $40 | Home Depot |
| Varathane Antique White wood stain (1 qt) | 1 | $9 | Home Depot |
| Screws (2.5″ and 1.5″ round-head) | As needed | $3 | Amazon Amazon |
Total cost of supplies: $98
Power tools used
How to build it
Plan: A detailed plan, i.e., snapshots of a 3D model of this project annotated with exact measurements of various components, is available at this link.
Step 1: Cut and sand 2″ x 6″ x 8′ lumber for the main frame support
The first step is to cut and sand the 2″ x 6″ lumber pieces which will be used to build the main support for the frame.
The dimensions are pretty straightforward, because a king-size bed is approximately 80″ long and 76″ wide.
But as with any woodworking project, you’ll need to pay attention to details. 🤨
You’ll also need to decide how high you want the frame to be. To do that, you’ll need to have an idea about what kind of mattress you’ll be buying for this.
We had decided that we would buy a 12″ memory foam mattress, like this one on Amazon.
We also wanted the top of the bed to be about 27″ from the floor.
This meant that our frame height was to be 27″ – 12″ = 15″.
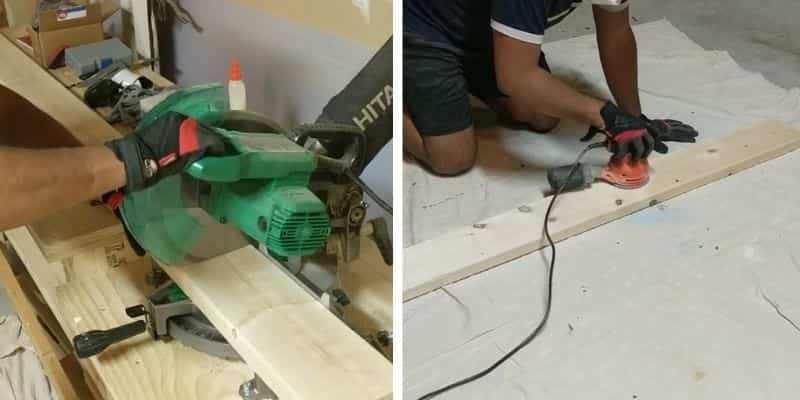
Each 2″x 6″ x 8′ lumber was cut using the miter saw to make 1 side and 1 leg of the bed frame.
The cut pieces were sanded using 120 grain sand paper to smooth them a bit and to remove any splinters.
Pic below illustrates these steps.
Have you enjoyed this post thus far? Do you have any questions or suggestions for improvement? Please leave a comment below. I’d love to hear from you.
Step 2: Stain the cut 2″ x 6″ pieces
My wife loves the Varathane Antique White stain (see my supplies list above), so that’s what I’ve been using for a lot of my indoor projects.
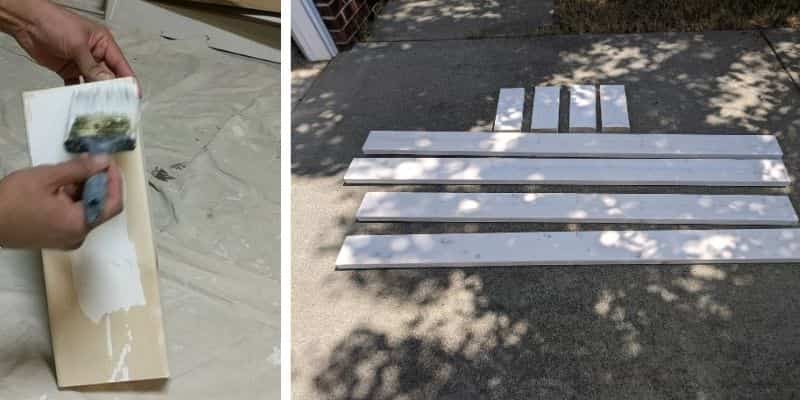
Staining is fairly straightforward. I typically use a paint brush for this stain, but you can also use a rag cloth.
Caveat: I’d recommend that you use protective gloves when working with this stain as it’s oil-based. I use these inexpensive gloves from Amazon. Also, be sure to clean the brush after staining, using some paint thinner. I typically use this inexpensive paint thinner from Home Depot. It costs less than $10 for 1 gallon!
After the staining, you should have 8 pieces of 2″ x 6″ lumber as shown in the pic below.
Four of the 8 pieces are legs, each about 14″ high.
Of the remaining 4 longer pieces, 2 will form the left and right sides of the frame. The other 2 will form the top (head) and bottom (toe) sides of the frame.
The sides are longer, at about 80″, to match the king bed size.
Note: For the longer 2″ x 6″ pieces (that is, pieces that form the sides of the frame), you only need to stain 3 sides/faces. The 4th side/face will not be visible when you look at the bed. This is convenient because you can lean the unpainted face against something or lay it down on the floor to conveniently paint the other 3 faces.
Step 3: Assemble the main frame support
Plan: A detailed plan, i.e., snapshots of a 3D model of this project annotated with exact measurements of various components, is available at this link.
Once the pieces of the main frame support are ready, you can start assembling them.
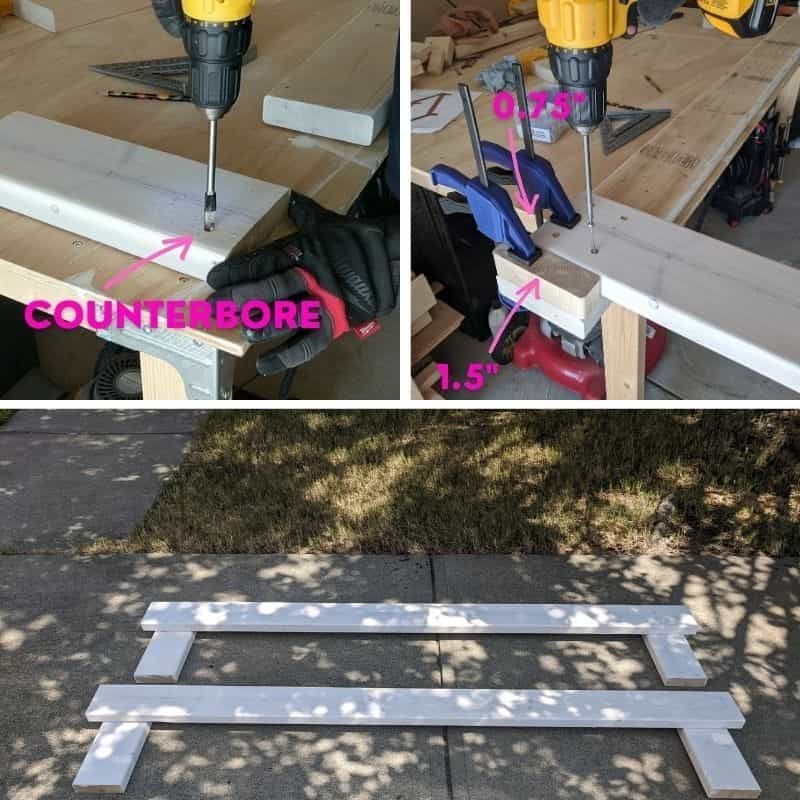
First attach the legs to the sides of the frame. See pic below.
The legs are attached to the unpainted faces of the longer sides, with 2 legs attached to each of the 2 longest pieces.
To attach each leg, create (optional) counterbores on the leg pieces, 4 bores on each leg piece, and screw them using the 2.5″ screws.
The counterbores can be created using a 3/8″ spade bit.
Again, the bores are optional, as the screw heads will face the inside of the bed frame, but they do add a bit of strength to the joint, as the screw will penetrate the second (the longer) wood piece deeper.
Each leg is to be receded by 1.5″ and 0.75″ from the edges of the long piece it’s attached to, as shown in the picture.
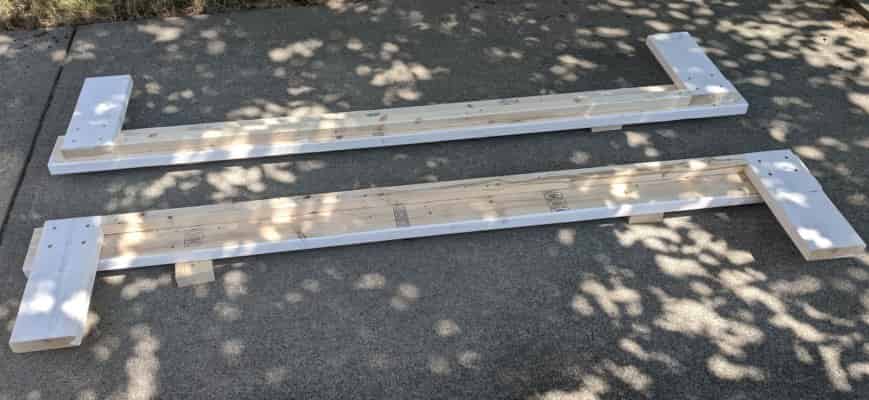
The result is 2 components, each shaped like a C. These components will form the 2 longer sides of the bed frame.
We’re now going to add a 2″ x 2″ board to the “inside” of each of these C-shaped components, between the legs.
The 2″ x 2″s will later act as supports for the bed slats.
This step is fairly straightforward. Simply screw in the boards between the legs, with the top of the boards flush with the top of the legs, as shown in the picture below.
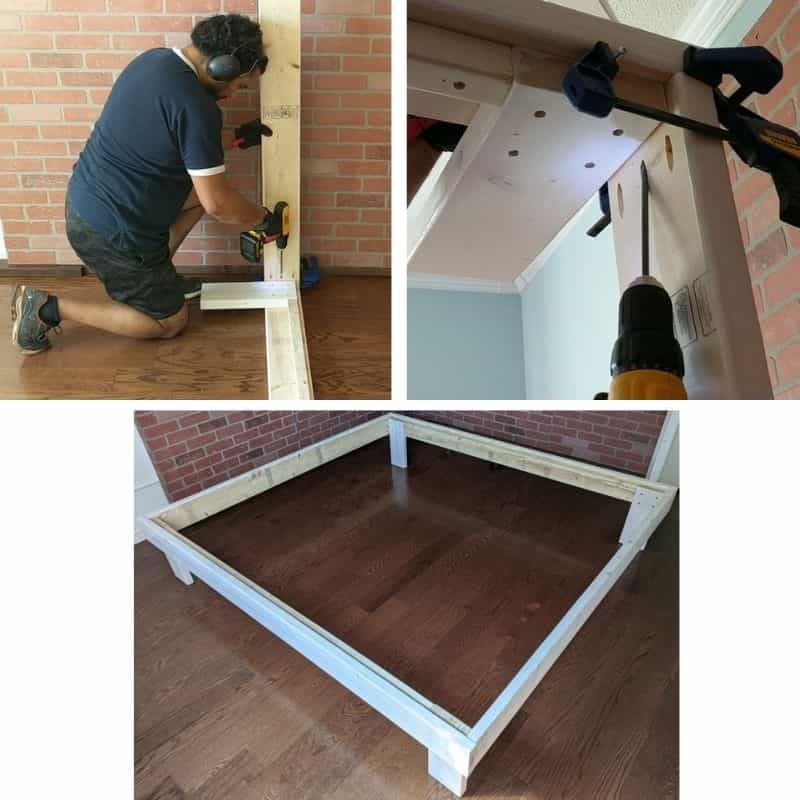
The 2 C-shaped leg assembly components can now be joined together with the remaining two 2″ x 6″ pieces, to form the main support for the frame.
This joinery can use pocket holes and 2.5″ screws. Each joint can have 3 screws as shown in the picture below.
Note: You may need to make use of clamps, or help from another person, to hold pieces together tightly as you join them. I even screwed temporary screws in (top right panel in the pic below) to provide a place for one the clamps to hold on.
Caveat: Starting with this step, perform the assembly in the room where you’ll have the bed. It will be really awkward, if not impossible, to get it through doors otherwise! 😮
Step 4: Add middle supports for the slats
The 1″ x 6″ Tongue and Groove boards that we’ll use as slats in the bed frame aren’t strong enough to handle the weight of the mattress + adults sleeping on it.
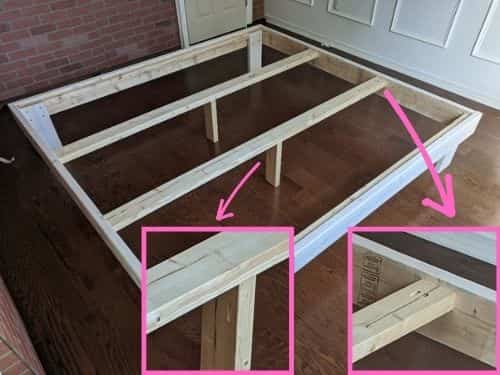
So, before installing the slats, I added a couple of support boards in the middle of the frame, using the 2″ x 4″ x 8′ boards. See pic below.
Each support beam was cut to size using miter saw.
Each support beam was in turn supported in its middle by adding a leg. Since each 2″ x 4″ board was 8′ long (96″) , and I needed only ~80″ for the support, the remaining ~16″ was used to make its leg.
All joints for these support beams were done using pocket holes, as shown in the insets.
All pocket holes in this project were left open as they would be hidden from view once the project would be finished, but if you’re inclined to hide them, read this post that describes the best method to cover pocket screw holes.
Tip: Cut and attach the beam first, and then cut its leg to length by measuring the beam’s distance from the floor exactly. This way you can ensure that the leg touches the floor precisely, and not just dangling or pushing the beam up in the middle.
Step 5: Attach the slats
The final step is to attach the slats, made from the 1″ x 6″ Tongue and Groove boards.
Note: The choice of Tongue and Groove boards (as opposed to regular 1″ x 6″ boards was driven by price, and not because I needed to use the “tongue and groove” to attach the boards to each other. The Tongue and Groove board was half the price of regular 1″ x 6″ x 8′ boards at the time of this project! The slats aren’t visible once the mattress is installed, so choice of slats does not affect the aesthetics at all.
Each slat board was screwed to the 2″ x 2″ support boards at the ends as well as the 2″ x 4″ middle support boards.
See pic below.
The 1.5″ round-head screws were used here.
The top panel shows the use of a scrap wood block placed between the slat being installed and the previous slat to get consistent gap.
Each slat was approximately 6′ long. This meant that about 2′ was cut off from each of the 8′ boards to make a slat.
To save material, and to keep expenses down, I used the 2′ pieces to make slats too.
Every 4th slat was made of three 2′ pieces cut off from the three previous slats (bottom panel in the pic below).
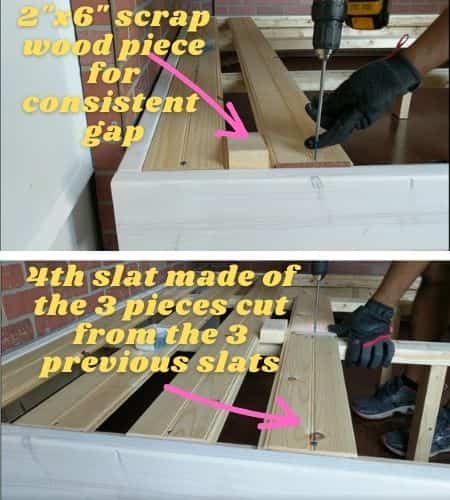
In total, there were 10 evenly placed slats, made from eight 1″ x 6″ x 8′ boards.
Two of these slats were made of three ~2′ pieces cut from the other slat boards.
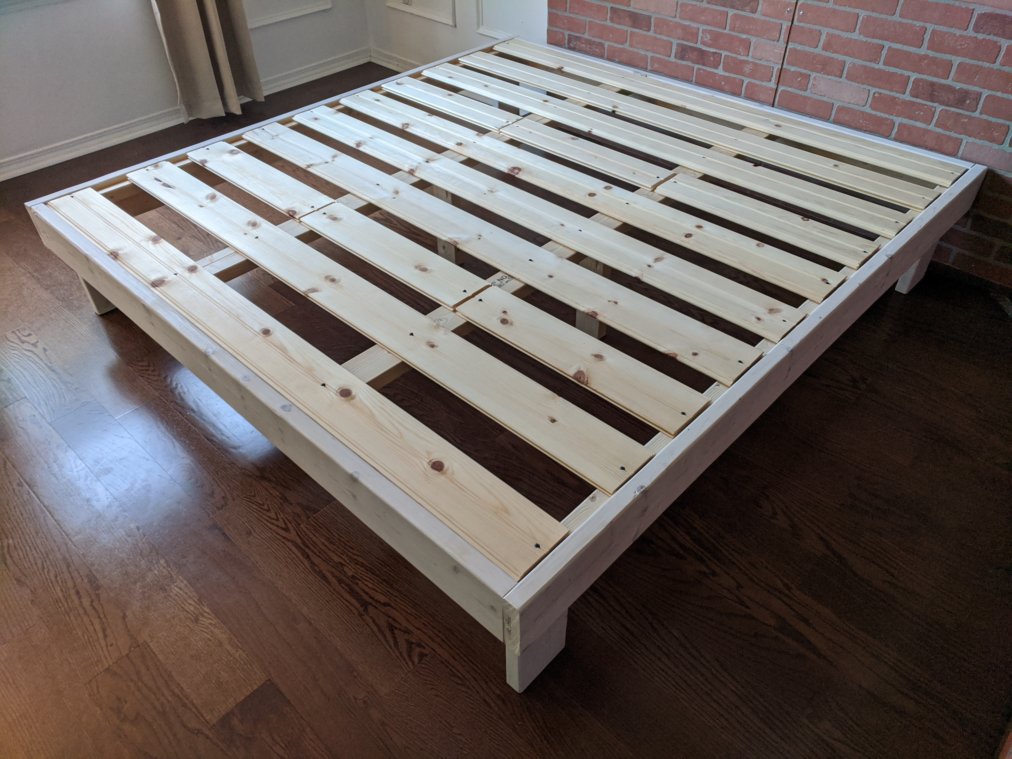
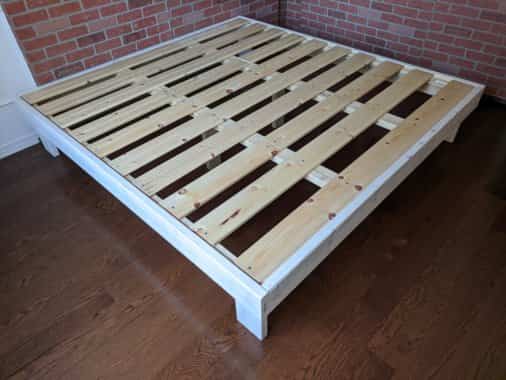
The final result after installing the slats is shown in the picture below.
At this point, the frame was complete, and ready for a mattress to be placed on it!
The frame is extremely sturdy. It can easily take on the heaviest mattress available on the market plus multiple adults! 😊
The mattress that we bought for the frame is one like this from Amazon.
We placed this platform bed frame in a temporary guest room that I built for guests for the arrival of our 3rd baby.
A picture of the frame with mattress placed on it can be found in my post about making that temporary guest room.
Have you enjoyed this post? Do you have any questions or suggestions for improvement? Please leave a comment below. I’d love to hear from you.
If you have enjoyed this post, you may also like my post on building a farmhouse chair under $35.
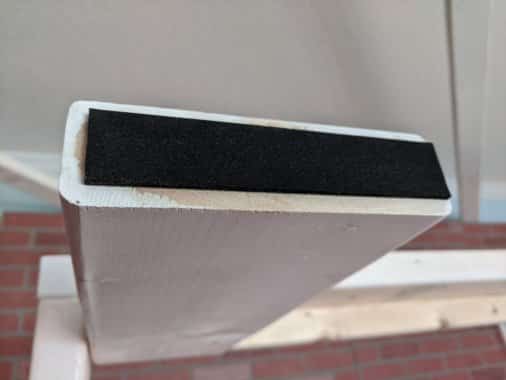
Optional step: Attach pieces of foam to the legs to protect the floor
If you have wooden floors that you want to protect, attach a small piece of foam to the bottom of each leg.
I used this 1″ adhesive foam available from Amazon.
Here’s a picture of how the foam looked like for me.
Optional step: Enjoy a backyard fire with the minimal material waste
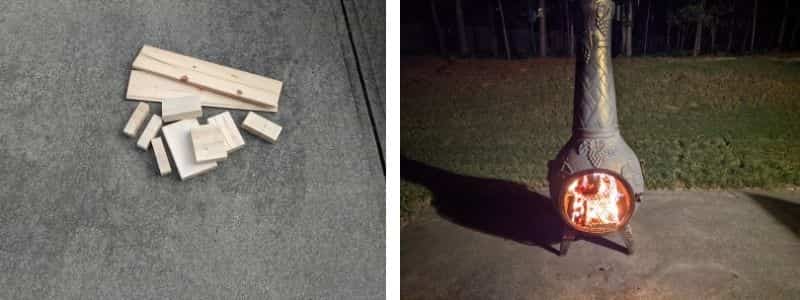
As I mentioned in the beginning of this post, minimizing material waste in the form of scrap wood was one of my criteria for making this plan.
All of the waste from this project is shown in the left panel of the pic below.
I used even that minimal waste, to create a nice, warm backyard fire the in our cast aluminum chimenea the evening I finished the project!
By the way, the chimenea shown in the pic is one of the best purchases we’ve made for our backyard. It’s made by Deeco and available for purchase from Amazon.