How to build a rustic, comfortable farmhouse chair under $35
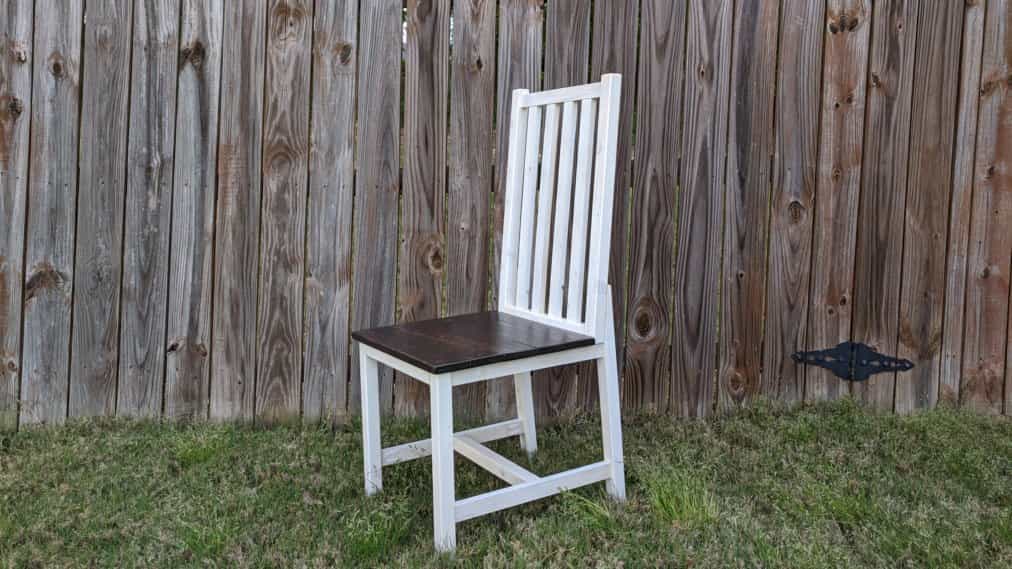
My wife and I were becoming increasingly frustrated with the dining furniture in our kitchen.
The kitchen chairs especially were old and falling apart.
They were also hard to clean because of the upholstery which trapped food crumbs that our young kids spill all the time. 😩
It was time for a chair upgrade! 🦾
We had several criteria for the new chairs.
We wanted them to:
- Be antique and rustic-looking, in farmhouse style
- Be easy to clean
- Be comfortable, even without upholstery
- Be inexpensive, under $50
- Be lightweight, under 15lb
- Have tall, inclined backrest
- Be aesthetically pleasing,
- Have a white and brown color combination
After looking at several ready-made chairs as well as DIY plans online, it became clear that there was either nothing out there that matched all criteria, or even if there was, our choices would be really limited.
It was time to make my own plans and do a DIY project. 😎
In addition to the criteria above, I wanted the DIY plan I’d come up with to:
- Minimize material waste
- Not require a circular saw or table saw for the build: I don’t have these tools, nor did I want to buy them. All plans I found online required these tools, to cut the inclined backrest. Coming up with plans that require only the minimal set of power tools I already have (miter saw, drill, and sander) is a passion of mine. It’s also a passion of my frugal wallet. 😁
Details of the plan I came up with and how I built the farmhouse chair are below.
Though my build was for our kitchen, the same build can be used just as well for bedroom, living room, vanity, entryway, or a desk. It can also be used with an ottoman.
Hope you find this post inspiring, empowering, and practical. Enjoy!
If you’re looking to build both DIY farmhouse chairs and a table, then check out my farmhouse table plan also that goes nicely with this chair.
Supplies and cost*
*Cost as of May 2021 when supplies were expensive, due to the prolonged economic impacts of the COVID pandemic. Also, the cost of screws includes only the screws used in the project, not entire boxes of screws. Same goes for stain and pocket hole plugs.
| Item | Count | Price | Store |
| 2″ x 2″ x 8′ furring strip board | 2 | 2 x $4 = $8 | Home Depot |
| 1″ x 2″ x 8′ lumber | 2 | 2 x $3.50 = $7 | Home Depot |
| 1″ x 4″ x 8′ lumber | 1 | $7 | Home Depot |
| 1.25″ pocket hole screws | 50 | $3 | Amazon |
| 2.5″ pocket hole screws | 12 | $1 | Amazon |
| Varathane Antique White stain | As needed | $1 | Home Depot |
| Varathane Kona stain | As needed | $1 | Home Depot |
| Minwax Water-Based Polyurethane | As needed | $1 | Lowe’s |
| White pocket hole plug | 50 | $5 | Amazon |
Total supplies and cost: $34
Power tools used
How to build it
Plan: A detailed plan, i.e., snapshots of a 3D model of this project annotated with exact measurements of various components, is available at this link.
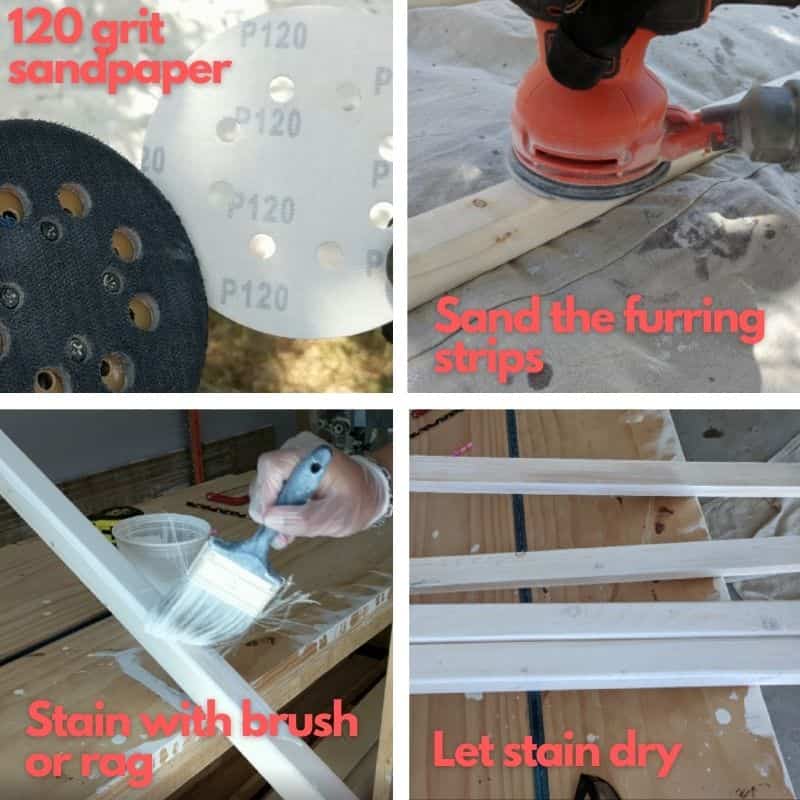
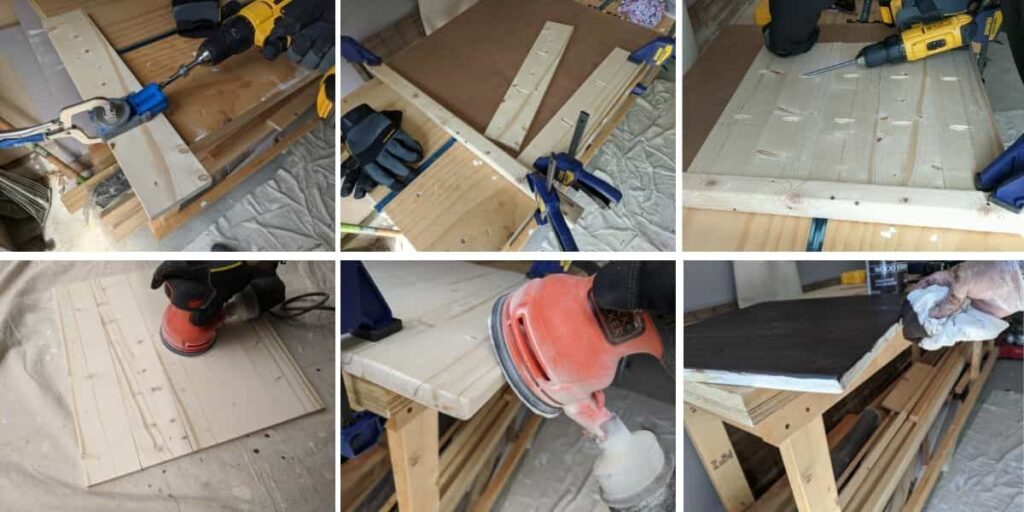
Step 1: Sand the 2″x2″s, and stain the 2″x2″s and 1″x2″s
Furring strip boards are some of the least expensive lumber you can buy from big-box stores.
Since they’re meant to be hidden in their typical use scenario, you’ll find their surfaces to be very rough.
However, with a bit of TLC (aka sanding ☺), I knew furring strips could be easily made suitable for the rustic, farmhouse-style build in the project.
So the first thing I did in the project was to sand the 2″ x 2″ furring strips.
The 1″ x 2″ boards were pretty smooth as it was, so there was no need to sand them.
The sanded 2″ x 2″s and the 1″ x 2″s were then be stained, with the Varathane Antique White stain. I was sure to wipe any sanding dust off the wood before staining.
Note: The decision to sand and stain before cutting and assembly is project-specific. The other option is to sand and stain after cutting and assembly. Each option has its pros and cons. I personally prefer sanding and staining before cutting and assembly because it’s easier that way, as long as I can hide the cut surfaces and screws in the final assembly.
I used a brush for the staining, but you can also use a rag.
The picture below illustrates the sanding, staining, and drying.
Step 2: Cut the lumber
The two 2″ x 2″s were used to make the legs, vertical sides of the backrest, and 3 cross pieces.
The two 1″ x 2″s were used to make the backrest support and 5 cross pieces.
The one 1″ x 4″ was used to make the seat.
All cuts were described in detail in the plan for this project.
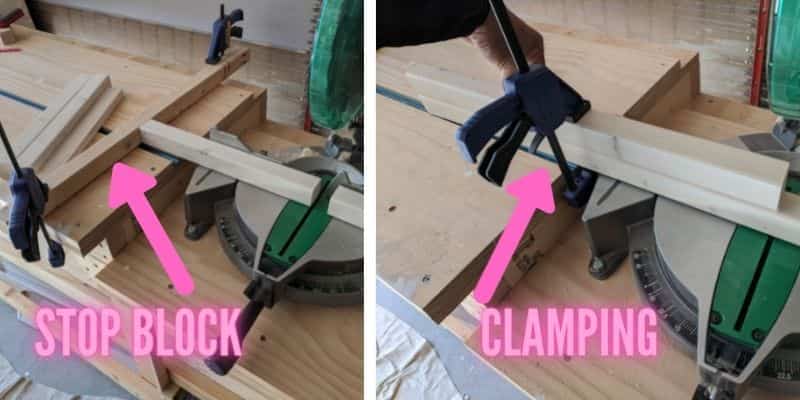
All cuts, with the exception of one, were straightforward to make with a miter saw.
You might, however, want to use a stop block to get consistent cuts for pieces of the same length, e.g., the 1″ x 2″ pieces used as support in the backrest.
Tip: Getting consistent cuts is especially important for this project, or else the chair may wobble too much.
An alternative to using a stop block was to clamp an already cut piece to the uncut lumber so that the new piece’s length matches the cut piece exactly.
See picture below for a “stop block” I made by clamping scrap wood to my miter saw station. I do not (yet) have a stop block built into my miter saw station.
The picture also shows the clamping technique, which was easier to set up when I only had 2 pieces of the same length to cut, e.g., the front legs.
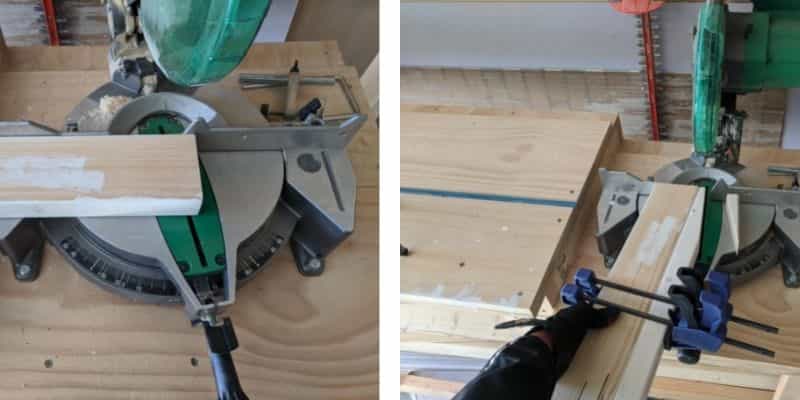
The one cut that’s tricky to make is the small-angle cut for the top part of the back legs.
This small angle is what determined how much the backrest, which gets attached to the back leg pieces, inclined.
To get this small angle, I first cut one end of a scrap piece of 2″ x 4″ at the same angle. See picture below.
Then I clamped the 2″ x 2″ back leg piece to this 2″ x 4″, place it on the miter saw as shown in the picture below, and cut!
The cut removed a long, triangular piece off the 2″ x 2″, exposing the surface against which the backrest will attach.
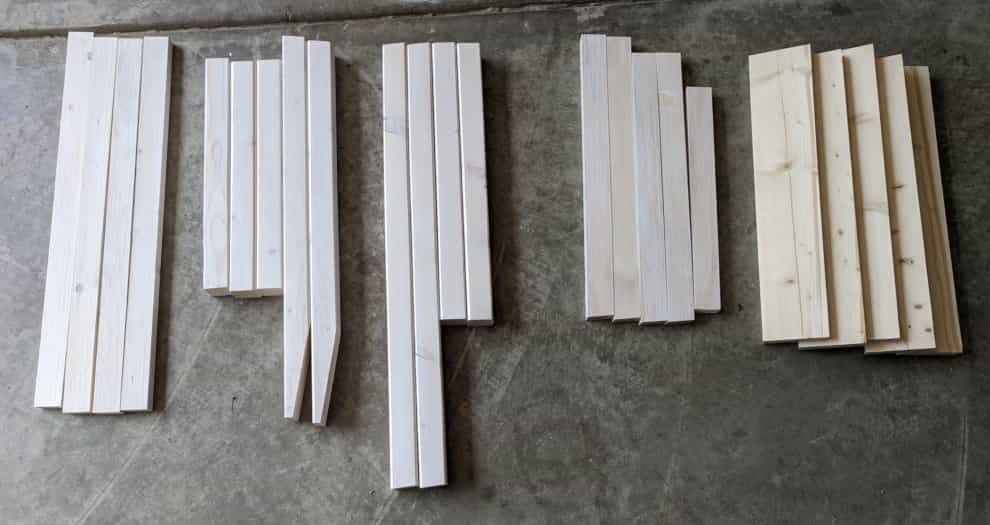
After all the lumber is cut, there were 23 pieces in total, as shown in the picture below.
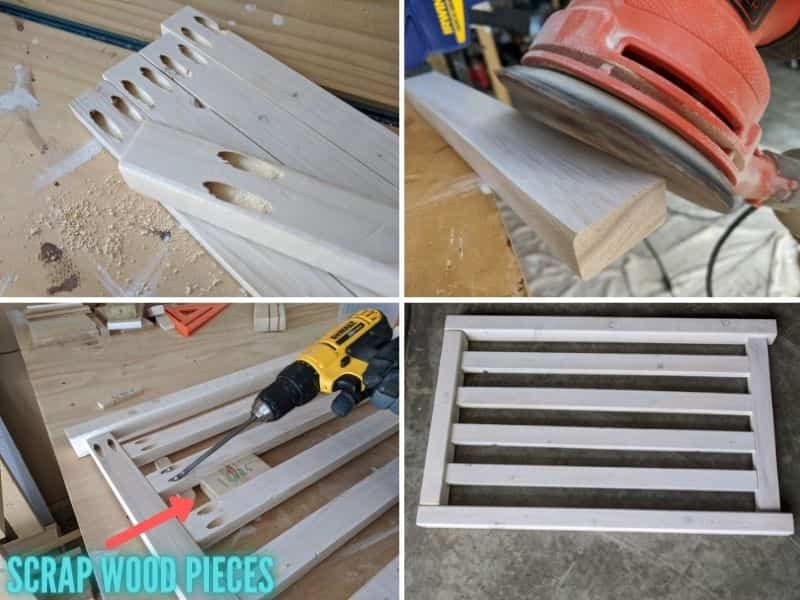
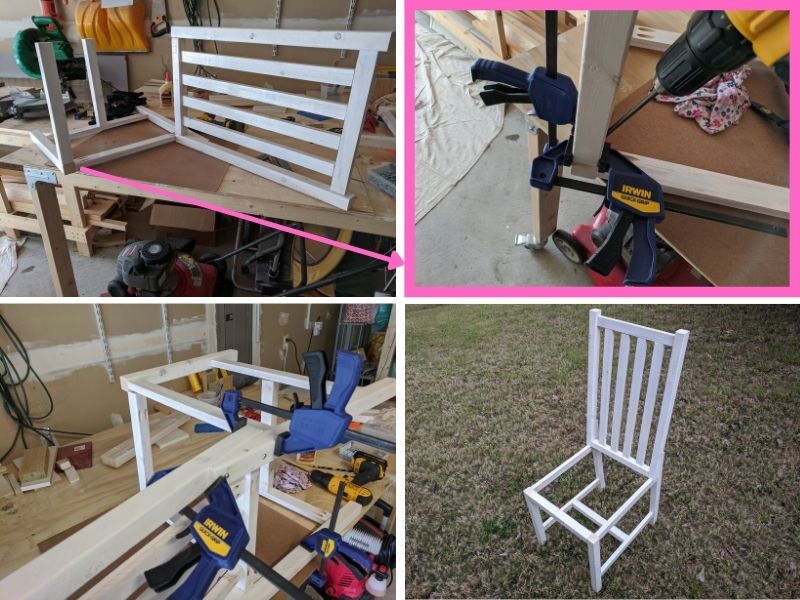
Step 3: Assemble the backrest
Three of the 2″ x 2″ pieces, and five of the 1″ x 2″ were used to make the backrest.
One of the 1″ x 2″ pieces, the piece that joined the two 2″ x 2″ vertical sides of the backrest, was slightly sanded along the edges to make those edges rounded.
This smoothing was done because that was the piece I expected people to wrap their fingers around to lift the chair, and I wanted the grip to be comfortable!
All backrest joinery was done using pocket holes and glue.
See picture below for illustrations.
Blocks of scrap wood cut to appropriate thicknesses were used to make sure that:
- The spacing between the 1″ x 2″ pieces were consistent
- When a 1″ x 2″ piece was attached to a 2″ x 2″ piece, the former was attached to the middle of the sides of the latter
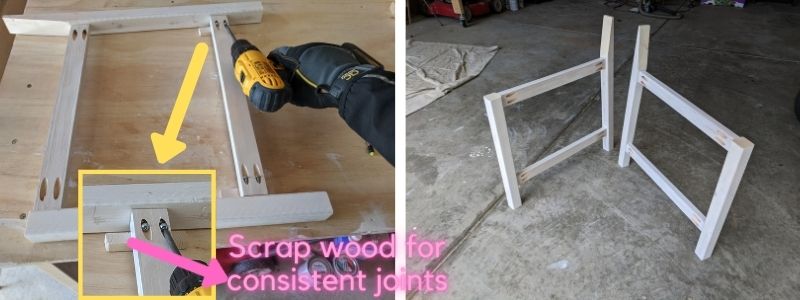
Step 4: Assemble the leg components
In this step, I assembled two leg components, each consisting of a front leg and a back leg.
Each leg component assembly consisted of 4 pocket hole joints, as illustrated in the picture below.
Each pair of front and back legs were connected using two 1″ x 2″s.
One of the scrap wood pieces used to get consistent joinery in the backrest assembly was used here too, to ensure that the 1″ x 2″ pieces were consistently attached to the middles of a sides of the 2″ x 2″ pieces.
The height of the bottom 1″ x 2″ pieces from the floor was carefully measured to maintain the angles of the legs w.r.t. the floor. See the plan for this project for the angles and measurements.
Note: The pocket holes on the 1″ x 2″ pieces were drilled such that they would appear on the “inside” of the leg assembly, as shown in the picture below. This was done so that the holes would hide from view as much as possible, to minimize the number of hole plugs I’d need to use.
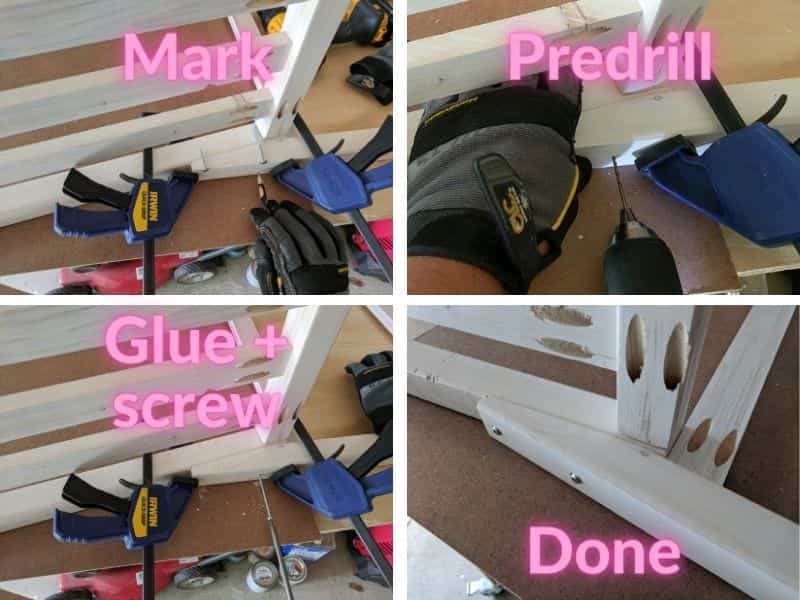
Step 5: Assemble the entire frame
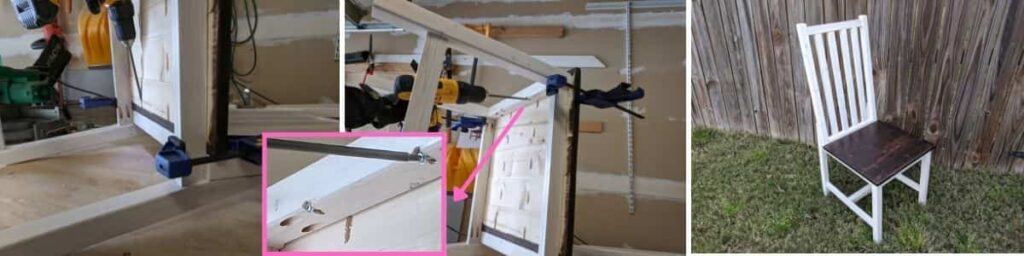
It was now time to attach together the backrest assembly, the two leg components, and two additional 2″ x 2″ cross pieces to assemble the entire frame of the chair.
It was very important for the joints between the backrest and back legs to be very sturdy, as those joints would be subject to a lot of stress as folks would lean back on the chair.
I used glue and 2 screws, one 1.25″ and another 2.5″, for each joint.
The picture below illustrates the joints.
First, the screw locations were carefully marked to ensure the screws wouldn’t stick out!
Then, I predrilled the holes at the marked locations.
Finally, the screws were carefully inserted.
Two clamps were used as shown in the picture below to stabilize the joints throughout the process.
Even though the joints weren’t pocket holes, I used pocket hole screws here. The round head of these screws ensured a tight joint as the screws tightened.
The resulting joints were sturdy and clean-looking.
After the backrest was attached to one of the leg components, the 2″ x 2″ cross pieces were screwed into that leg component, as shown in the picture below.
Here too, the pocket holes were places such that they would hide from view as much as possible, e.g., in the back, for the 2″ x 2″ cross piece that connected the two front legs, as shown in the picture below.
After the cross pieces were screwed in, the other leg component was also screwed in, to complete chair frame assembly.
It was now beginning to look like a chair! 😎
Step 6: Assemble and attach the seat
The seat was made from 5 pieces of 1″ x 4″, attached to each other via pocket holes and glue.
Two pocket holes were cut on each of the pieces, as shown in the top panels of the picture below.
The pieces were then attached to each other via the pocket hole joints (the 1.25″ pocket hole screws) and glue.
During these joinery, each piece was pressed against a straight piece of scrap wood clamped onto the table, to get even edges on all sides of the seat.
Note: I could have used plywood for the seat. As I have described in detail in my plywood vs. MDF comparison, plywood would be sufficiently strong enough for the seat. However, the smallest plywood sheet available in big-box stores is 24″ x 24″, which would be too big. Cutting plywood would require another power tool (a jig saw or table saw), which I did not want to introduce into the project, in the interest of minimal power tool usage. Also, putting the seat together using slats of 1″ x 4″ solid wood would be aesthetically more pleasing.
The top surface (the one without the holes, of course), edges, and corners of the seat assembly were then sanded down to make the seat comfortable.
The sandpaper used here also was 120 grit.
The sitting surface and sides of the assembly were then treated with Varathane Kona stain, to obtain a luxurious brown color.
I used a rag for the staining.
See the picture below for details.
Note how the pocket holes on the one of the 1″ x 4″ pieces (the leftmost pieces in the top right panel in the picture above) were not used in assembling the seat.
These holes were used to attach the seat onto the chair frame, specifically the bottom 2″ x 2″ cross piece of the backrest, as shown in the left panel in the picture below.
The front portion of the seat was also attached to the frame, specifically using pocket holes drilled laterally into the 2″ x 2″ piece that connected the 2 front legs, as shown in the middle panel in the picture below.
Note: As you can guess, it was important to drill the lateral pocket holes on the 2″ x 2″ before starting the installation of the seat. The pocket hole jig I have needs to be clamped onto the wood, and I couldn’t do that clamping if the seat was in the way.
The seat installation completed all wood assembly.
The resulting DIY farmhouse chair was something my wife and I were super happy about!
Note: There’s no need to cover the pocket holes used to assemble the seat because these holes will be facing down out of sight. But if you’re inclined to cover them up, refer to this detailed comparison of different ways to cover pocket holes.
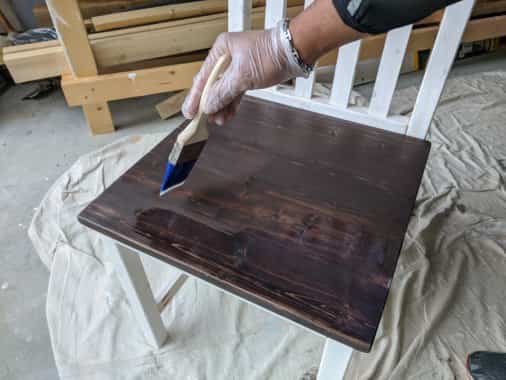
Step 7: Finish the seat with polyurethane
The final step was to apply finishing touches.
This involved applying a coat of polyurethane to the top and sides of the seat.
I used a brush to apply the polyurethane.
Picture below illustrates this.
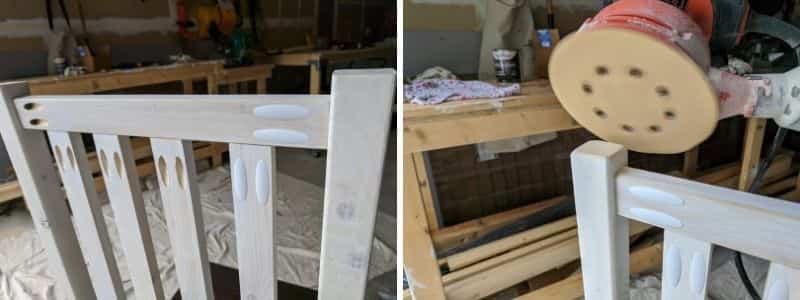
Step 8: Plug the pocket holes and smooth the tops of the backrest
In the final step, I applied finishing touches.
This involved plugging the pocket holes that were easily visible.
Also, the edges and corners of the tops of the 2 vertical 2″ x 2″s that made the sides of the backrest were sanded to make them smooth and round.
The picture below illustrates these steps.
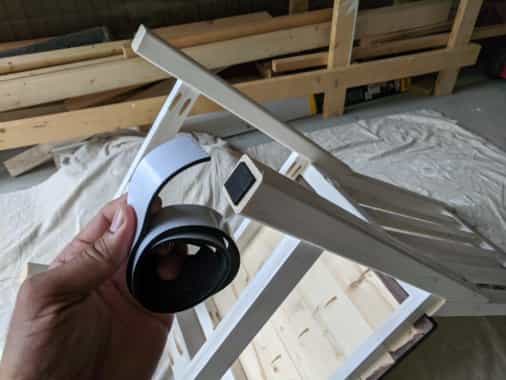
Optional step: Pad the bottoms of the legs
If you have wooden floors that you want to protect, attach a small piece of foam or felt pad to the bottom of each leg.
I used this 1″ adhesive foam available from Amazon.
Below is a picture of how the foam looked like for me.
This step is similar to the one for the king-size platform bed I built.
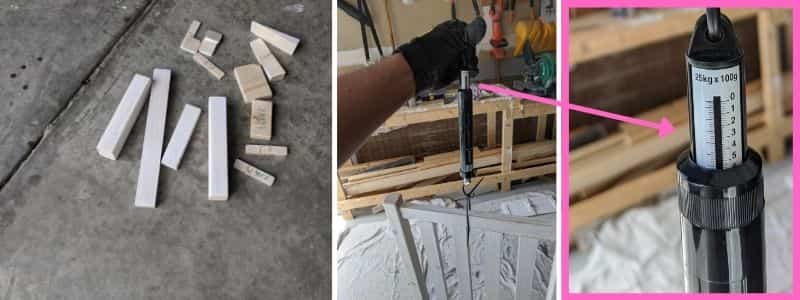
Optional step: Pat yourself on the back for the lightweight build with minimal material waste
As I mentioned in the beginning of this post, minimizing material waste in the form of scrap wood was one of my criteria for making this plan.
All of the waste from this project is shown in the left panel of the pic below.
I’d normally use the material waste for a backyard fire, but since most of the wasted wood was already stained (not safe for burning), I decided to save most of them for future use as scrap wood in various projects.
Another criterion I had was that the chair would be lightweight.
At 13.2lb (6kg) as shown in the middle and right panels of the pic below, the chair was indeed lightweight, especially considering that it was tall, wide, and made of solid wood.
Optional step: Adding a seat pad for a farmhouse chair with cushion
As mentioned at the beginning of the post, my wife and I did not want upholstery on the chair, as any upholstery tends to trap food crumbs that our kids spill all the time.
We found the chair very comfortable without any cushioning.
But, if you are looking for a farmhouse chair with cushion, the plan and build in this post will work for that purpose as well.
Simply buy a cushion or seat pad separately and install it, e.g., this no-slip chair cushion available on Amazon.
One caveat though, the cushion will hide most of that beautifully stained and finished seat. 🤔