How to build a temporary wall to divide a room for a private office or bedroom

My wife and I were ecstatic to find out in early 2020 that we were going to have a 3rd child!
New addition to the family meant we needed an extra, 4th bedroom to accommodate guests who would stay with us after the baby was born.
Our initial plan was to hire a contractor to separate our large dining room into a small dining room and a bedroom.
But once the COVID pandemic hit, we did not want to hire anyone, for social distancing reasons.
So, DIY was my only option. 😮
These were our main requirements for the DIY wall:
- The wall must be temporary. We wanted to have the option to take it down later, e.g., if we were to sell the house
- The new room must offer privacy (with door). The new room was to be used as the bedroom for guests. This meant we wanted it have to have as much privacy as any other bedroom in the house.
- The wall must be completely freestanding. Specifically, no changes made to the house, not even a single nail or screw driven on existing walls. If we take the wall down at some point, we wanted the dining room to look like the wall was never there!
- I should be able to put the wall up by myself without help. We were too pregnant for my wife to be able to lend a hand. 😊 And we didn’t want to call a friend to help for social distancing reasons during the COVID pandemic.
After drafting these requirements, I could already tell that this was to become my most challenging project to date.
But it was totally worth it in the end. We saved a ton of money, and I gained a lot of experience and confidence. 😎
You too may be looking to create a new, private space in your bedroom, garage, or basement during these days of quarantining, e.g., a private office to work from home or rented apartment. If you are, then read on for the details of my project. 😊
Note: The dimensions of the space where you’re planning to place the walls will likely differ from mine, so you won’t be able to adopt my plans as they are. But you will be able to take inspiration from the elements of my project, to design a new wall that fits your needs.
Supplies and cost*
*Cost as of Jan 2021 when supplies were expensive, due to the prolonged economic impacts of the COVID pandemic. I built the wall in August 2020 when the costs, especially of lumber, were less than below.
| Item | Count | Price | Store |
| 2″ x 4″ x 8′ lumber | 26 | 26 x $5.25 = $136.5 | Home Depot |
| 2″ x 4″ x 12′ lumber | 3 | 3 x $9.5 = $28.5 | Home Depot |
| Faux brick wall panel | 9 | 9 x $34.5 = $310 | Lowe’s |
| Shims packet | 1 | $1.5 | Home Depot |
| 30″ x 80″ Prehung door | 1 | $100 | Home Depot |
| 1″ x 3″ x 8′ Common board | 3 | 3 x $4.5 = $13.5 | Home Depot |
| 2″ x 2″ x 8′ lumber | 2 | 2 x $2.5 = $5 | Home Depot |
| 1/2″ 2′ x 2′ Plywood | 1 | $9.5 | Home Depot |
| Varathane Antique White wood stain (1 qt) | 1 | $9 | Home Depot |
| Varathane Dark Walnut Classic wood stain (1 qt) | 1 | $7 | Home Depot |
| 2.5″ Kreg pocket screws (250 pack) | 1 | $21 | Amazon |
| Double-sided heavy-duty removable tape (2 pack) | 1 | $15 | Amazon |
| 1″ adhesive foam strip (2 rolls) | 1 | $17 | Amazon |
| Remote control outlet kit | 1 | $18 | Amazon |
| Privacy door knob | 1 | $10 | Amazon |
Total cost of supplies: $701
Power tools required
- Miter saw
- Power drill
- Jig saw
How to build it
Step 1: Survey the wall location in detail and create a 3D model
For a project as complex as this, it really helps to carefully measure the location of the wall, and build a detailed 3D model before you start buying and cutting supplies.
Shown below was the half of our large dining room that we wanted to wall off.
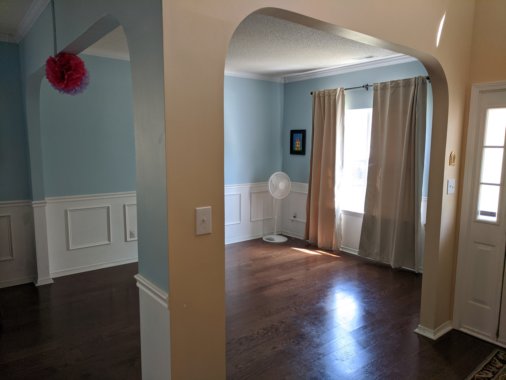
Note the baseboards and chair rails. These complicated the design a lot. The temporary wall panels and frame would need to go around these!
Also note the pillars and the arches. These worked to my benefit. Pillars would provide surfaces for the wall to press against. Arches meant my wall would not need to go all the way to the ceiling.
Fact: Surveying the location and making a detailed cut plan of all components that would make the wall was the most time consuming part of the project. I spent a few hours every evening for a month doing this.
I use FreeCAD for all my modeling needs. It’s a completely free, open source, and fully featured CAD modeling software.
In contrast with other popular free CAD modeling software like SketchUp Free, you own your FreeCAD models 100%.
My design was to build an L-shaped wall. The 2 sides of the L would be connected with long, diagonal beams to stabilize the wall.
A snapshot of the model I created is below.
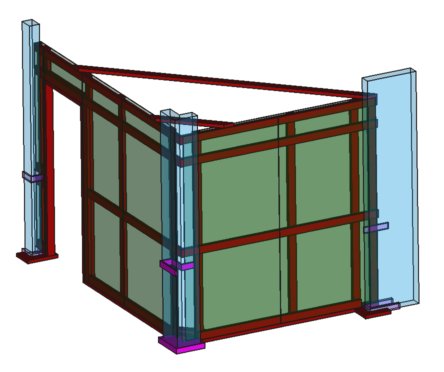
To fit my space, I had the following overall dimensions for my wall:
- Length of the side with the door (the long side of the L-shape): 11′ 3″
- Length of the other side (the short side of the L-shape): 8′
- Height of the wall: 8′
Step 2: Get the supplies
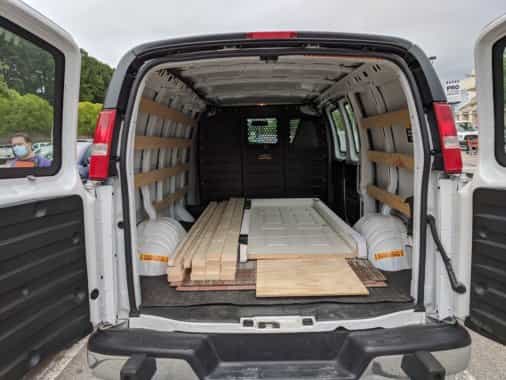
Since I didn’t have a pick up truck, getting the supplies from the big-box store by itself was a major phase of the project for me! 🙄
After doing some research, I settled on renting a U-haul van.
I rented a U-haul van for 3 hours. It cost me $36.64. Not only was this cheaper than renting a truck directly from Home Depot for the same duration, I also had the ability to reserve the van in advance, something Home Depot doesn’t let customers do.
I did not purchase any of the extras with the van rental, like insurance, as my car insurance + credit card covered all that for me.
Note: I recommend renting a van (for example, from Home Depot or U-Haul) as the most beginner-friendly way to get the large-sized lumber supplies needed for most beginner projects. With a van, you need not worry about tying anything down since the cargo compartment is closed. You also don’t need to worry about the weather.
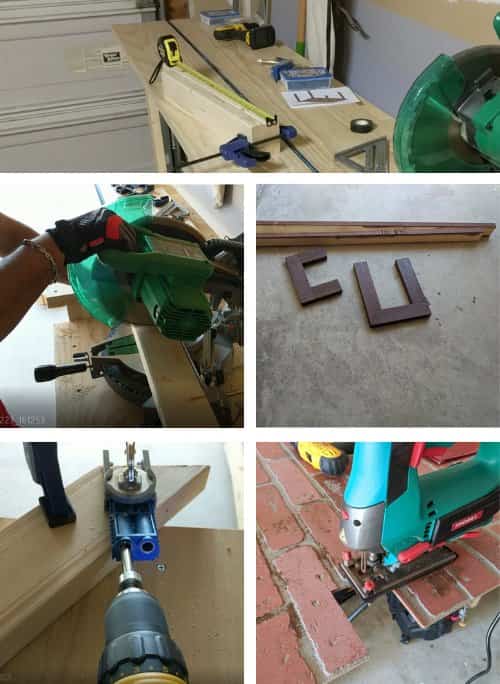
Step 3: Prepare the lumber and wall panels in the garage
We have small children running around in the house. We could not have any unstable, partially finished wall structures inside the house as small kids won’t mix well with those. 😆
I had to get the wall structure to a stable, freestanding state as quickly as possible once I started assembling things inside the house. I aimed to do this in 1 day.
This meant that I had to prepare all the materials in advance in the garage.
Even if you don’t have small children, I’d recommend you prepare things in the garage in advance to keep clutter and dust out of the house!
The preparations involved:
- Careful measurements of lumber and wall panels
- Miter cuts of lumber, and cutting and ripping of wall panels using the jig saw
- Staining the base plates where the wall made contact with the floor. There were 2 types of base plates:
- Type 1: straight pieces of lumber.
- Type 2: U-shaped pieces that wrapped around the pillars to stabilize the 2 ends of the wall. These U-shaped pieces were assembled using pocket holes.
- Lots of pocket holes
Have you enjoyed this post thus far? Do you have any questions or suggestions for improvement? Please leave a comment below. I’d love to hear from you.
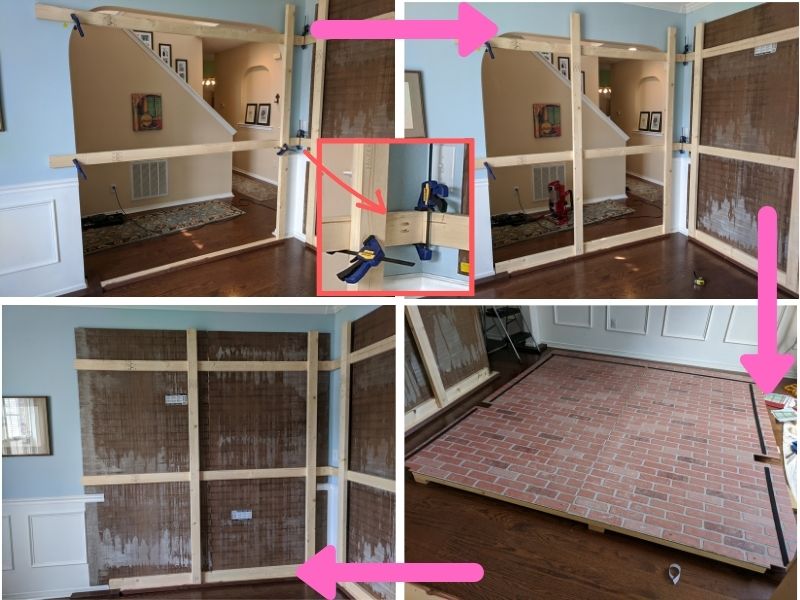
Step 4: Erect the frame and some panels of the long side of the wall
Once I prepared all the components in my garage, it was time to start assembling.
The assembly started with erecting the frame and some panels of the long side of the L-shape.
Step 4A: Install the base plates
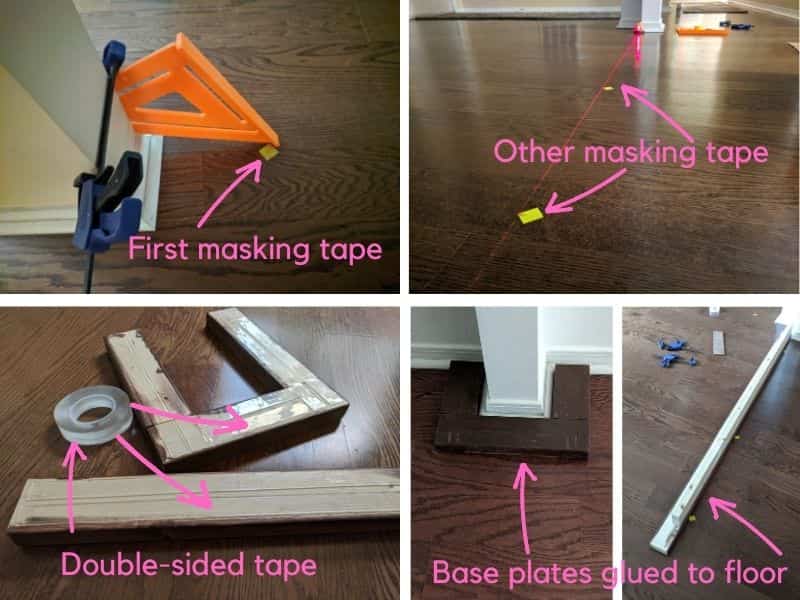
The base plates for the long side were installed by sticking them to the floor using strong, removable, double-sided tape (see supplies list above).
Prior to the installation of the straight base plate, its location was carefully marked with pieces of masking tape.
A straight edge square clamped to one pillar guided the first piece of masking tape.
The other masking tape piece locations were guided by a laser beam that touched the first masking tape piece and the other pillar.
These steps are illustrated in the pic below.
Fact: I mentioned above that the detailed planning and 3D modeling for this project was the most time-consuming aspect of it. The second most time-consuming aspect was figuring out the detailed step-by-step process for assembling the components inside the house. I couldn’t just assemble the 2 sections of the wall on the floor and erect it one by one – they would be too heavy for me to do it on my own. And, I didn’t want to call a friend for social distancing reasons during COVID. This meant I had to figure out a sequence of steps to erect the wall one small component at a time. I designed the steps below keeping this in mind.
Step 4B: Erect the wall panels that touch the arch
Of all the components, the wall panels were the heaviest and the most awkward to handle. Each panel weighed approximately 35lbs.
Fortunately, I could figure out a way to erect the panels separately for the longer side of the wall.
The first panel was erected by screwing its bottom to the base plate assembly and clamping the top to the arch. See pic below.
A simple L-shaped jig was made to support the wall on one of the vertical sides.
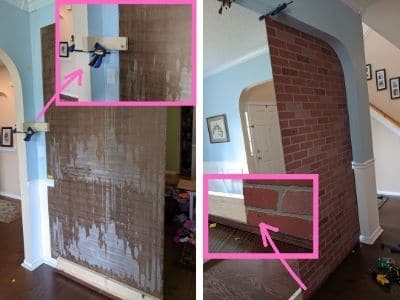
Before the panel was erected, the parts of it that touched the wall were padded with the stick-on foam (see supplies list). This cushioning was to prevent it from scraping the paint and damaging the wall.
See pic below.

Step 4C: Erect the frame and the next wall panel
In this step, I first erected the long (~12ft), top beam into position using clamps. See top left panel of the pic below.
I erected the top beam by itself as it’s almost as wide as the room, and heavy. I didn’t want to have to erect it attached to something else.
A small piece of wall panel was attached to this beam (see right side of the beam in the pic) so I wouldn’t need to stick it in later.
Following that, the 2 vertical bars were screwed into the base plate as well as the top beam. See top right panel in the pic below.
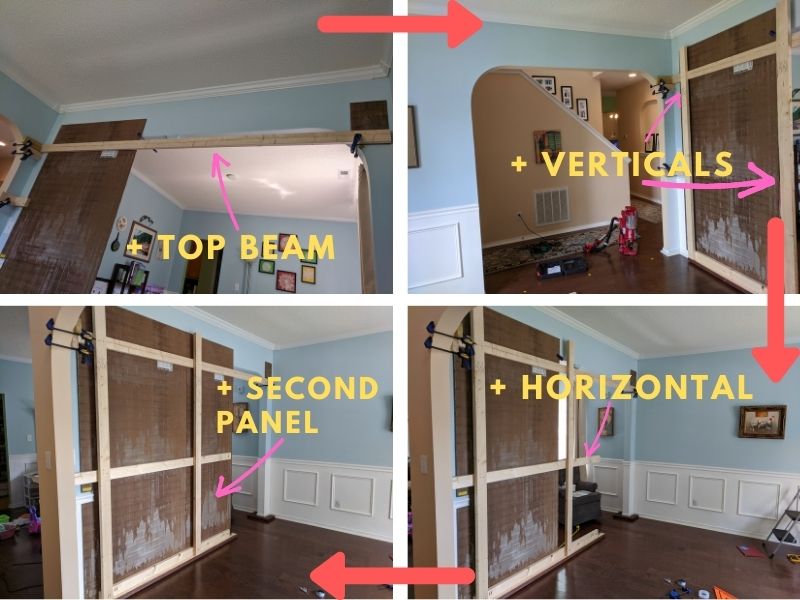
Next, I attached a middle, horizontal beam to the 2 vertical beams. This is shown in the bottom right panel in the pic above.
Finally, a second wall panel was screwed into position.
The entire structure was held in place vertically by 3 clamps!
The holding strength of 3 clamps was enough for me to continue working.
But I wouldn’t be leaving it like that overnight, especially with kids running around the house! 😅
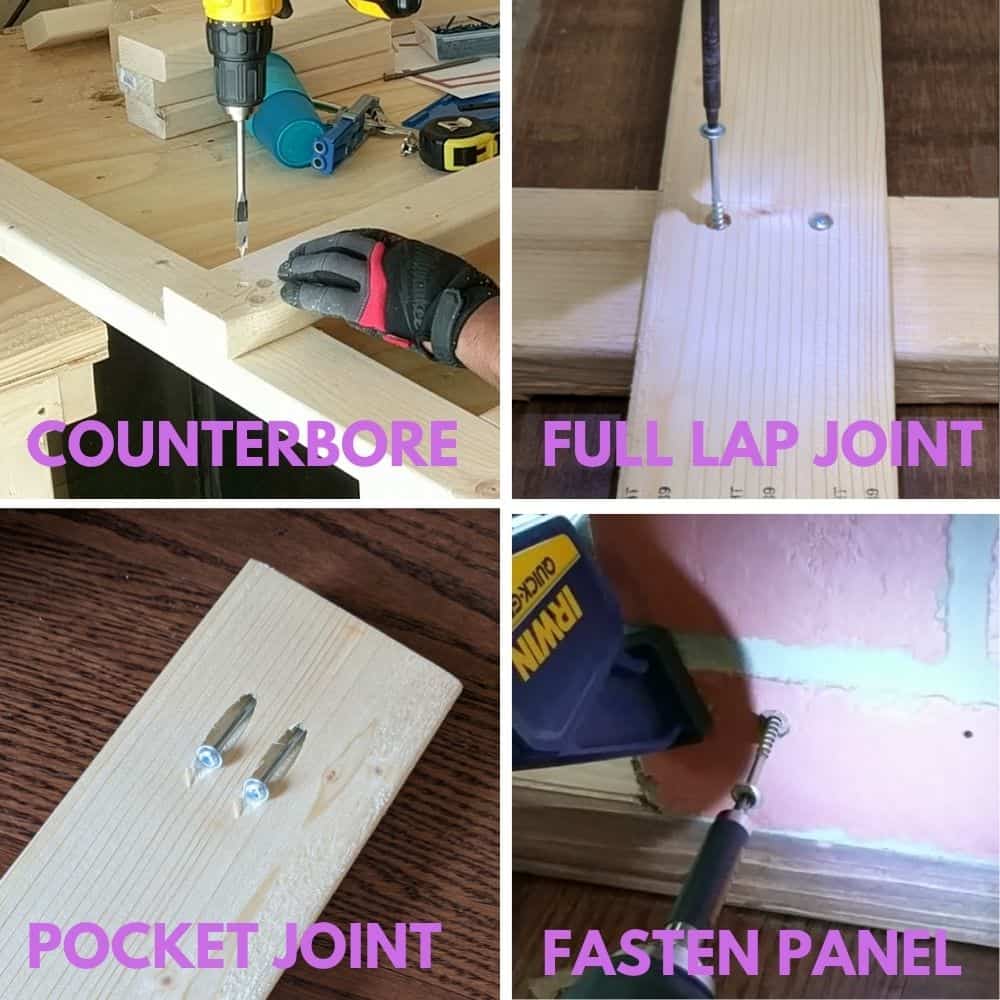
Note: I used round-head washer screws with short thread length everywhere on this project. These screws’ heads have a flat underside and longer smooth (non-threaded) shank near the head, which bind wood pieces together as you tighten it. Typical flat-head deck screws and general construction screws do not do these characteristics. Since I did not want the round-head screws to stick out, I used a 3/8″ spade bit to drill counterbores before driving the screws. See pic below for more info around the joints used in this project.
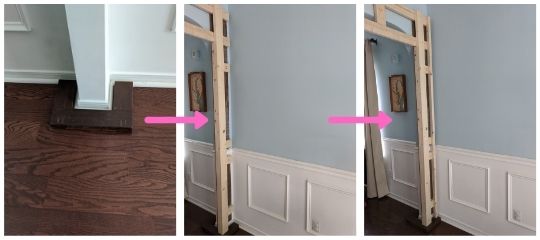
Step 5: Erect the frame and some panels of the short side of the wall
I felt a big relief after I erected the long side of the wall as in the previous step. My plans seemed to be working!
I wanted to erect the short side of the wall such that its frame, especially its horizontal 2x4s, aligned with those of the long side perfectly. This alignment would enable me to join the 2 sides using pocket holes.
To do that, I first glued the base plate onto the floor as I did for the long side (see previous step)
Then I clamped on 2 horizontal and 1 vertical bars such that the alignments were perfect. See top left panel of the pic below.
Next, I screwed on the vertical bar I erected above, and also added another vertical bar and horizontal bar (for the bottom). This is shown in the top right panel in the pic below.
Note: The pocket hole in the inset below isn’t screwed on just yet. The 2 halves of the wall aren’t attached to each other – the short side is held in place only by clamps. Also, the long side that I erected in the earlier step is not help in place vertically by 1 clamp. 😲 But not for long!
Once I had the frame of the short side aligned perfectly with that of the other side, it was time to take the former and attach panels to it (bottom right panel of the pic above).
Once the panels were attached, I lifted the entire thing back in place, and screwed it into the other section using pre-drilled pocket holes. See bottom left panel in the pic above.
Note: I expected the shorter section of the wall to be light enough for me to lift. And I was relieved to find out that I was right! The horizontal bars in this section provided a place for me to hold the section as I lifted it off the floor and onto the base plate.
Note in the pic above that the clamps are now taken off! Yay!
It was at this point that I knew for sure that the project would succeed, phew!
Of all the criteria that I had when I set out to do the project, the “no screws or nails driven into existing walls” criterion added a lot of complexity to the project. But I adamantly kept that criterion for 3 reasons:
- This is by far the most complex project I’ve done. I didn’t know when I set out the build whether or not I’d be successful. Up until this point in the build at least! I wanted to have the option of stopping the project at any time without leaving any blemishes on the walls.
- While it’s true that a lot of people can easily fill any nail holes in a wall, I know from experience that I suck at that job. I’ve never mastered the “swiping” of plaster, sanding it, and painting it to make it look like a hole was never there. I knew I’d leave visible marks on the wall if I were to fill holes.
- Finally, I just love a challenge. The design and engineering effort required to solve the no screws or nails problem only made me want to do it even more.
Have you enjoyed this post thus far? Do you have any questions or suggestions for improvement? Please leave a comment below. I’d love to hear from you.
Step 6: Stabilize the basic wall frame by adding diagonal bars
In this step, I added additional horizontal bars at the top on both sections of the wall.
I also added a vertical bar to the shorter section.
See orange arrows in the pic below for these horizontal and vertical bars.
Then I added diagonal bars at the top and bottom, making the wall stable and freestanding.
Yellow arrows in the pic below point to these diagonal bars.
Out 9′ ceiling was less than a foot away from the top bar, so there wasn’t enough space to use a drill to tighten the top diagonal bars.
I had to tighten the diagonal bars at the top with a hand wrench. Needless to say, those 8 screws (2 per each end of each diagonal bar at the top) took for ever to tighten! 😋

Fact: Step 4, 5, and 6 of the assembly were completed in a single day. Once I started the assembly in step 4, I didn’t want to stop until I had the wall in a stable, freestanding state because of safety reasons, especially with small kids running around the house! Completing step 6 was a huge relief! I called it Phase I of the project. It was completed on a Saturday. I took a break and put the project off until the next weekend.
Step 7: Build the frame for the hinge side of the door
The next major step was to build a stable, strong frame for the hinge side of the door.
First, I needed a stable base plate for the frame.
I had build a U-shaped base plate for this purpose. This plate was glued to the floor as I did for other parts of the wall. See first panel in the pic below.
Next, I built an assembly out of 2x4s, wall panel pieces, and 2x2s according to my 3D model, and erected that in place on top of the base plate.
The long, 12ft top bars of the long section of the wall stabilized the top of this assembly.
The base plate, of course, stabilized the bottom of this assembly.
Having a detailed 3D model to follow was crucial to the success of this step.
Step 8: Finish frame assembly and add wall panels
Once the basic L-shape frame was up and hinge side of the door was built, the rest of the frame was relatively straightforward.
Components were prepared in the garage and brought into the house to be added to the wall one by one.
These included:
- Pieces of wall panels
- Pieces of 2x4s to be added to the frame to provide additional locations to screw in the wall panels
- Additional vertical bars to support a corner shelf
- The corner shelf pieces
The pic below shows these steps.
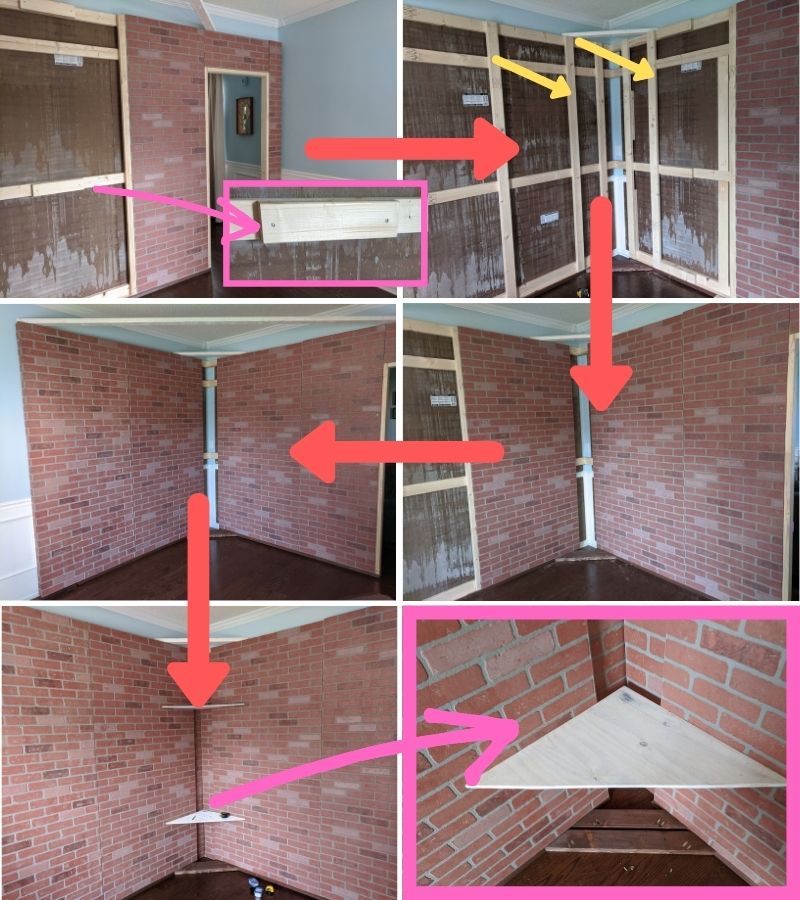
I really enjoyed this step as a clean-looking wall was taking shape and everything was fitting together nicely.
Since I was planning to make this into a bedroom, the bottom corner shelf would become an end table. Pretty simple set up that would prove useful for our guests.
I chose plywood over MDF for the corner shelves because of the advantages of the former when compared to the latter.
After step 8, the wall was looking great. I considered this as another phase of the project completed. I took another week-long break.
Note: I found it important to do this complex project in phases, each phase completed over a weekend, taking week-long breaks in between. I’d recommend you do the same for a similar project. All the little details of the project can be a bit overwhelming. The long breaks help reset the mind and body. Getting rest also makes it safer to operate different power tools.
Step 9: Install the pre-hung door and door knob
I was able to distill basic instructions from the numerous YouTube videos available to install the pre-hung door.
The videos I found most helpful were these:
Since there are numerous resources already available for door installation instructions, I will list only the major steps here, with any project-specific modifications I made. The are:
- Pad the rough opening from the inside of the room with 1″ x 3″ boards, increase the wall thickness around rough opening (top left panel in the pic below). This is because split-jamb pre-hung doors are made for standard wall with thickness slightly more than 4″, but my wall was only 3.5″ thick.
- Cut 1.5″ off the bottom of the trim portion of the jamb on the hinge side to accommodate my base plate. I used a hand saw to do the job (see middle right panel in the pic below).
- Install the hinge-side of the half of the jamb with the door attached to it, using shims and a long level to make sure the hinge side was plumb. See middle left panel in the pic below. Most tutorials out there recommend nails for the installation, but I used trim-head 2.5″ screws after pre-drilling the jamb.
- Screw in the horizontal and the vertical strike side of the installed half of the jamb, using shims and levels to correct alignment. Also make sure the gap between the door and jamb is even throughout. See top right panel in the pic below.
- Screw in the other half of the jamb. See bottom left panel in the pic below.
- Finally, install the privacy door knob. Installing door knobs is fairly straightforward. Here’s a video that I followed for this step. You can find many others on YouTube.
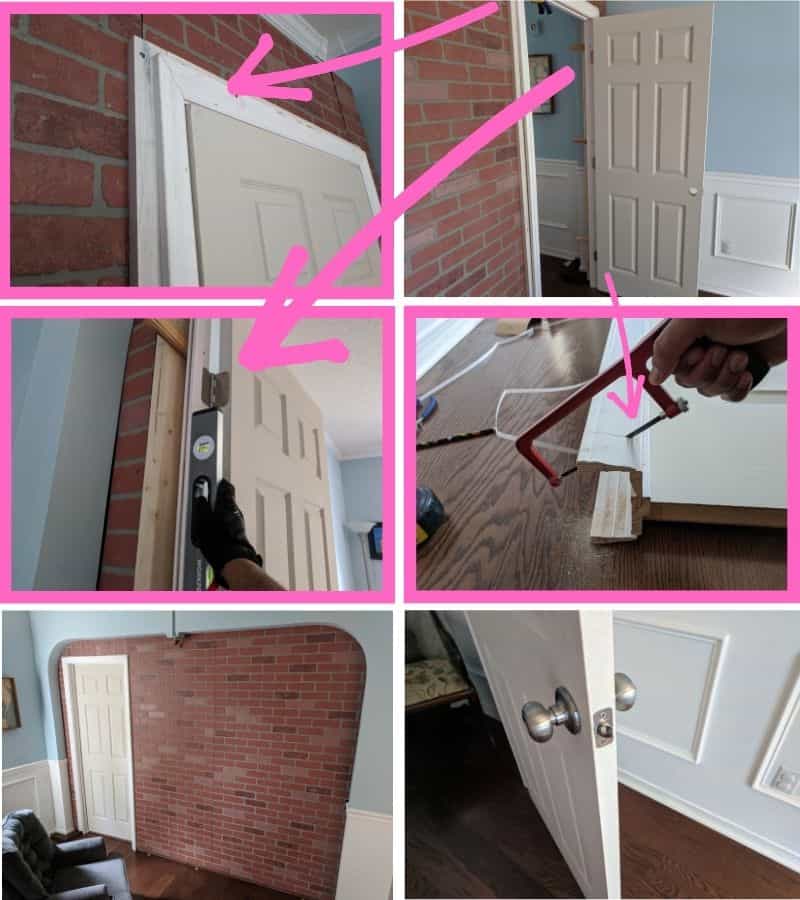
All in all, my first door installation was a great success.
I was able to achieve a nearly uniform 1/8″ gap between the door and the jamb.
Given that doors often settle over time and expand with humidity, and it’s cumbersome to fix doors that rub against the jamb as I have described in another post, I was very happy with the result of my door installation efforts.
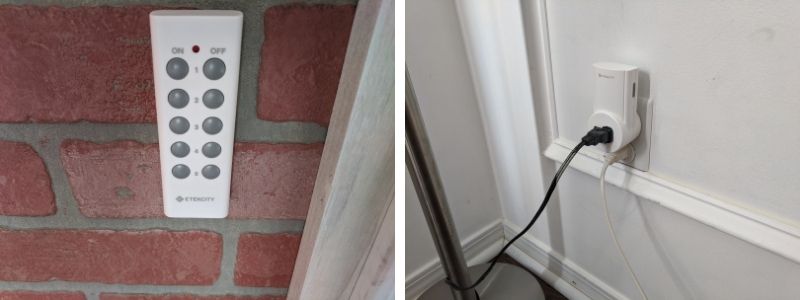
Step 10: Install the remote control outlet kit for lights and fan
Your room will likely need its own fan and lights.
Instead of doing any electrical work inside the temporary wall, a quick and easy way is to install an electrical switch on the wall is a simple remote, wireless outlet kit you can purchase online (see my supplies list).
The kit will come with a remote you can attach to the wall next to the door using the same double-sided tape used for the wall base plates. See left panel in the pic below.
The kit will also come with multiple outlet adapters through which you can plug in lights and (standing) fans in the room.
The switches on the remote will then control the appliances. Pretty simple, right? 😎
Once the room was finished, I even built a king-size platform bed frame under $100 to put in the room.
I may in future build a vertical bookshelf like this one to go with this room.
Have you enjoyed this post? Do you have any questions or suggestions for improvement? Please leave a comment below. I’d love to hear from you.