Stupid Simple DIY Sandbox Perfect for 2 Kids

My wife and I both have fond memories of playing in a sandbox growing up.
Well, for me it was just a huge pile of sand the contractors left behind after building my parents house, but whatever. 😏
We definitely wanted to our children to have a sandbox in the backyard. At the time of this build we had two kids: 2 beautiful twin girls!
It was only my 2nd woodworking project.
When I started looking for plans online, I was appalled by how complex and expensive those plans looked.
It shouldn’t be this difficult, I thought.
So I made my own plan, with the most inexpensive yet safe components I could come up with.
Hope this post inspires you, and helps you save some money too.
Note: I have used similar materials and plans to make a (stupid simple) raised garden bed. If you’re interested in that, check out the plans here.
Supplies and cost*
*Cost as of Dec 2020 when lumber was expensive, due to the economic impacts of the COVID pandemic
| Item | Count | Price | Store |
| 5/8″ x 5.5″ x 6′ Cedar dog ear fence picket | 4 | 4 x $3.5 = $14 | Lowe’s |
| 2″ x 4″ x 8′ Cedar | 1 | $10 | Lowe’s |
| 1″ x 6″ x 8′ Cedar | 1 | $18 | Lowe’s |
| 1.5″ Deck screws | 1 pack | $9 | Lowe’s |
| Landscape fabric | 1 roll | $20 | Home Depot |
| Play sand (50lb bag) | 13 | 13 x $4.8 = $62 | Home Depot |
| Playset anchor | 4 | $14 | Amazon |
Total cost of supplies: $147
Power tools required
- Miter saw
- Power drill
How to build it
Step 1: Make the sandbox frame
The frame is really simple.
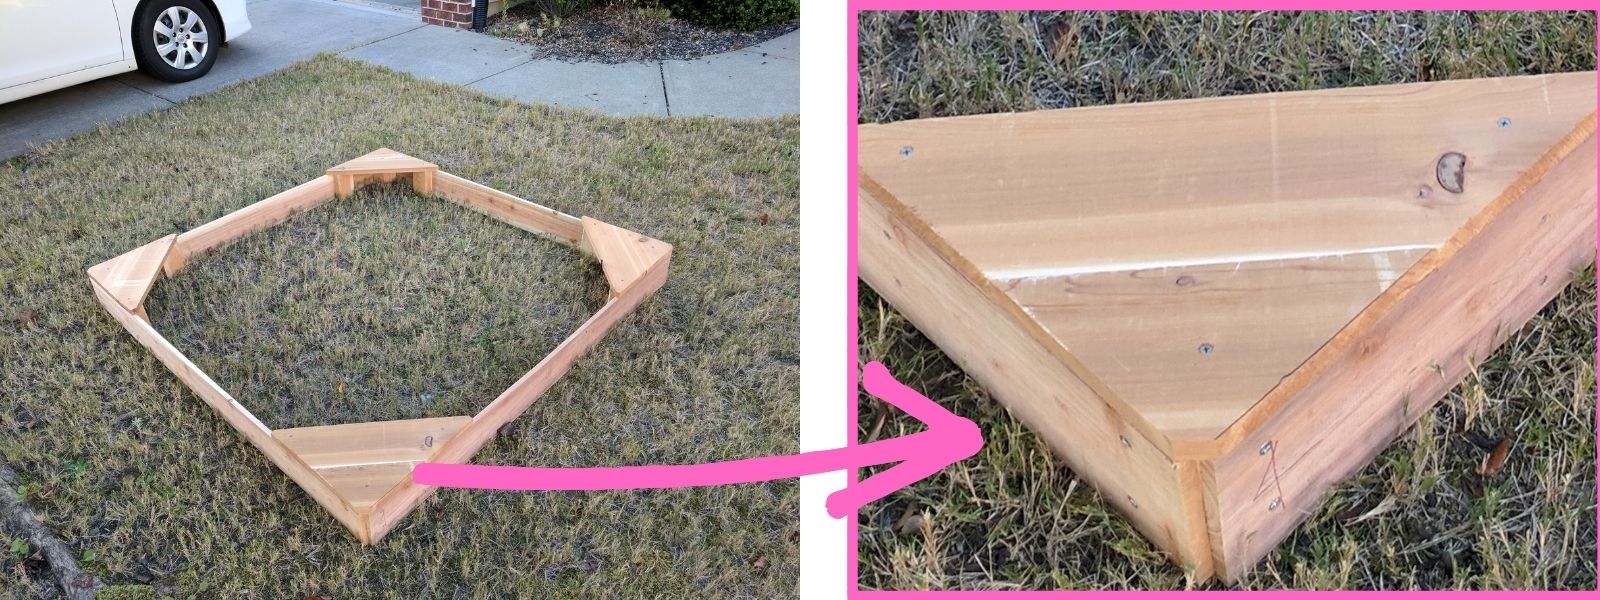
Cut the 4 fence pickets to 5ft length. Remember to cut off the side with the “dog ear.”
Then join them to make a square similarly to the picture below.
You would the fence boards to 2″ x 4″ cedar blocks cut to 5.5″ length at the corners to do this joining. Simple right?
Note: I used 4″ x 4″ Douglas Fir blocks in the picture below at the corners because I had some of that lying around the garage. But you can use the 2″ x 4″ cedar blocks so you don’t have to buy another piece of lumber. The 2″ x 4″ blocks will work just fine – just be careful as you drive the screws as one side of the block will be only 1.5″. You can also join 2 2×4 blocks to make a 3″ x 3.5″ block that looks just like the 4″ x 4″ Douglas fir blocks I have in the picture. Either way, offset the screws as you attach them so that they don’t run into each other. 🤔
After the make the square, add one 2″ x 4″ cedar block on either side of each corner (8 blocks total) as shown in the picture below. These additional blocks will support the corner seats.

Step 2: Attach the corner seats
Cut 4 triangle and 4 trapezoid pieces from the 1″ x 6″ cedar board.
Screw on one triangle piece and one trapezoid piece at each corner to form a seat, as shown in the picture below.
I found that 3 screws total in each corner is sufficient.
Each of the 3 screws would pass through the cedar board and into the cedar block underneath it.
Chop off and sand the corners of the 1″ x 6″ cedar board pieces so that they don’t become a safety issue for little hands and feet playing in the sandbox. ❤
Have you enjoyed this post thus far? Do you have any questions or suggestions for improvement? Please leave a comment below. I’d love to hear from you.
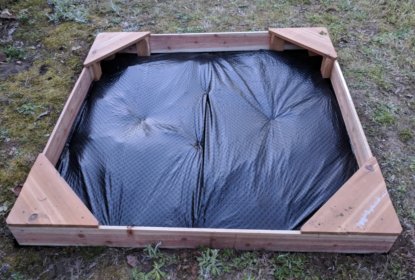
Step 3: Install the sandbox
Find a flat 5′ x 5′ area of your backyard where you’d like to have the sandbox.
Lay down landscaping fabric over the area.
Install the sandbox over the fabric.
You’re almost done!
Step 4: Fill with sand
Now you’re ready to fill the sandbox with sand!

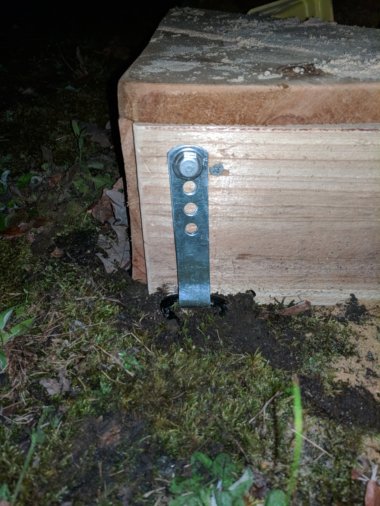
Step 5: Anchor the corners
Once filled with sand, the sandbox will not move across the ground, but it can still be lifter off the ground, say by one of the corners.
As a safety measure against older kids perhaps experimenting by lifting a corner of the sandbox, anchor the corners using the playset anchors.
Follow the instructions that came with the anchors to install them.
Optional step: install a cover
If you’re living in an area where stray cats are common, you may want to install a cover on any sandbox.
Otherwise the felines may use the sandbox as their litter box!
Have you enjoyed this post? Do you have any questions or suggestions for improvement? Please leave a comment below. I’d love to hear from you.
Update after 3 years: how the sandbox is doing in 2021
In 2021, 3 years after it was originally installed in 2018, this sandbox is going strong in our backyard.
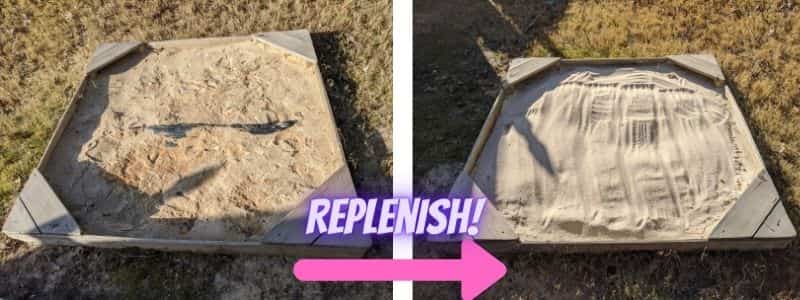
Our kids are fond of throwing sand out of the sandbox, so I’ve had to replenish the sand every year.
The pic below shows the sandbox before and after replenishment in the Spring of 2021. This round of replenishment involved 5 new bags of play sand.
You can see that the cedar boards are faded (which is normal), but still strong and intact 3 years after the original installment of the sandbox!