Economical Playset with Sturdy Swing Set, Climbing Wall, and Slide
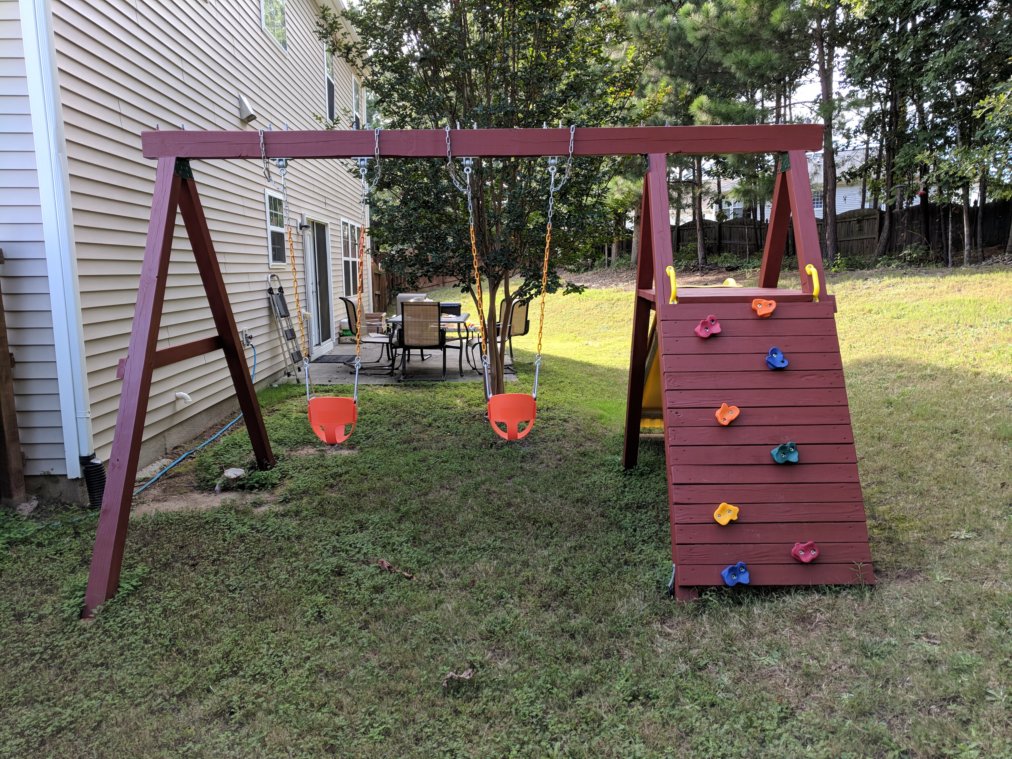
This playset is one of my most favorite woodworking projects!
Our kids have enjoyed it for years.
It has also been a major attraction in our backyard for our visiting friends and families.
A high-quality playset (with swings, slide, and climbing wall) will cost you upwards of $1000 if you were to buy it.
I built it for significantly less than that cost, not to mention the confidence and satisfaction I derived from doing so. 😎
Hope this article inspires and empowers you to build this playset or a playset like this for your family!
At the very least, this article should enable you to better evaluate the pros and cons of buying vs. building a playset to make a more informed decision.
Supplies and Cost*
*Cost as of Dec 2020 when lumber was expensive, due to the economic impacts of the COVID pandemic
| Item | Count | Price | Store |
| Pressure treated ground contact 4 x 6 x 12 timber | 1 | $30 | Home Depot |
| Pressure treated ground contact 4 x 4 x 8ft lumber | 6 | 6 x $10 = $60 | Home Depot |
| Pressure treated ground contact 2 x 4 x 8ft lumber | 30 | 30 x $5 = $150 | Home Depot |
| A-frame bracket | 6 | 6 x $12 = $72 | Amazon |
| Deck screw (#8 x 2-1/2 in) | 250 | $23 | Home Depot |
| 7 in. Screw Bolt Fasten System | 14 | 14 x $3 = $42 | Home Depot |
| Slide with safety handles | 1 | $110 | Amazon |
| Pair of swings | 1 | $50 | Amazon |
| Climbing hold | 12 | $25 | Amazon |
| Pair of swing hangers | 2 | $36 | Amazon |
| Exterior stain and sealant (1-2qt) | 1 | $20 | Lowes |
| Playset anchor | 6 | $30 | Amazon |
Total cost of supplies: $648
Power Tools Required
- Miter Saw
- Drill
- Sander
How to Build It
Step 1: Get the Supplies
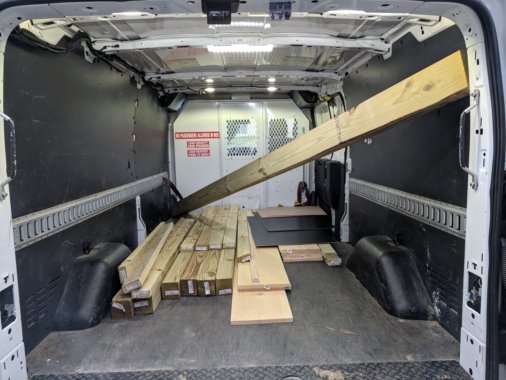
A standard sedan can haul only up to 8ft lumber. So, if you don’t have a pick up truck, the first challenge you’ll need to address is getting the 12ft beam from the lumber store.
I recommend renting a van (for example, from Home Depot or U-Haul) as the most beginner-friendly way to get the large-sized lumber supplies needed for this project. That’s what I did – see pic below.
With a van, you need not worry about tying anything down since the cargo compartment is closed. Note, you’ll need to place the 12ft beam diagonally in the cargo compartment.
Caveat: I have found over the years that some U-Haul vans aren’t big enough to carry a 12-ft beam even diagonally. If you’re not sure about the vans you have access to, rent a pick up truck after learning how to transport long lumber supplies in it. Alternatively, go to the rental facility and ask to measure the van before renting it. You’ll need to measure the length, width, and height of the cargo compartment, and use this formula to calculate the diagonal to make sure it’s at least 12ft.
Step 2: Make the A-frames
In this step, you’ll cut the 4 x 4s and attach them using the A-frame brackets.
Step 2A: Cut the 4 x 4s
Cut both ends of the 4x4s using the miter saw as shown in the picture below.
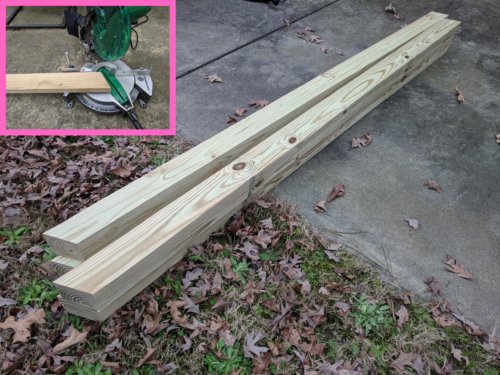
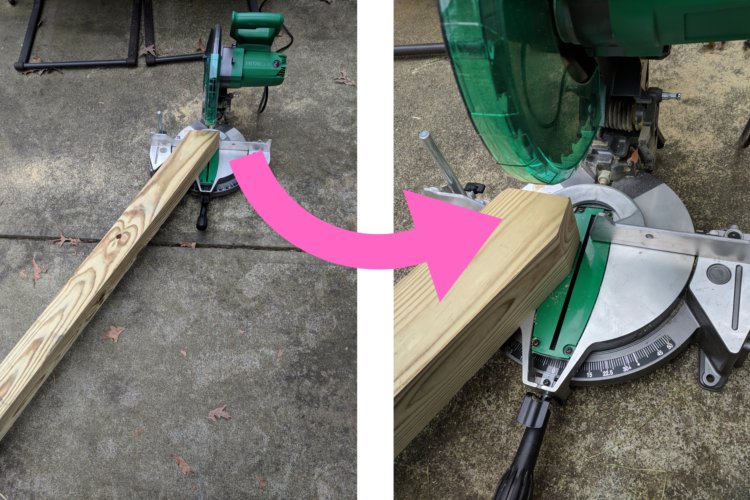
Then cut one end of the 4 x 4s perpendicular to its face as shown in the pic below. This is the end that will be used to fasten with the A-frame bracket to the legs of the “A”.
Note: This is a tricky cut. 🤔 Miter saws’ miter angles are typically limited to less than 60o cuts. Mine is limited to 53o. That’s why you’ll need to position the 4 x 4 this way for the cut. Take your time with it.
Step 2B: Fasten the A-frame brackets
Fasten the 3 pairs of 4 x 4s at their ends with 2 cuts using the 6 A-frame brackets.
Each “A” should be fastened with 2 brackets, one on either side. Make sure to align the 4 x 4s well. The face produced by the second cut above one one 4 x 4 should press firmly against that of the other 4 x 4, as shown by the dotted lines in the pic below. Do this on a flat surface – I did it on my backyard patio.

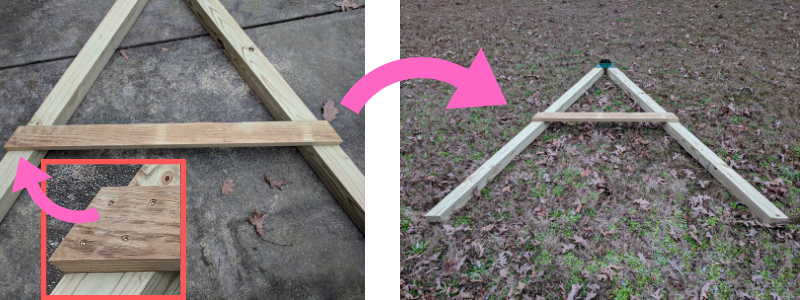
Step 2C: Connect the A-frame legs with cross bars
Now add cross bars (like the horizontal line in “A”) to connects the legs of each of the A-frames. These cross bars are necessary for the A-frames to support heavy vertical loads.
The ends of the cross bars should be cut at the same angle as the ends of the A-frame legs.
Each end can be screws on with 4 deck screws as shown below.
Two of the 3 A-frames should have cross bars at the same height. This will become the height of the horizontal platform between the climbing wall and the slide.
The 3rd A-frame’s cross bar can be connected mid-way between the top and bottom of the frame.
Have you enjoyed this post thus far? Do you have any questions or suggestions for improvement? Please leave a comment below. I’d love to hear from you.
Step 3: Prepare the location of the playset
Step 3A: Choose a location
Make safety your priority when choosing a location for your playset.
- Choose the flattest 12 x 8ft area that you can find in your yard. Don’t worry if you cannot find a flat area that meets all criteria below. I’ll describe in a later section how you can prepare the ground such that the playset will be level.
- Kids will swing several feet beyond the legs of the A-frame. Leave several feet of space between the 2 sides of the playset and other structures (your house, fence, trees, etc.) where the swings will swing to.
- Leave a few feet of space between the other 2 sides of the playset and other structures. This is for general safety, and to allow kids to safely walk around the playset on all sides.
- Locate the playset such that kids cannot touch anything unsafe while they’re on the platform between the climbing wall and the slide.
- Make sure the location is generally soft, grassy ground. If kids fall while playing or climbing on the swing set (assume they will), they shouldn’t hit any hard objects. The soft ground will also make it easier to dig for leveling the playset.
Step 3B: Prepare the ground
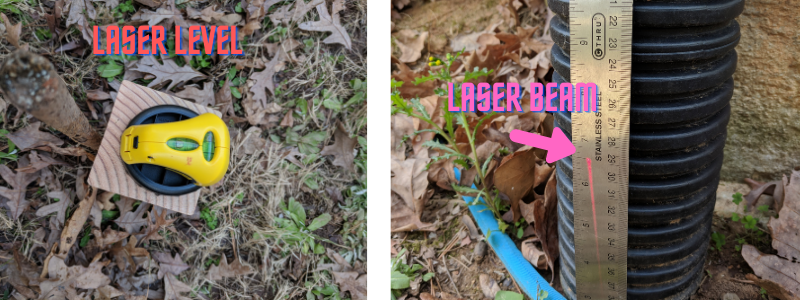
If you (like me) cannot find a perfectly flat location for your swing set, you’ll need to dig holes of differing depths on the ground to install the 6 playset legs.
Below is how you can figure out the depths of each of the 6 leg locations without any expensive tools.
Lean a measuring ruler against a structure near your playset location. Then, use a simple laser level to shine a horizontal laser beam from each of the 6 leg locations. See pic below. Note down the mark where the laser beam shines on the ruler for each of the 6 leg locations.
If you do not have a laser level, you can get one for under $10 from Amazon.
You might want to place the laser level on a stable support, like a block of wood like I did, so that the level will not move when you let it go to note the location of the laser beam.
Note: Make sure the measuring ruler doesn’t move in between these readings!
Once you have the 6 readings, find the leg location with the lowest laser reading. That location will not need any digging.
For all other 5 locations, the digging depth is the laser reading for that location minus the reading for the lower location. It’s that simple!
Now, dig a 4″ x 8″ hole at each of those 5 locations, to the depths you calculated.
Note: I’m suggesting a 4″ x 8″ hole size above to accommodate an 8″ long piece of 2×4 in the hole. The playset legs can then be installed on this 2×4 to minimize any sinking or settling over the years.
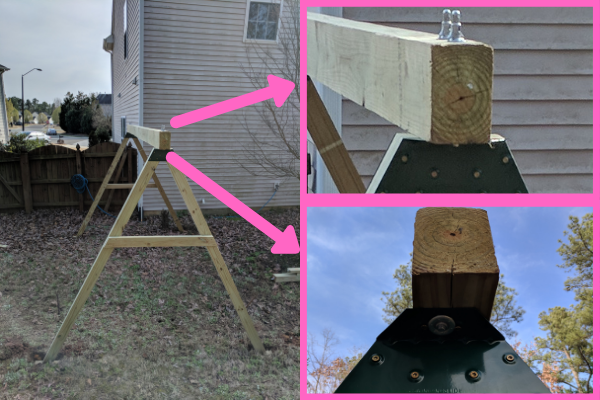
Step 4: Connect End A-frames to the beam
Drill quarter inch, 5.5″ holes through (the height) of the 4 x 6 x 12ft beam at its ends.
Then, using 2 of the 7 in. screw bolt fasten systems (see supplies described earlier), loosely and partially attach to the beam the 2 A-frames that go at the ends.
Use 1 bolt per A-frame. Do not tighten all the way so that you can freely rotate the A-frame as you erect the structure later.
Step 5: Erect the Beam Connected with the 2 A-frames
Caveat: Though I did this step on my own, it was really challenging and I regretted not calling a friend. I highly recommend that you get a friend’s help for this step. If you do not have help available, you may be able to do it on your own following my instructions below, provided you’re comfortable lifting 100lbs or so above your shoulders.
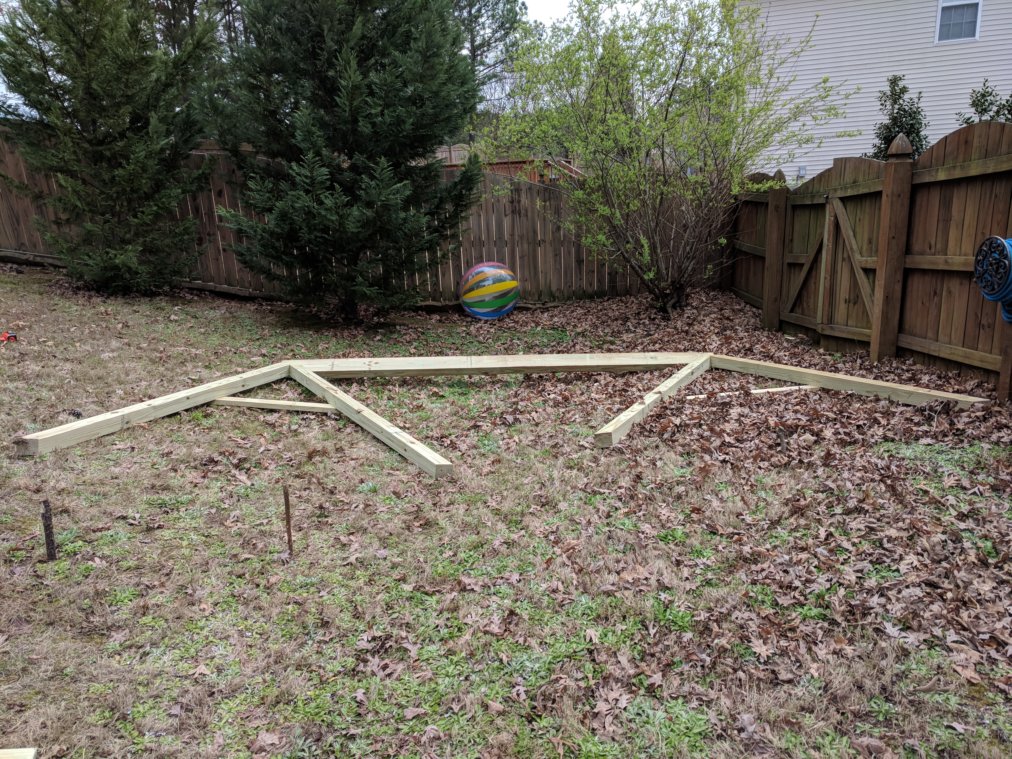
Insert four 8″ 2×4 pieces into the 4 outer holes you dug.
Drag the 12ft beam with the 2 A-frames attached to it close to the holes. Also place some 8ft 2x4s close to the holes to temporarily support the beam as you erect it in place.
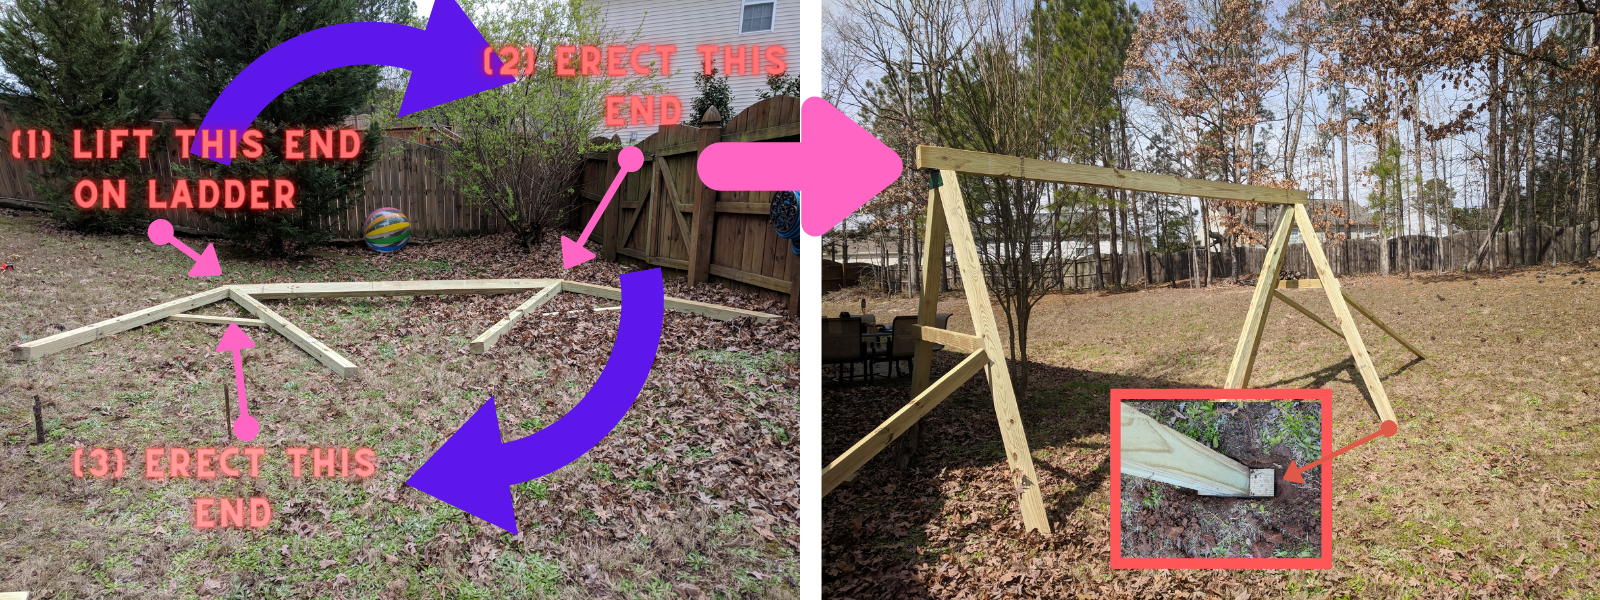
Lift one end of the 12ft beam and place it one a step ladder placed close to where one of the A-frames will stand.
Now lift the other end of the beam, carefully erect the A-frame attached to that end in place, and support it with 8ft 2x4s.
Go back to the end of the beam that was placed on the ladder, and erect the A-frame at that end in place. Support this end also with 8ft 2x4s.
Pic below illustrates these steps. Sorry, I was super stressed trying to do it on my own, so I forgot to take more pictures of these steps.
Now it’s time to tighten the 2 A-frames to the beam.
Tighten the 2 screw bolt fasten systems already inserted into the beam, slowly and gradually removing the supporting 2x4s leaned against the structure as you tighten the bolts.
Drill the 2 additional holes needed through the beam, one for each bracket, insert 2 screw bolt fasten systems through these holes, and tighten them as well.
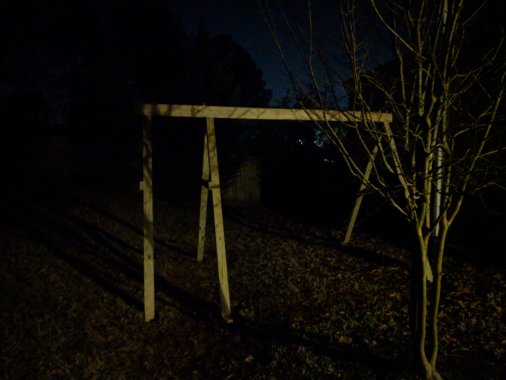
You now have the basic structure up, like in my pic below!
Note: The A-frame closer to the camera in the above pic should have been turned 180o such that the cross-bar was “inside” of the swing set so that I could easily screw the platform 2x4s on it. But I didn’t notice the mistake until I installed the everything. Given how challenging it was to erect this structure, I simply left it as is, and screwed another cross-bar on the “inside” of that A-frame.
Step 6: Attach the 3rd A-frame
Attached the 3rd (middle) A-frame. Make sure its cross-bar is facing the A-frame closer to it.
I did this after work on a weekday evening. That’s why it’s dark in the pic below.
Caveat: If your holes in the ground are perfectly dug, the 3rd A-frame will fit perfectly, supporting its share of the weight but not lifting the either of the other 2 A-frames off the ground. But it’s normal for it to be not perfect, so you may have to adjust the holes a bit, following a trial and error process. 😊
Step 7: Make the climbing wall and platform
Now you’re ready to screw in 2x4s to make the climbing wall and the platform.
Screw in 2x4s between the 2 close A-frames to make the climbing wall.
Screw in 2x4s between the cross bars of the close A-frames to make the platform between the wall and the slide.
This step is straightforward but time-consuming. I used 2 deck screws for each end of a 2×4 for the climbing wall.
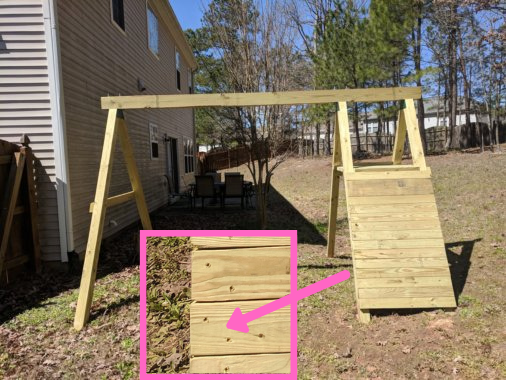
Fun fact: the drill I had at the time of this project was a crappy 7V Black & Decker that wasn’t powerful enough to drill 2.5″ deck screws all the way. I screwed them half-way with the drill and then hand-cranked them the rest of the way using a socket wrench. There were at least 150 deck screws – imagine how sore my arms were! Luckily for my kids, my love for them far exceeded that pain! 😂
Step 8: Wait for the wood to dry and then sand and stain it
Pressure treated wood comes with a lot of moisture content.
For that reason, it won’t absorb stain well until it dries.
Learn how to tell when pressure treated wood is dry enough to be painted by splashing some water on it.
Note: It’s not unusual to have to wait for months for the wood to dry, if it’s winter (no sun), or humid in your area, or the wood was really wet when you bought it from the store. I waited several months before I stained my playset.
And when it it’s dry, sand it, and stain it! Sanding will ensure you remove any splinters that can hurt little hands. ❤
Caveat: Be sure to wear protective mask when sanding pressure treated wood.
See my cost and supplies section for what stain I used.
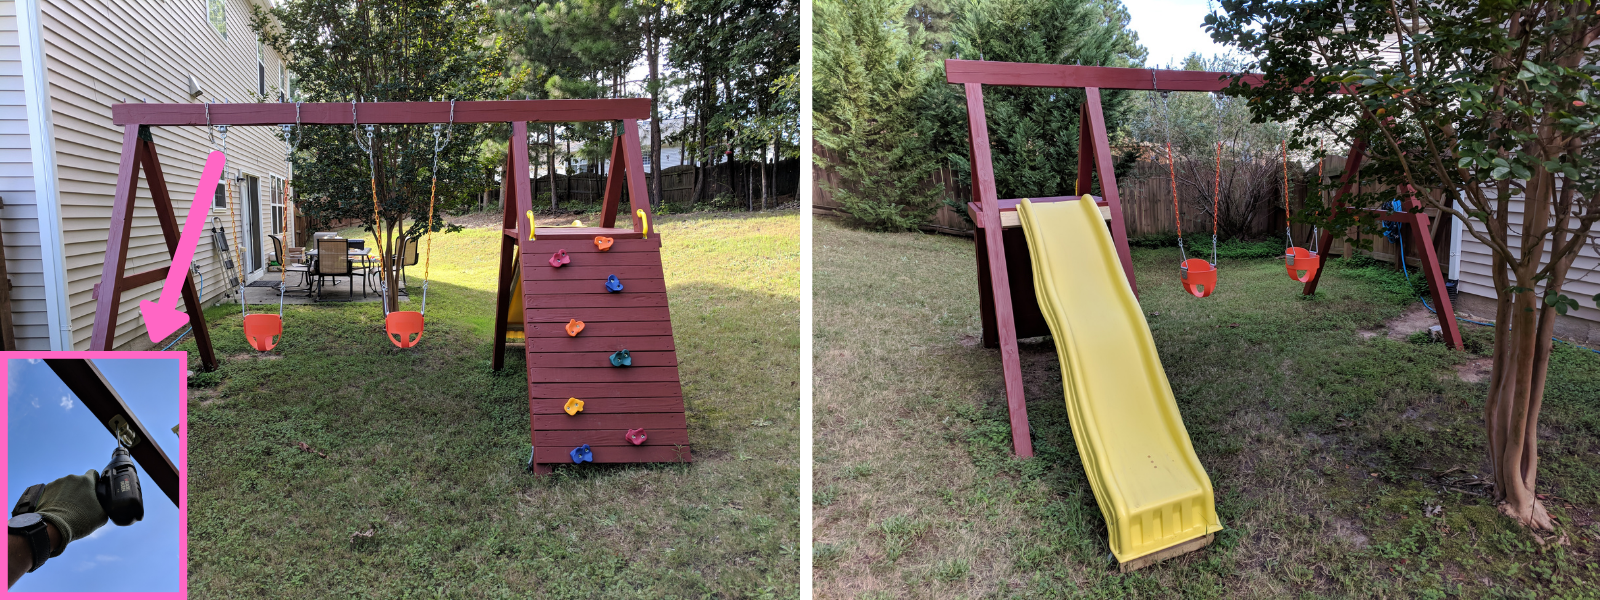
Step 9: Attach the accessories
This was the most fun step for me!
See my supplies and cost section for the list of accessories I used. Follow the instructions that come with the accessories to attach them.
You would use the swing hangers and screw bolt fasten systems (see cost and supplies section) to attach the swings.
Caveat: The screws that came with the climbing holds were not long enough to pass through 2x4s. I discarded those screws and simply used deck screws instead.
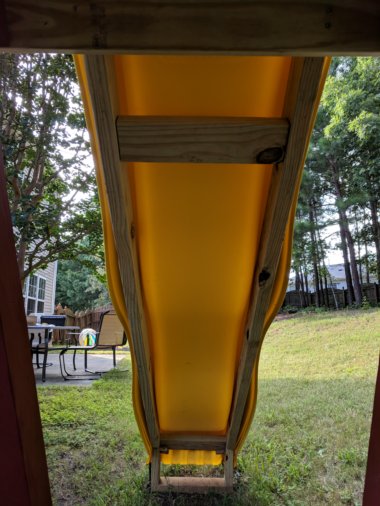
Optional Step: Build a support structure for the slide
When I was reading through the reviews of most plastic slides (including the one I recommend in this post), I saw that most of them buckle when older kids use it. This is especially true for wavy slides.
So I build a support structure for the slide before installing the slide. See pic below.
The support structure was made out of 2x4s, custom built for the slide I bought. It’s not hard to build – you just need to make sure it fits the slide well.
Step 10: Anchor the playset legs
Anchor the playset legs so that it won’t topple even if (older) kids swing hard.
I personally had another reason to anchor right away: I built this playset right before Hurricane Florence hit the East Coast in 2018. I definitely didn’t want the playset to be damaged or cause damage in the high winds.
I installed 1 anchor per A-frame leg.
See supplies and cost for the type of anchors I used.
Conclusion
This has been one of the most challenging yet rewarding projects I’ve done as a beginner woodworker.
But I thoroughly enjoyed the entire process, from researching for components, to seeing my children having a ball playing in it.
Update: How the playset is doing in 2020
The playset is still standing strong, just as I installed it. It’s still perfectly level, even after 2 years!
I haven’t had to do any maintenance on it, except changing the swings from bucket style to regular, now that my kids have grown.
My family and I are spending countless hours hanging out in our backyard during these COVID pandemic times. The playset is one of the popular items to play on. Even I swing on it myself, occasionally. 😎
This project has been worth every second I spent working on it. I learned a lot and fill with pride every time I look at it.
Have you enjoyed this post? Do you have any questions or suggestions for improvement? Please leave a comment below. I’d love to hear from you.